
String str % arg → new_str click to toggle source Format—Uses str as a format specification, and returns the result of applying it to arg. If the format specification contains more than one substitution, then arg must be an Array or Hash containing the values to be substituted. See Kernel::sprintf for details of the format string. static VALUE rb_str_format_m(VALUE str, VALUE arg) { volatile VALUE tmp = rb_check_array_type(arg); if (!
Dive Into HTML5 ive Into HTML5 seeks to elaborate on a hand-picked Selection of features from the HTML5 specification and other fine Standards. The final manuscript has been published on paper by O’Reilly, under the Google Press imprint. Buy the printed Work — artfully titled “HTML5: Up & Running” — and be the first in your Community to receive it. Your kind and sincere Feedback is always welcome. The Work shall remain online under the CC-BY-3.0 License. The site is currently maintained by some html5homies. Getting started with Heroku Getting started with Heroku This guest post is by Ben Scofield, who is Heroku’s developer advocate, responsible for listening to the tens of thousands of developers deploying their Ruby applications to the cloud. He’s spoken at many conferences around the world, and in 2010 became the co-chair for RailsConf. Introduction Heroku has been in the news a lot lately, and it’s been a popular choice for Ruby application developers for a few years.If you haven’t worked with it before, here’s your chance — it’s designed to be as painless as possible to get going, and to give a powerful, stable, and scalable platform for your code.
Download Mouse without Borders from Official Microsoft Download Center <a id="b7777d05-f9ee-bedd-c9b9-9572b26f11d1" target="_self" class="mscom-link download-button dl" href="confirmation.aspx?id=35460" bi:track="false"><span class="loc" locid="46b21a80-a483-c4a8-33c6-eb40c48bcd9d" srcid="46b21a80-a483-c4a8-33c6-eb40c48bcd9d">Download</span></a> Mouse without Borders is a product that makes you the captain of your computer fleet by allowing you to control up to four computers from a single mouse and keyboard. This means that with Mouse without Borders you can copy text or drag and drop files across computers.
6. Flow Control Ahhhh, flow control. This is where it all comes together. Even though this chapter is shorter and easier than the methods chapter, it will open up a whole world of programming possibilities. After this chapter, we'll be able to write truly interactive programs; in the past we have made programs which different things depending on your keyboard input, but after this chapter they will actually different things, too. But before we can do that, we need to be able to compare the objects in our programs. We need...
why’s (poignant) guide to ruby Read This Paragraph At my local Barnes and Noble, there is a huge wall of Java books just waiting to tip over and crush me one day. And one day it will. At the rate things are going, one day that bookcase will be tall enough to crush us all. It might even loop the world several times, crushing previous editions of the same Java books over and over again. File: GUIDE.txt [spreadsheet-0.6.5.2 Documentation] This guide is meant to get you started using Spreadsheet . By the end of it, you should be able to read and write Spreadsheets. Reading is easy! First, make sure all that code is loaded:
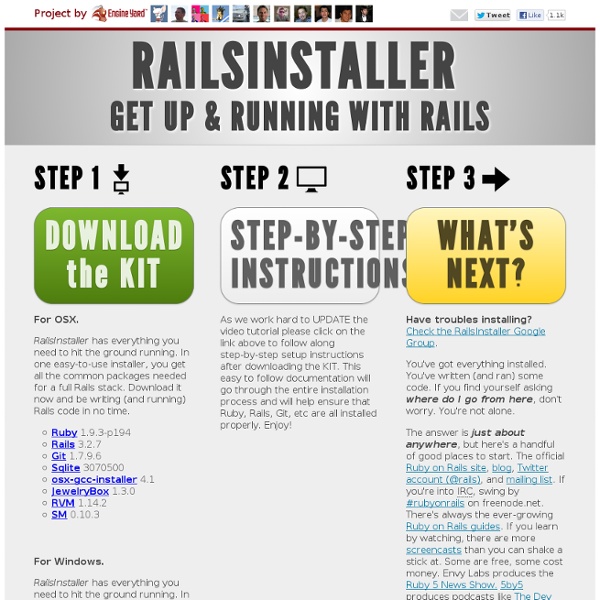
Getting Started with Rails 1 Guide Assumptions This guide is designed for beginners who want to get started with a Rails application from scratch. It does not assume that you have any prior experience with Rails. Rails is a web application framework running on the Ruby programming language. If you have no prior experience with Ruby, you will find a very steep learning curve diving straight into Rails. There are several curated lists of online resources for learning Ruby: Getting Started as a Collaborator cli collaboration Table of Contents Heroku makes it easy to collaborate with others. Collaborating allows you to share access to your source code, make any changes and deploy a new version of the application quickly and easily. You can start sharing existing applications with a single command.
Building Backbone.js Apps With Ruby, Sinatra, MongoDB and Haml Introduction In this post we're going to explore writing Backbone.js applications with a Ruby back-end. To assist with this, we're going to use Sinatra – a DSL (domain specific language) for rapidly creating web applications in Ruby. Similar to the section in Backbone Fundamentals on writing an application with Node.js, our server-side language (Ruby) will be used to power an API whilst Backbone.js will be the client consuming it. What Is Sinatra? In the past, you've likely come across or used Ruby on Rails (RoR) – a popular web application framework for the Ruby programming language that helps organize applications using the MVC pattern.