
7 DIY Wallet Patterns. I’m big on small projects like these easy DIY wallet patterns!
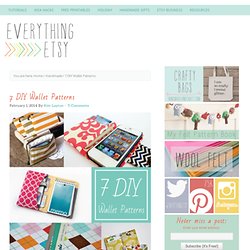
Simple sewing tutorials rock! They’re a fun way to use up small pieces of designer fabric and you’re finished in minutes. What’s not to love?? Once you start making these you’ll want to whip up a few, so mix it up with more than one of this collection of free patterns. Iphone Wallet Tutorial – My 3 Monsters Organizer Wallet Tutorial – LBG Studio Summertime Wallet - Midwestern Girl Credit Card Wallet – My So Called Green Life Patchwork-y Bifold Wallet – All Wrapped Up Bi-fold Wallet – Modest Maven Don’t miss this Zipper Card Pouch from Craft Passion!
Now, the hard part will be choosing the fabric…good luck with that!!! Organizer Wallet. Basic zipper pouch tutorial. Let’s make some zipper pouches!
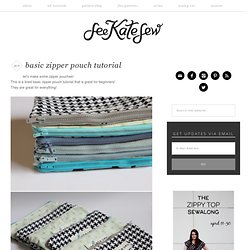
This is a lined basic zipper pouch tutorial that is great for beginners! They are great for everything! Let’s start: To begin you need four pieces each measuring 6.5″ tall by 8″ wide. A front, back and two lining pieces. Lay your zipper face down on the front piece. Sandwich it in with the lining piece. Stitch at 1/4″ with a straight stitch. This is what you’ll have. Press the front piece. Topstitch close to the edge. Repeat with the back and second lining pieces. When you’ve topstitched both pieces, your pouch will look like this: Open the zipper. Pin back and front right sides together and lining pieces right sides together. Sew it up with a 1/2″ seam allowance, leaving a few inches open at the bottom of the lining. Trim the bag down to 1/4″ and clip the corners.
Sew it up with a straight stitch, backstitching at each end. Fold-over clutch, metal zipper. I'm hot for fold-over clutches.
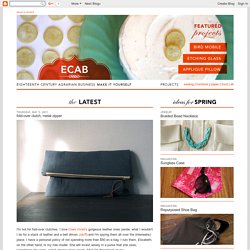
I love Clare Vivier's gorgeous leather ones (aside: what I wouldn't I do for a stack of leather and a belt driven Juki?) And I'm spying them all over the (interwebs) place. I have a personal policy of not spending more than $50 on a bag. I ruin them. Elizabeth, on the other hand, is my role model. Supplies: Metal zipper, at least 12"Exterior and lining fabric, at least 13.5" x 24" and a bit more for zipper bindingFabric for binding Cut both your interior (lining) and exterior fabric to 13.5" x 24".
You'll need to cut your zipper (with it zipped) to 11.5". Next, you'll make the binding for the ends of the zipper. Cut two pieces of fabric 2" x 3.5" or so, I like to have it a little long while I'm working. Open the strip back up and line up one long-side raw edge of the binding with the raw edge of the zipper, right sides together. Next, attach the zipper to the fabric. Use a zipper foot to stitch closely to the zipper. Next, bind these two raw sides. 1300+ Free Clothing Patterns! Welcome to the Free Clothing Patterns section at SewingSupport.com, where you'll find a collection of over 1300 free clothing patterns & tutorials gathered from all over the web.
Sew dresses, aprons, shirts & blouses, skirts, hats, and more! And if you happen to be a beginner who's just learning how to sew and you'd like to sew a garment for your firstsewing project, consider choosing a design that consists of simple shapes such as an apron, a hat, a scarf, or one of the more basic dress designs. This way, you'll likely finish your project faster and gain the confidence that comes witha quick success. And one thing you may want to keep in mind is that some of these designs don't include an actual pattern template. However, these particular designs likely consist of simple shapes you can easily measure and cut yourself. Sewing Quick Tip: Quilter's Tool Tote by PegAnders. Fully lined zippered box pouch - pattern and tutorial - it's a Pretty Modern life. I love the look of a zippered box pouch...so incredibly cute.
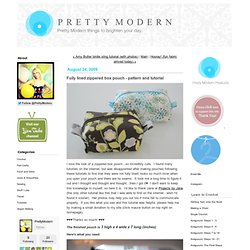
I found many tutorials on the internet, but was disappointed after making pouches following these tutorials to find that they were not fully lined; looks so much nicer when you open your pouch and there are no seams. It took me a long time to figure it out and I thought and thought and thought...then I got it♥ I don't want to keep this knowledge to myself, so here it is.
I'd like to thank Jane at Projects by Jane (the only other tutorial like this that I was able to find on the internet - wish I'd found it sooner). Her photos may help you out too if mine fail to communicate properly. If you like what you see and this tutorial was helpful, please help me by making a small donation to my site (click mauve button on top right on homepage). ♥♥♥Thanks so much! The finished pouch is 3 high x 4 wide x 7 long (inches) Here's what you need: 1 twelve inch zipper 2 10x7 inch panels for the lining (my lining fabric is the green one) STEP 1.