
DIY: GRADIENT-DYED LAMPSHADE. Tarvitset: Valkoisen riisipaperisen lampunvarjostimen, kangaspäällysteisen kattolampun johdon, spraymaalia ja maalarinteippiä 1 Kokoa lampunvarjostin ja ripusta se langalla maalausalueelle.
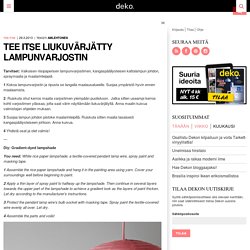
Suojaa ympäristö hyvin ennen maalaamista. 2 Ruiskuta ohut kerros maalia varjostimen ylempään puoliskoon. Jatka sitten useampi kerros kohti varjostimen yläosaa, jotta saat värin näyttämään liukuvärjätyltä. Anna maalin kuivua valmistajan ohjeiden mukaan. 3 Suojaa lampun johdon pistoke maalarinteipillä. 4 Yhdistä osat ja olet valmis! Diy: Gradient-dyed lampshade You need: White rice paper lampshade, a textile-covered pendant lamp wire, spray paint and masking tape. 1 Assemble the rice paper lampshade and hang it in the painting area using yarn. 2 Apply a thin layer of spray paint to halfway up the lampshade. 3 Protect the pendant lamp wire’s bulb socket with masking tape.
Home Beyond Havoc — Dinnerware. More Design Please - MoreDesignPlease - DIY Doily Lamp. Make Love (Literally) April 26th, 2011 Just spotted this tutorial on Craftgawker and ‘love’ it!
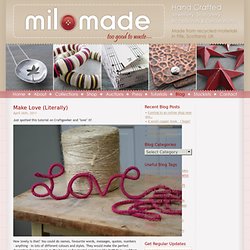
How lovely is that! You could do names, favourite words, messages, quotes, numbers – anything – in lots of different colours and styles. They would make the perfect decoration for any room in the house or for special occasions like birthdays, weddings and anniversaries. All you need is: - a length of wire reinforced clothesline - thick coloured wool - wire clippers and some scissors For the wire into the word or number or your choice and then tie your wool to one end and start wrapping it around the wire. Gift Ideas for Poor Creative Souls (10) Posted by: Cathy on May 22, 2012.
Designer Homewares & Unique Homewares. DIY fabric rug tutorial. After walking away empty handed from a recent rug shopping trip, I was beginning to wonder if I would ever find the perfect rug for my entryway.
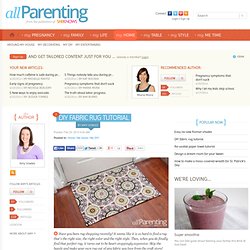
With a nearly endless supply of patterns and colors to choose from at the fabric store, I knew that making my own rug out of ordinary fabric would be the perfect solution! What you'll need Decorator weight fabricRubber door matScissorsSpray adhesivePaint brushWater based polyurethane Iron and ironing board What you'll do Start by cutting the rubber mat down to the size you would like your rug to be. Cut the fabric so that it is 2-inches larger than the rubber mat on all sides. Heat up your iron and iron out any wrinkles in the fabric. If your rubber mat is like mine, there will be a textured side and a smooth side.
Lay the rubber mat down so that the sticky side of the mat is facing the back side of the fabric. Use the spray adhesive to spray along the edges of the fabric and on the back of the mat. E v e r s - DIY Fashion blog. This time I decided to go a little further and make a bigger DIY project.
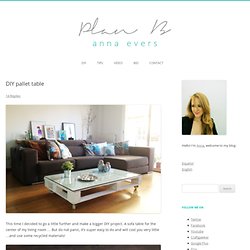
A sofa table for the center of my living room … But do not panic, it’s super easy to do and will cost you very little …and use some recycled materials! First things first … You’ll need this piece that many of you already know … the famous pallet. If you have a good smile you can get it free at a department store or a factory. · 4 bolt wheels.
(you can buy them at a hardware store) but you can opt for metal wheels or old legs for a more vintage look. · Screws and screwdriver to mount the wheels. · White matt paint or color of your choice (water based) · Brush or foam roller. · Sandpaper Optional: · Glass plate, the same pallet size (I had this old glass from another table) Constellation Jar. I asked Amy of This Heart of Mine for a project that would be fun for kids or adults.
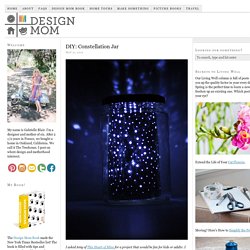
I love that she thought of star-gazing! We’re so far into the countryside, that the stars here are outrageously bright. It’s awesome! — Gabrielle Star gazing is one of my favorite things. Because of my love of the stars, when my daughter was little, I purchased her a night light that shines stars all over her bedroom walls. What you’ll need: - a wide mouth jar – The jar needs to be wide enough to fit the small click light inside.
-an awl - scissors Cut a strip of the cake pan long enough to fit around inside the jar and tall enough to reach to the very top of the jar. Industrial Shelving Unit RSG. The industrial trend is a breath of fresh air for interiors.
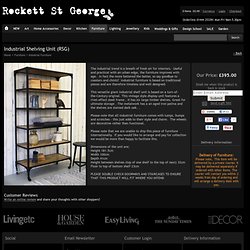
Useful and practical with an urban edge, the furniture improves with age. In fact the more battered the better, so say goodbye to coasters and chintz! Industrial furniture is based on traditional pieces and are therefore timeless and well designed. This versatile giant industrial shelf unit is based on a turn-of-the-Century original. This vintage style display unit features a rivet-effect steel frame , it has six large timber shelves.
Please note that all industrial furniture comes with lumps, bumps and scratches - this just adds to their style and charm. Please note that we are unable to ship this piece of furniture internationally. Dimensions of the unit are; Height 181.5cm Width 100cm Depth 41cm Height between shelves (top of one shelf to the top of next) 32cm Floor to top of bottom shelf 23cm. Egg crate condiments set. Mr Wild Owl Stool. Online Fashion, Dresses, Jewellery, Homewares, Furniture Shop. Wall stickers, Wallpaper, Beanbags, Handbags, Jewellery, Unusual Presents & more.