
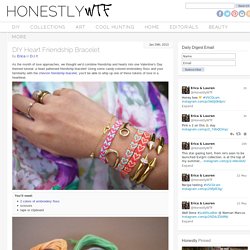
Mølleøreringe og ring. Snart kommer forår og sommer, og derfor ville jeg lave nogle glade og lidt barnlige smykker, som minder om, at det gode vejr er på vej.
De var ikke særligt svære at lave. Jeg brugte bare noget fimo-ler, Depend neglelak nr. 38, en ring, øreringsstikker og superlim. Øreringsstikkerne købte jeg på ebay, hvor jeg fik 50 stk. for en 5'er. P1070761_medium.JPG 207×207 pixels. Cappuccino and coffee bean earrings by nanwoods on Etsy. Michael ann made.: woven friendship bracelet tutorial. I love the summer friendship bracelet trend that i keep seeing in blog land, so i thought it would be fun to share with you another way to weave a friendship bracelet. one of the parents at work showed me this technique of using a circular cardboard loom and i love how quick it goes, you can easily finish a bracelet in one sitting. - cardboard - something small and circular (like a teacup or ramekin) - scissors, ruler, pen - embroidery thread in pretty colors , thin yarn, or ribbon trace a circle onto your cardboard, and use a ruler to draw 8 lines cut a small ways into each line, between 1/2 an inch to an inch and make a hole in the middle of the circle where all the lines intersect. cut 7 strands of embroidery floss, about 24 inches long and tie them together with a slip knot. pull your thread bundle through the hole in your cardboard with the knot right up next to the hole and use a little piece of tape to hold it in place while you start.

Google Translate. Wire Wrapped Stone Cabochon Setting {Video} — Jewelry Tutorial Headquarters. I’ve always wanted to learn how to make a wire wrapped stone setting for a cabochon.
Selling Handmade Jewellery - part 1. Selling your handmade jewellery is probably an art-form in its own right.
We have all come across "great" salesmen and women in our time, so why do so many of us lack confidence when it comes to selling our own work? How do we increase our marketing skills, capitalise on opportunities and find the confidence to turn from hobby jewellery designer into professional? Even the best handcrafted jewellery will not sell itself. The act of selling is something that must be learned and practised. Friendship Bracelets Part 2: Forward Knot and Chevron Bracelet. Finally.
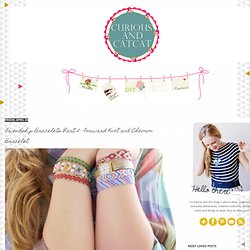
Part two of the friendship bracelet series is here! This time I'll show you how to do a forward knot and how to make a chevron friendship bracelet using only forward and backward knots. Easy! And for those who are bored with that easy chevron pattern, I added instructions for turning the direction of the chevron pattern from upwards to downwards and back. Main 495×495 pixels. DIY Heart Friendship Bracelet. As the month of love approaches, we thought we’d combine friendship and hearts into one Valentine’s Day themed tutorial: a heart patterned friendship bracelet!
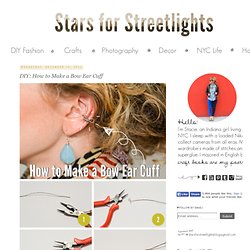
Using some candy-colored embroidery floss and your familiarity with the chevron friendship bracelet, you’ll be able to whip up one of these tokens of love in a heartbeat. You’ll need:2 colors of embroidery flossscissorstape or clipboard Creating a heart pattern involves just a simple modification to the chevron patterned friendship bracelet. Start by cutting 4 strands of each color, at about 24 inches each, for a total of 8 strands. Alternate the thread colors before tying them together in a knot. Separate the threads into 2 sets, 2 of each color on each side. Start on the left side with the outermost strand (shown here in red) and make a forward knot by creating a 4-shape over the 2nd strand (shown here in blue), loop it under and back through the opening. Pull up and to the right to tighten. Mirror the step on the other side. DIY: How to Make a Bow Ear Cuff. The other day when I was looking around Etsy, I found this awesome ear cuff and I had to try to figure out how to make it.
While something as dainty and cute as this little cuff usually isn't quite my style, (I go for loud, colorful, and over-the-top) I thought it was too cute to pass up. :) You need: -Jewelry pliers -Wire -Wire cutters Step 1: First you need to twist two pieces of wire together so that it becomes one piece of wire. Step 2: With one end of the wire hanging out, wrap the other around the widest part of the pliers to make a loop. Step 3: Switch sides and make another loop to mirror your first loop.
WireWorkers Guild: ARROW NECKLACE. As you may know from my last blog, I have been very busy working up new KIT designs and projects using feathers.
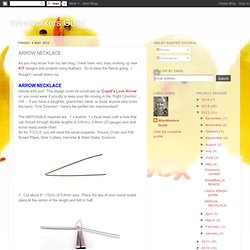
So to keep the theme going, I thought I would share my: tutorial with you! This design could be construed as 'Cupid's Love Arrow' or, you could wear it proudly to keep your life moving in the 'Right Direction' ... OR ... if you have a daughter, grandchild, niece, or know anyone who loves the band, 'One Direction' - here's the perfect fan merchandise!!
The MATERIALS required are: 1 x feather, 1 x focal bead (with a hole that can thread through double lengths of 0.8mm), 0.8mm (20-gauge) wire and some ready made chain. 1. 2. 3. DIY – your name bracelet « Born in 82 – Fashion and Creativity Blog. This is the last DIY of 2012, and it’s definitely a project a bit ‘special, a little because these bracelets are very fashionable lately, a little’ because there are many words that you can write, not just your name.
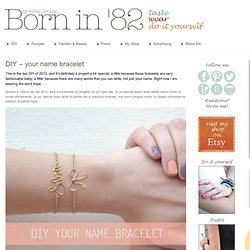
Right now I am wearing the word hope …. Questo è l’ultimo diy del 2012, ed è sicuramente un progetto un po’ speciale, un po perchè questi braccialetti vanno molto di moda ultimamente, un po’ perchè sono tante le parole che si possono scrivere, non solo il proprio nome. In questo momento ho indosso la parola hope…. 46 Ideas For DIY Jewelry You'll Actually Want To Wear. DIY: Dainty Chain and Beads Rings. I love the look of dainty rings on the tips of the fingers, edgy, delicate and feminine.
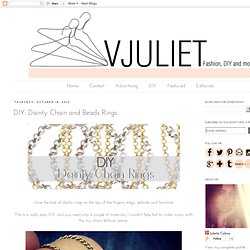
This is a really easy DIY, and you need only a couple of materials, I couldn't help but to make many with the my chains leftover pieces. You'll need: -Delicate chain pieces (mine were about 1.5"- 2" long) -Jump rings - Tiny beads (you could use crystals, pearls or metal ones) -Round nose jewelry pliers. Start by opening the jump ring and inserting one of the ends of your chain, then add a bead and the other end of the chain, close the jump ring using the round nose pliers.
Leather Flower Earrings. I have a long face: horsey long, “why-the-long-face” long. I like a dangling earring, but it renders the whole long-face thing a bit out of control. . . However, a wide earring causes no pain. I’ve been looking at leather flowers for a while. I feel like I want to add to my plain cuffs (on Etsy) & I’m thinking flowers, although I’m also thinking flat shapes or little metal studs (all thoughts welcome by the way, on that.)