
Swing-Out Tool Bar. Swing-Out Tool Bar Space is almost always at a premium in a woodworking shop.
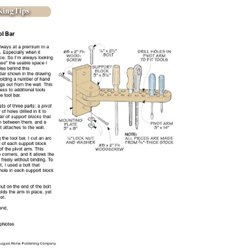
Especially when it comes to wall space. So I’m always looking for ways to "increase" the usable space I have. That’s the idea behind this wall-mounted tool bar shown in the drawing at right. Besides holding a number of hand tools, the bar swings out from the wall. The tool bar consists of three parts: a pivot arm with a number of holes drilled in it to hold the tools, a pair of support blocks that “sandwich” the arm between them, and a mounting plate that attaches to the wall. Before assembling the tool bar, I cut an arc on the outside end of each support block and on both ends of the pivot arm. Tightening a lock nut on the end of the bolt so it’s just snug holds the arm in place, yet still allows it to pivot. Have a nice weekend, Bryan Nelson Online Editor, ShopNotes. AW Extra - Dream Workbench - Woodworking Projects. Tired of working on a sheet of plywood thrown over a pair of sawhorses?
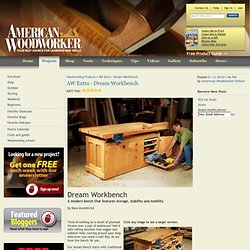
Had it with rolling benches that wiggle and wobble? Hate running around your shop whenever you need a tool? Boy, do we have the bench for you. Our dream bench starts with traditional workbench features like a thick top, a sturdy base, bench dogs and a pair of vises. Then we added tons of storage, an extra-wide top, and modern, cast-iron vises. Our bench is built to withstand generations of heavy use. The thick, butcher-block-style top is truly a joy to work on. Tools & Materials If you go all out like we did you can expect to pay about $900 for materials. You could build adjustable shelves inside the cabinets instead of drawers and pullout trays.
The best thing is you can cut costs and still get a fully functional bench right away, even if you go with the least expensive options. Getting screws to hold in end grain. Because wood is relatively weak perpendicular to its grain, screws don't hold that well when screwed into the end grain.
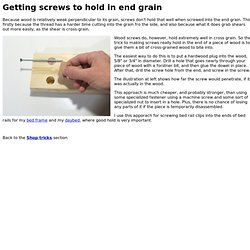
This firstly because the thread has a harder time cutting into the grain fro the side, and also because what it does grab shears out more easily, as the shear is cross-grain. Wood screws do, however, hold extremely well in cross grain. So the trick to making screws really hold in the end of a piece of wood is to give them a bit of cross-grained wood to bite into. The easiest way to do this is to put a hardwood plug into the wood, 5/8" or 3/4" in diameter. Drill a hole that goes nearly through your piece of wood with a forstner bit, and then glue the dowel in place. The illustration at left shows how far the screw would penetrate, if it was actually in the wood. This approach is much cheaper, and probably stronger, than using some specialized fastener using a machine screw and some sort of specialized nut to insert in a hole.
Using Stain to Make Artwork! {Burn pile Buffet Part 2} If you missed Part 1 of our Buffet Transformation, click here to read about how we rescued this buffet from a burn pile… stripped, sanded, repaired, primed, and painted!
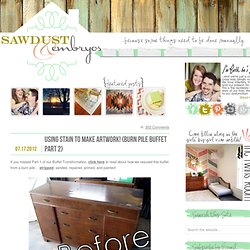
Next is the fun part. You may not know this about me, but I love to draw with charcoal. I love the shading, and the instant gratification of seeing a masterpiece unfold before your eyes. I can’t draw a person to save my life… but I can shade, yo! I get an inordinate amount of joy from coming up with new ways to make furniture (or a room) unique and beautiful. If you’ve ever stained something before, you know that the longer you leave stain on the wood, the darker the finish will be when you wipe it off. With that in mind, I started with the center petals and stained each petal, starting at the center and working my way out toward the tip of the petal. Luthier Clamps. 1001 Pallets, Recycled wood pallet ideas, DIY pallet Projects ! The Pocket Table. What is a PocketTable · Specifications · Options · In-wall Installation · On-wall Installation What is a PocketTable?
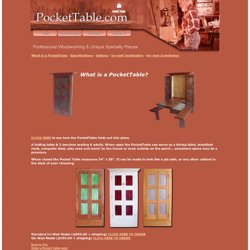
CLICK HERE to see how the PocketTable folds out into place. A folding table & 2 benches seating 4 adults. When open the PocketTable can serve as a dining table, breakfast nook, computer desk, play area and more! In the house or even outside on the porch... anywhere space may be a premium. When closed the Pocket Table measures 34" x 58". Standard In-Wall Model ($850.00 + shipping) CLICK HERE TO ORDER On-Wall Model ($950.00 + shipping) CLICK HERE TO ORDER Back to Top Order a Pocket Table now!
Specifications When Open: 5" deep x 54" wide x 70" high Table top measures: 25" x 45" x 1 3/8" Benches (2) measures: 12" x 39" x 1" When Closed: 5" deep x 34" wide x 70" high. Woodworkers Guide: Easy to build Continuous Motion Treadle Lathe.