
Not Just for Kids: 7 Space-Saving (& Adult-Sized) Loft Beds Adults sometimes have trouble with the associations a bunk bed conjures to mind. Lofting full-sized beds may be the best-kept secret when it comes to bedroom layouts: they can make room for entire desks or dressers below and represent a far cheaper alternative to moving apartments when you run out of space. Consider, for example, these stand-alone ideas and built-in solutions from via Remodelista. Minimalist metal ladders and railings can make a lofted sleeping area feel much less childish, while decorative touches can integrate an elevated portion of a bedroom without rendering it visually detached from core themes of material, color or decor. Of course, building out an entire section of a room is not a simple do-it-yourself project. Just think about it for a moment: beds take up the same amount of space regardless of the size of your dwelling.
Awesome Loft Beds With Stairs: Loft Beds with Stairs Decoration – Quakerrose Loft Beds with Stairs Decoration Close Awesome Loft Beds With Stairs : Loft Beds With Stairs Decoration Vizimac.com - The amusing Loft Beds With Stairs Decoration pics above, is part of Awesome Loft Beds With Stairs post which is classified within Bedroom category and posted at October 7th, 2012 02:36:12 AM by Henriette Moreau. The pics entitled Loft Beds With Stairs Decoration above, is tagged with : build a loft bed, white beds, full size bunk bed, childrens beds with storage, twin mattress for bunk bed, childrens loft beds, black bunk beds, modern bunk beds, bump beds, childrens bunk beds, kids bunk bed, full loft beds, bunkbeds, kids bunk beds with stairs, loft stairs, Bunk Beds, cheap beds for sale Loft Beds With Stairs Decoration : Awesome Loft Beds With Stairs The Loft Beds With Stairs Decoration pics above, is one of the pics on the subject of Awesome Loft Beds With Stairs, created at October 7th, 2012 02:36:12 AM by Henriette Moreau. Back to Awesome Loft Beds With Stairs
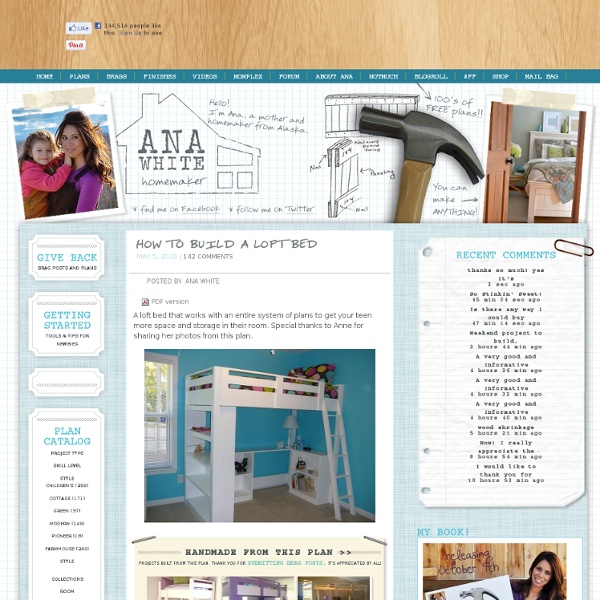
Build a Simple Closet Organizer PDF version Closet organizers can be so expensive, or are often made of particle board. Yet they are so easy to build and customize to your needs. This is a large closet organizer, suitable for dividing up closet space. Handmade from this plan >> Dimensions Dimensions: Dimensions are shown above. Materials and Tools Shopping List: 2 – Sheets of 3/4″ Particle Board (closet grade) or MDF or A1 plywood cut into 15 1/2″ wide strips, 8 feet long You could also use closet shelving in any width as a substitute (for example 20″ wide shelves for a 20″ deep shelving system) 1 sheet 1/4″ plywood or MDF 1 – 1×2 26″ long 2″ screws 2″ finish nails wood glue wood filler 120 grit sandpaper primer wood conditioner paint paint brush Tools: measuring tape square pencil safety glasses hearing protection drill circular saw sander countersink drill bit Cut List Cut List: 2 – 1×16 @ 82 1/2″ (Sides) 6-1×16 @ 25 1/2″ (Shelves) 1 – 1/4″ Plywood @ 82 1/2″ x 27″ (Back) 1 – 1×3 @ 25 1/2″ (Footer) Step 1 Build the Box Step 2 Back Step 3 Footer
every little thing: Bunk Beds for the boys... Bunk Beds for the boys... Night after night, G always asks if he and C can sleep in C's crib together. One evening, I said ok (knowing it wouldn't last, but interested to see what they would do). I kissed them goodnight, pulled the covers over them and turned out the light, giving a mock parental warning about being quiet. I stood by the door and listened. Silence. More silence... Then it began. C let out an excited "AH!" Rustling and squeaking of the crib rails ensued. Jumping in the bed followed shortly thereafter. I flashed on the lights and the two of them stood grinning from ear to ear, holding onto the sides of the crib. This wasn't the first time I began thinking about bunk beds. However, in my mind, I think rinky-dink metal ikea posts when I think bunk beds, so I have never completely resigned myself to the idea of getting them for the boys. So I began a search tonight...and here are some amazing, out-of-the-box bunk beds that make me excited for the day when we can build our own design!
How to Install a Terraced Window Well in Your Basement Design for safety 1 of 1 Looking out A terraced window well dramatically increases natural lighting in a lower level or basement. These egress windows satisfy Building Code rules. The primary rules for designing a window well are the code requirements for an egress window. Otherwise, you're only limited by safety and drainage issues. Terracing minimizes the danger of a fall. Still, we took the extra precaution of adding a curb about 8 in. above grade plus flower beds and low bushes to keep folks from stepping into it. Decorative concrete wall block is another good choice for terracing. Good drainage is critical If your basement hasn't suffered any moisture or flooding problems, digging a window well or expanding an existing well is unlikely to create water problems, as long as you follow the instructions in the photos. Soil with a high clay content, however, poses another problem. Some homes have drains on the interior, under the basement floor, and rely on a sump pump to get rid of water.
Overview | How to Line a Cedar Closet While there are many types of cedar, Eastern red cedar, aka aromatic red cedar, is the only type that gives off the familiar scent that deters moths and insects. Eastern red cedar is sold in both large pressboard panels and tongue-and-groove boards. Panels make for an easy, cut-to-fit installation, but they have a rough texture that can snag clothing. Tongue-and-groove boards, shown in this installation, require more cuts but give a closet a smooth, custom-finished look. You don’t have to line the entire closet for the cedar to be effective, but the more cedar the better. There are several ways to get the cedar on the walls.
A completely renovated first&apartment Pages Search Eames Lounge Chair, Barcelona Chair, Marble Tulip Tables - Exclusive at Rove Concepts Colorado real estate and homes Kim's personal links MY FAVOURITE DECOR SHOPS IN OTTAWA kitchen remodel in my last house my twin sister's mostly kid's rooms decor blog « WINKS | Main | Valerie and Alan's bathroom remodel » Friday Aug132010 A completely renovated first apartment Posted on Fri, 13 Aug 2010 by kim 540 Comments We received an email from Ron and it started off like this: "I'm 27 years old and live in Tel Aviv Israel, currently an industrial design student. And some info on what went on after they had their way with their new apartment: "In short we re-did the whole place:Tore down the wall in the kitchen opening it up to the living room and dining area. I cannot even put into words how in awe I am of Ron's talent. And SO MUCH MORE after the jump. Reader Comments (540) Wow! 13 Aug 2010 | Mike The green bedroom is fabulous! Michelle Okay, that faucet/towel rack in the bathroom is genius! Erin Racu ab m
Rub n' Buff Tips and Tricks! Ok, so here is the skinny on the Rub n' Buff. I've had lots of questions about how to use Rub n' Buff on furniture, so I'm gonna give you all the know-how I got!! There are actually several techniques I have tried that work well. First off here is what you need Rub n' Buff metallic wax. It comes in several different colors. If I'm using Rub n' Buff on a relatively small area, like the arms or legs of a chair, the legs of a table, frames, hardware, etc. On wood furniture, after applying it with a cloth as I mentioned above, if I ever run into the problem of the Rub n' Buff not looking solid enough (meaning you can kinda see through it to the wood) then, I'll use Liquid Deglosser to dilute the Rub n' Buff and paint it on. I have found that Liquid Deglosser works better than paint thinner. Then you need a small glass cup and an artist brush. This is how I do it. After you have buffed it, you need to let it sit for a while (24 hours is best). After 24 hours... use a cloth this time. Smiles!
Creative Window Seat Ideas Redesign your window to create a cozy corner to curl up in the sun. What would you wish for? For the second part here