
FabLab RUC: Controlling the Mi Light from Arduino or NodeMCU. Circuits imprimés et faces avant : trucs et astuces. Cracking GSM with RTL-SDR for Thirty Dollars. Theoretically, GSM has been broken since 2003, but the limitations of hardware at the time meant cell phone calls and texts were secure from the prying ears of digital eavesdroppers and all but the most secret government agencies.

Since then, the costs of hardware have gone down, two terabytes of rainbow tables have been published, and all the techniques and knowledge required to listen in on cell phone calls have been available. The only thing missing was the hardware. Now, with a super low-cost USB TV tuner come software defined radio, [domi] has put together a tutorial for cracking GSM with thirty dollars in hardware.
Previous endeavours to listen in and decrypt GSM signals used fairly expensive software defined radios – USRP systems that cost a few thousand dollars a piece. Homemade DIY CNC Machine using Step Motors, Dremel, and EMC2. Tags: CNC, DIY, Machine, Motor Control, Robot, Robotics, Stepper Motor What is a CNC?
The abbreviation CNC stands for computer numerical control, and refers specifically to a computer “controller” that reads G-code instructions and drives a machine tool, a powered mechanical device typically used to fabricate components by the selective removal of material. In simple words, a CNC is a machine which is controlled by a computer, and used to fabricate 3D objects. Easy to Build Desk Top 3 Axis CNC Milling Machine. Réaliser un circuit imprimé. Pour ceux qui veulent se lancer eux-mêmes dans la réalisation de PCB (= printed circuit board = circuit imprimé), je vous propose un petit pas-à-pas par l'image.
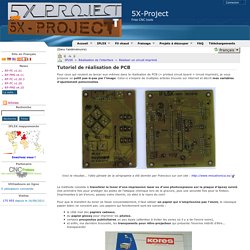
Celui-ci s'inspire de multiples articles trouvés sur internet et décrit mes variables d'ajustement personnelles. La méthode consiste à transférer le toner d'une impression laser ou d'une photocopieuse sur la plaque d'époxy cuivré. Une première fois pour protéger les pistes de l'attaque chimique lors de la gravure, puis une seconde fois pour la finition. A petits pas, le Moteur pas-à-pas - Tuto Arduino.
Sans titre. HeartyGFX: Réaliser un circuit imprimé sans insoleuse. Comment graver proprement et rapidement un circuit imprimé, sans le matériel adéquat, à savoir insoleuse principalement.
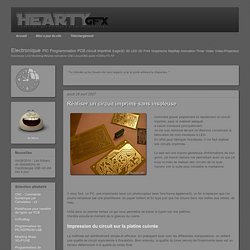
Je me suis retrouvé devant ce dilemme concernant la fabrication de mon insoleuse à LED. En effet pour fabriquer l'insoleuse, il me faut réaliser ses circuits imprimés.... Le web est une manne généreuse d'informations de tout genre, j'ai trouvé l'astuce me permettant avec ce que j'ai sous la main de réaliser des circuits de ce type. Voyons voir la suite pour connaitre la manœuvre. Il nous faut, un PC, une imprimante laser (un photocopieur laser fonctionne également), un fer à repasser que l'on pourra remplacer par une plastifieuse, du papier brillant et fin type pub que l'on trouve dans nos boites aux lettres, de l'eau. Voilà dans un premier temps ce qui nous permettra de tracer le typon sur nos platines. Impression du circuit sur la platine cuivrée La méthode est extrêmement simple et efficace. Circuits imprimés avec rien... ou presque ! Scooterputer. I spend a fair amount of time zipping around town on my scooter, and thought it would be cool to add a voltage monitor to warn when the battery might need recharging.
Waiting until the electric starter no longer works is somehow lacking. So after an evening with an Arduino Duemilanove, I had a simple programmable voltage divider with 3 LEDs indicating battery low, good, and charging. Done. That's when I saw Liquidware's very cool TouchShield Slide OLED display with touch screen. It was telling me it wanted to be on my scooter. Bill Wong Tech: How to Build a HUD for your Car. Hello all, this is the Car Heads-Up Display (HUD) Version 1.0: Researched, constructed, and installed in approximately a month on a 2004 Toyota Highlander.

This is what it looks like in action: Overview HUDs are built-in on some modern luxury cars, but if you not lucky enough to have one, here's how to make your own, DIY-style. Projects - Where is my car? Realtime GPS+GPRS Tracking of Vehicles using Arduino. You just need to install your Arduino with the GPRS+GPS Quadband Module (SIM908) in a hidden place in your car, maybe in your trunk, in the glove compartment or under your spare tyre.
Then connect the GPRS-GSM and the GPS antenna and a SIM card, all of this powered with a battery and... you are ready! First of all you have to call the police of course, but you can help them a lot. If your car is not parked where do you think, something is wrong... Hall Effect Current Sensor. Energy Monitoring using Pachube, Arduino 1.0 and SCT-013-030.
Energy monitoring using Arduino through it’s serial monitor completely well explained by openenergymonitor.org.
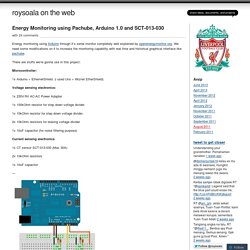
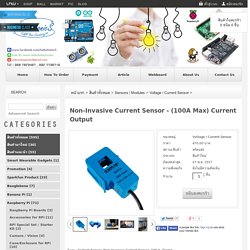
We need some modifications on it to increase the monitoring capability with real time and historical graphical interface like pachube. There are stuffs we’re gonna use in this project: Microcontroller: 1x Arduino + EthernetShield. (i used Uno + Wiznet EtherShield) Non-Invasive Current Sensor - (100A Max) Current Output - Arduinothailand.com Arduitronics สำหรับผู้สนใจพัฒนา Arduino : Inspired by LnwShop.com. Data Sheet :openenergymonitor.org/emon/sites/default/files/SCT013-000_datasheet.pdf CT sensors - Interfacing with an Arduino To connect up a CT sensor to an arduino, the output signal from the CT sensor needs to be conditioned so that it meets the input requirements of the arduino analog inputs: a positive voltage between 0V and the ADC reference voltage.
Note: This page give the example of an Arduino board working at 5 V and of the EmonTx working at 3.3 V. CT sensors - Interfacing with an Arduino. CT sensors - Interfacing with an Arduino To connect up a CT sensor to an Arduino, the output signal from the CT sensor needs to be conditioned so that it meets the input requirements of the Arduino analog inputs: a positive voltage between 0V and the ADC reference voltage.
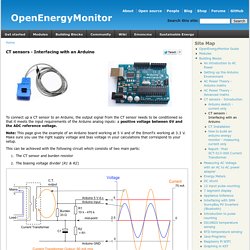
Note: This page give the example of an Arduino board working at 5 V and of the EmonTx working at 3.3 V. Make sure you use the right supply voltage and bias voltage in your calculations that correspond to your setup. This can be achieved with the following circuit which consists of two main parts: The CT sensor and burden resistorThe biasing voltage divider (R1 & R2) Calculating a suitable burden resistor size.
Non-Invasive Current Sensor - (100A Max) Current Output - Arduinothailand.com Arduitronics สำหรับผู้สนใจพัฒนา Arduino : Inspired by LnwShop.com. CT sensors - Interfacing with an Arduino. Arduino Yún powers this electricity monitor. A Maker by the name of “Akellyirl” has designed an electricity monitor built around an Atmel-powered Arduino Yún. As previously discussed on Bits & Pieces, the Yún – designed in collaboration with Dog Hunter – is based on Atmel’s popular ATMega32u4 microcontroller (MCU) and also features the Atheros AR9331, an SoC running Linino, a customized version of OpenWRT.
The Yún is somewhat unique in the Arduino lineup, as it boasts a lightweight Linux distribution to complement the traditional microcontroller (MCU) interface. Key features of Akellyirl’s project include a WiFi connection to facilitate continuous monitoring, TEMBOO for cloud support (with Google APIs), as well as automatic recording and writing of power consumption to a Google Drive Spreadsheet (+ analysis). Comparatif des différentes cartes arduino et des cartes « compatible arduino . Bonjour tout le monde ! Mchr3k/arduino-libs-manchester. [Projet Home Made] La Check Box Arduino & Co ! - Page 2. Tiens, je reviens sur l'histoire de la sonde de température (pour finir la conversation qu'on avait commencé dans l'autre topic).
La domotique chez soi. Domotique. Petite parenthèse dans l’alarme pour parler de Domogik… Non, Domogik n’est pas mort, même si il y a peu d’activité/buzz hors du cercle restraint de l’irc et du forum et des commitsNon, Domogik n’est pas en train de stagner dans un coin (il suffit de regarder l’historique des commits sur le dépôt pour voir que ça bouge beaucoup)Non, Domogik 0.2.0 ne va pas sortir dans la semaineOui, Domogik bougeOui, Domogik évolueOui, la version 0.2.0 a pris beaucoup de retard Quelques explications à ce retard dans la 0.2.0 (soyons transparents que diable!)
… Il y a 6 semaines (environ), nous étions à un doigt de sortir une version alpha et, comme nous faisons des spécifications pour le futur en parallèle, nous avons formaliser un nouveau format pour les fichiers de description des plugins. Ce format avait été choisi au début du projet car il se prêtait bien au besoin de l’époque, et il faut l’avouer, beaucoup d’applications utilisent des fichiers de xml pour la configuration! Arduino and remote control of Home Easy devices « Andy's Life. Février 2012. Bonjour Aujourd’hui je vous présente la PushingBox ! C’est un service internet entièrement gratuit, qui permet de recevoir des informations concernant votre maison ou n’importe quel objet capable de ce connecter à Internet directement par Mail, sur Twitter, ou sur votre téléphone (Android, i-Phone, WindowsPhone) C’est vous qui choisissez par quel moyen vous voulez être averti et quelles infos vous voulez recevoir. (Il a aussi l’avantage d’être compatible avec les cartes Arduino !!)
Pas de création de compte pour utiliser PushingBox, le service utilise votre compte Google ! Ensuite les moyens de notification déjà disponibles sont les suivants : EmailTwitter (Réseau social)Karotz (Lapin communicant)Prowl (iPhone)Pushme.to (iPhone)Toasty (Win Phone)Notifry (Android)Notify My Android (Android)GetNote (Android) Evidement, vous devez avoir des comptes sur un ou plusieurs de ces services pour pouvoir recevoir vos messages !
Comment cela fonctionne ? Valider avec Submit Allez dans l’onglet MY SCENARIOS. Travaux Pratiques Arduino - Air. Category: Arduino. My older son recently started school and needed his own desk for doing homework. I wanted to make something nicer than a simple tabletop with legs, and realized that I could also build in a bit of fun for when the homework is finished. Both my boys and I still had space travel on our minds from our summer trip to Kennedy Space Center. Interface with Remote Power Sockets – Final Version « Rayshobby. Untitled. Ardumote Tutorial - Control an Arduino from an iPhone. Thats it! Pretty simple, huh? Go ahead and tap the Toggle button on your interface.
The LED on pin 6 should light up! Press again to turn it off. Control Arduino Board Wirelessly With iPhone, iPad or iPod Using iArduino App and Ethernet Shield. This tutorial will guide you with how to make whole setup to control your Arduino Board with iArduino application.For understanding, we will use Led and we will switch it On and Off with the help of iArduino app.From this you will get the idea about how to setup iArduino to control your Arduino board Wirelessly. Whole setup will take 4-5 min. So let's get started........ InterfacingWithSoftware. Controlling an Arduino with an iPhone. Annikken Andee-An Easy Link between Arduino and Android. LibraryList. A complete guide to hacking your vehicle bus on the cheap & easy – part 1 (hardware interface) Arduino / Code. Camerontech/inclinometer. Relais-spdt-etanche-p-367. Suivre sa consommation d’eau : domotisation d’un compteur d’eau à l’aide d’un arduino. Fabriquer un détecteur de tension simple à réaliser.