
Wire Wrapped Bracelet Tutorial. Wire Wrapped Bracelet Tutorial This tutorial will cover how to make the wire wrapped bracelet pictured below: Okay, this is my first attempt at a tutorial, so please excuse the poor quality pictures (next time I'm enlisting my husband's help in taking pictures).
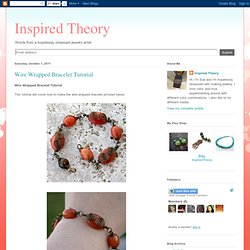
What you will need to create this bracelet: 3 - oval beads, approximately 20 x 13 mm 3 - barrel beads, approximately 12 x 10 mm 1 - czech glass faceted bead, approximately 10 mm x 10 mm 6 - 4 mm jump rings 1 - spool of 20 gauge wire (I used Parawire's Vintaj brass) Tools: Round nose pliers Chain nose pliers One of the main elements used in this bracelet is a double wrapped loop, let's begin with how to make one. Whirl Jewelry Link Tutorial : Cozy Sister's Jewelry Making Blog.
Posted on | February 13, 2013 | Comments Off Wire wrapped whirl link jewelry component, natural and with verdigris Here is an interesting jewelry link that can add a primitive look to your necklaces, bracelets, and if done on a smaller scale, even earrings.

The sample shown here is quite chunky, measuring 2 cm across the spiral and almost 4 cm from end to end. WigJig Jewelry Making Techniques for Using Tools, Beads, Wire, and Jewelry Supplies pg 7. Viking Knit Directions. Fine Art by Rocio Viking Knit Directions Step 1Wrap the bronze color wire around a credit card 5 times Step 2Slide the wire off and wrap one end around like shown above.
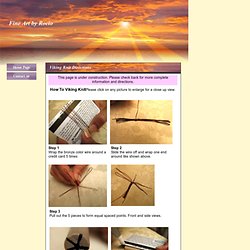
Step 3Pull out the 5 pieces to form equal spaced points. Front and side views. Step 4With a pen or marker, draw a 5 point star. Step 5Draw lines that connect to the star pattern on the end. How to Wire Wrap Cabochon Tutorial Links. Cabochons are focals without any holes.One good way to turn them into pendants is to wire wrap them.
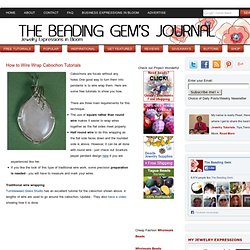
Here are some free tutorials to show you how. There are three main requirements for this technique. The use of square rather than round wire makes it easier to wrap wires together as the flat sides meet properly. Half round wire to do this wrapping as the flat side faces down and the rounded side is above. Microsoft Word - Wire Bracelet Tutorial.doc - tutorial1.pdf. Bizsugyár. Learn to make jewelry making and beading. As promised, I will share with you the tutorial of making this wired bangle.

I will split the tutorial into 3 parts. You may want to subscribe the blog post thru email so that you don’t miss any post.This is an interesting wired jewelry project. It shows you pictorial step by step to twist the wires and come up with the wonderful wired bracelet. I offer the tutorial in PDF that provide clearer intruction on the respective picture. If you are interested to buy the eBook at USD3, contact me at diyjewelryclub at gmail dot com. Wire-Wrapped Bead Bracelet. Wiggle Earrings – Free Wire Wrapped Jewelry Making Tutorial : Cozy Sister's Jewelry Making Blog. Posted on | March 7, 2011 | Comments Off For these playful earrings, you’ll need: Two matching wiggle links (learn how to make them here)Two ear wires (buy them or make your own)Two small briolette beads.Two five-inch lengths of 24-gauge dead soft wireRound nosed pliersFlat nosed pliersFlush cutters Thread one of the wires through one of the beads.

Positioning the bead about 1/3 of the way from one end of the wire, press both wire tails tightly up the sides of the bead, bringing the two tails together at the top of the teardrop. Cut t he short tail to about 1/4 inch in length. Using the flat nosed pliers, grip the longer wire tail at the point where it meets the top of the shorter wire tail.
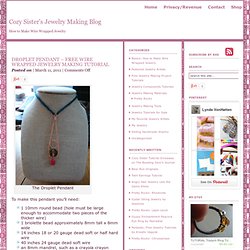
Using the round nosed pliers, form a loop in the long wire, positioning the loop so that it sits at the top of the short wire, centered neatly above the tip of the briolette. Droplet Pendant – Free Wire Wrapped Jewelry Making Tutorial : Cozy Sister's Jewelry Making Blog. Posted on | March 11, 2011 | Comments Off The Droplet Pendant To make this pendant you’ll need: 1 10mm round bead (hole must be large enough to accommodate two pieces of the thicker wire)1 briolette bead approximately 8mm tall x 6mm wide14 inches 18 or 20 gauge dead soft or half hard wire40 inches 24 gauge dead soft wirean 8mm mandrel, such as a crayola crayona sharpie markera cotton swab and rubbing alcoholround nose pliersflat nose pliersflush cutterchasing or ball pein hammeranvil or bench block To begin, coil the 18 gauge wire around the mandrel twice near the center of the wire.
How to Use the Bail Forming Pliers Tutorials. There are many tools you can use to coil wire and make consistent sized loops.

The bail forming pliers is yet another option which can help you make connectors, clasps, ear wires and jump rings. I bought the large sized bail forming pliers because I already had other tools like the 3 step loop forming pliers and wanted to avoid duplication. It makes two different sizes of rings - 9 mm and 7 mm. The inspiration for this tutorial are these beautiful cubic zirconia fans from Art Bead's cubic zirconia collection. These are not flat at all and presented a design challenge! My first tutorial! Wire wrapped pendant. - Lampwork Etc. 2011.03.01. - 2011.04.01. A Royal fülbevaló volt az első ékszer, amelyet tanfolyamon kívül, teljesen egyedül készítettem.

Ekkor még csak néhány hete kezdtem a drótékszer-készítést. Cleotól megtanultam a fogók használatát, az alapelemeket, az alaptechnikákat, továbbá minden órán segített elkészíteni egy-egy ékszert. Ezzel a tudással késznek éreztem magam, hogy egyedül is megpróbálkozzak az ékszerkészítéssel. Az interneten (Zita ékszerei) akadtam rá erre a fülbevalóra, és azonnal megtetszett. Pearl and Wire Bracelet. Bizsugyár. A sok magányos fülbevaló és medál után eldöntettem, hogy készítek egy szettet, amely színét és formáját tekintve vidám és különleges.

Igyekeztem némi hasonlóságot vinni a fülibe és a medálba, ám nem szerettem volna egyformára hajlítani őket, mert akkor méretüket tekintve már túl sok lett volna a jóból. Így hasonlítanak is meg nem is. J A medál elkészítése nem annyira egyszerű, mint amilyennek látszik, az ötlet megszületését követően több prototípust is gyártottam, mire megszületett a tökéletes darab. Tutorial WireWork PolymerClay by *Alkhymeia on deviantART. Bizsugyár. A Triangulum füli egy hirtelen ötlet szüleménye volt.
Az egyik délután jutott eszembe az ötlet, így gyorsan papírt ragadtam, és nagyjából lerajzoltam, nehogy elfelejtsem, mire odajutok, hogy este meghajlíthassam. Spiral wire clasp tutorial. Hello! I have a little something to share with my blog readers – a tutorial I created just for YOU.