
Packaging/PPA/InstallingSoftware - Launchpad Help. Launchpad Help > Packaging > PPAs > Installing software from a PPA PPAs work like normal Ubuntu archives.
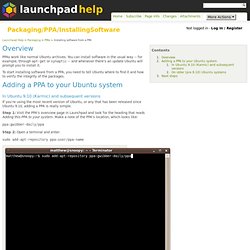
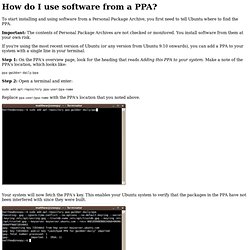
You can install software in the usual way -- for example, through apt-get or synaptic -- and whenever there's an update Ubuntu will prompt you to install it. To start installing software from a PPA, you need to tell Ubuntu where to find it and how to verify the integrity of the packages. In Ubuntu 9.10 (Karmic) and subsequent versions If you're using the most recent version of Ubuntu, or any that has been released since Ubuntu 9.10, adding a PPA is really simple. Step 1: Visit the PPA's overview page in Launchpad and look for the heading that reads Adding this PPA to your system. How do I use software from a PPA? To start installing and using software from a Personal Package Archive, you first need to tell Ubuntu where to find the PPA.
Important: The contents of Personal Package Archives are not checked or monitored. You install software from them at your own risk. If you're using the most recent version of Ubuntu (or any version from Ubuntu 9.10 onwards), you can add a PPA to your system with a single line in your terminal. Step 1: On the PPA's overview page, look for the heading that reads Adding this PPA to your system. Make a note of the PPA's location, which looks like: HowtoDebian/liveCD - Infogerance Evolix - Trac. Manuel FreeBSD. WebHome. Fr/NetworkConfiguration. Table of Contents L'essentiel de la configuration d'un réseau peut être fait en passant par le fichier de configuration interfaces du répertoire /etc/network/interfaces.
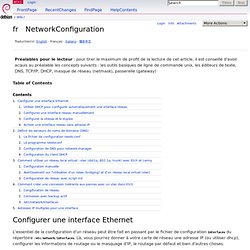
Là, vous pourrez donner à votre carte de réseau une adresse IP (ou utiliser dhcp), configurer les informations de routage ou le masquage d'IP, le routage par défaut et bien d'autres choses. Tuto_nix:config_network. Traductions de cette page?
: [fr] [en] LiveCDCustomizationFromScratch. This procedure works and can create a bootable Ubuntu LiveCd (along with the automatic hardware detection and configuration) from scratch.
You do not need to start from a pre-existing LiveCd. You may wish to create an Ubuntu Remix and distribute it as a LiveCd. Here is a way to do that without having to start from an existing Ubuntu Desktop Cd. There are three different areas to think about; the host system, the disk image and the chroot. The Host System This refers to the Ubuntu desktop you are running, the one the customised LiveCd is being built on. The Disk Image The disk image is a folder that we will burn to Cd. The disk image will be created in the host environment, outside of the chroot. LiveCDCustomization. You may wish to customise the Ubuntu Desktop LiveCd to:
Baby-laptops/gecko-install.htm. This page is currently a work-in-progress My two units arrived early February 2010, one with Puppy 4.3.1 pre-installed, the other with WattOS.
I did some testing and identified various problems with both, see my blog report: I have started to fix the problems... Updating the Flash BIOS The date of the BIOS in my unit with Puppy 4.3.1 was July 27, 2009. Barry Kauler - Powered by PPLOG. This blog is archived, read-only.
The gzipped database is almost 8MB, so I have decided that is big enough. My new blog: Posted on 30 Oct 2012, 21:59 - Category: General - No comments The Category and number of comments of each post was not displaying. Lvm. LVM (Logical Volume Manager, ou gestionnaire de volumes logiques en français) permet la création et la gestion de volumes logiques sous Linux.
L'utilisation de volumes logiques remplace en quelque sorte le partitionnement des disques. C'est un système beaucoup plus souple, qui permet par exemple de diminuer la taille d'un système de fichier pour pouvoir en agrandir un autre, sans se préoccuper de leur emplacement sur le disque. Building an Ubuntu Live CD for VMware View. With the recent public release of a full PCoIP View client for Linux I imagine many people will look to use this as a low-cost platform for re-purposing PCs as a lightweight View endpoint.
As the VMware View Client for Linux is only (officially) available for Ubuntu right now I will focus on that. Consider this the first part of an ongoing series, but right now I’m just going to cover the basics of getting an image setup so that you can live boot Ubuntu and have the View Client installed in the image. I also will be doing the creation and testing of the live CD from a virtual machine and I highly recommend you do the same. I am using my home lab with vSphere 5, so I’ll be using vCenter to create a new VM, but any virtualization platform can be used. The virtual machine we’re creating here will be our live CD “build” machine, there’s nothing special about it, it’s just a straight installation of Ubuntu, so let’s get on with it. Access the console for the VM, and power it on. UCK Icon. Tutoriel:comment_installer_un_paquet. L'installation d'un paquet (applications, bibliothèques, etc.) est une tâche d'administration qui s'effectue avec les droits d'administration.
Votre mot de passe vous sera demandé.L'utilisateur concerné sera obligatoirement administrateur du système. Consultez la page concernant la gestion des utilisateurs. Il faudra également disposer d'une connexion à Internet configurée et activée. Buntu. XBMCbuntu is a boot-USB drive/LiveCD image with XBMC pre-configured to work directly out-of-the-box for a dedicated set-top-box style installation of XBMC.
Users can either demo XBMC without touching the internal HDD, or use it to install XBMCbuntu on the HDD, without any pre-installed operating systems. XBMCbuntu is based on a light weight version of Ubuntu. XBMCbuntu currently supports MCE (Media Center Edition) Remotes with USB IR-receiver receivers directly out-of-the-box. Installation only requires 8GB (or larger) USB drive or internal HDD. When installed onto a USB flash drive or hard disk drive XBMCbuntu has the ability to save settings and make updates to XBMC Media Center and the operating-system back onto the USB flash drive or hard disk drive that it is installed onto, this is not possible when running XBMCbuntu from a Live CD booting from a CD-ROM disc as they are read-only and any changes settings are only temporarily saved until the system is rebooted. 1 General FAQ.