
Making of 3D render 'House to Catch a Forest' by Celestino Geronimo – 3D Architectural Visualization Rendering Blog - Ronen Bekerman. I’m happy to bring you a new making-of article by forum member Celestino Geronimo.
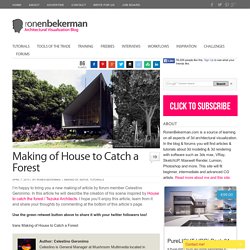
In this article he will describe the creation of his scene inspired by House to catch the forest / Tezuka Architects. I hope you’ll enjoy this article, learn from it and share your thoughts by commenting at the bottom of this article’s page. Use the green retweet button above to share it with your twitter followers too! Author: Celestino Geronimo Celestino is General Manager at Mushroom Multimedia located in Singapore.
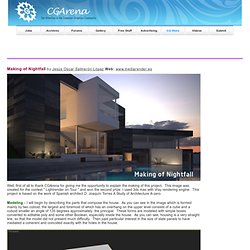
Check out what they do at their website – www.mushroommultimedia.com. This is my interpretation of a Tezuka House by the forest, played with different foliage types as opposed to the original site itself. First let see how we end up… I prepared the site with a plane as the base, pulled some vertices on the z axis to achieve an uneven terrain. I always choose a texture which has a good tiling quality and not obviously repetitive when rendered. Also incorporated a refract value to the leaf. Making of Nightfall. Well, first of all to thank CGArena for giving me the opportunity to explain the making of this project, This image was created for the contest " Lightrender on Tour " and won the second prize.
I used 3ds max with Vray rendering engine. Configuration Steps. VRayLightMtl + VRayDirt for Quick AO Render Checkup. Here’s a quick tip I use almost all the time now, mostly because I really like the look and it’s easy and quick to setup, but the main advantage of an AO (ambient occlusion) pass is spotting problem areas in the geometry – especially holes and flipped normals you might have missed Setting up the AO pass with VRayLightMtl & VRayDirt is real easy and fast.
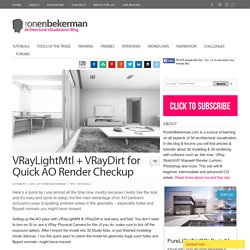
You don’t need to turn on GI or use a VRay Physical Camera for this (if you do, make sure to tick off the exposure option). After I import the model into 3d Studio Max, or just finished modeling inside 3dsmax, I run this quick pass to check the model for geometry bugs such holes and flipped normals i might have missed.
In the image below you’ll see how those problem areas will show in such a pass. This will only work if the Emit light on back side option in the VRayLightMtl is off allowing for all those problem areas to appear pure black since they are not emitting any light. Quick Render. The Third & The Seventh by Alex Roman. No words can describe the amount of talent, work and dedication that went into the creation of this piece of art by Alex Roman – A truly remarkable 3d architectural visualization / film.
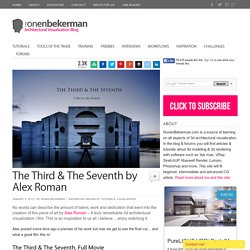
This is an inspiration to us all i believe… enjoy watching it. Sensei. 3D Snow Creation Tips by Bertrand Benoit. Following Bertrand’s great 3d recreation of the Bauhaus School at Dessau, I got that many request to post more detail about the snowy image he made in that set.
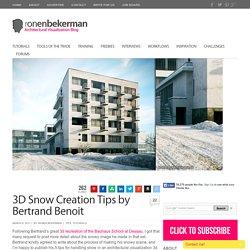
Bertrand kindly agreed to write about the process of making his snowy scene, and I’m happy to publish his 5 tips for handling snow in an architectural visualization 3d scene. Enjoy! Author: Bertrand Benoit Bertrand participated in the GH House Challenge, winning the Grand Prize Award for his “Norwegian Lake Shore” entry and as a Judge in the HOVER challenge. Sunny 16 rule. The basic rule is, "On a sunny day set aperture to f/16 and shutter speed to the [reciprocal of the] ISO film speed [or ISO setting] for a subject in direct sunlight.
"[1] For example: On a sunny day and with ISO 100 film / setting in the camera, one sets the aperture to f/16 and the shutter speed to 1/100 or 1/125 second (on some cameras 1/125 second is the available setting nearest to 1/100 second).On a sunny day with ISO 200 film / setting and aperture at f/16, set shutter speed to 1/200 or 1/250.On a sunny day with ISO 400 film / setting and aperture at f/16, set shutter speed to 1/400 or 1/500. 3D Rendering Tutorial - Making of Restaurant in Bordeaux – 3D Architectural Visualization Rendering Blog - Ronen Bekerman. Pawel Podwojewski the owner & founder of MOTYW shows us how he done this night time image above in the project ‘Restaurant in Bordeaux’ by using Autodesk 3ds Max, Vray, and Adobe Photoshop.
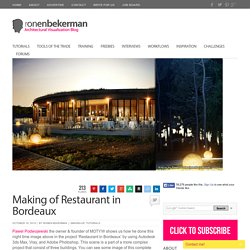
This scene is a part of a more complex project that consist of three buildings. You can see some image of this complete project directly below before the article starts. I hope you’ll enjoy this article, learn from it and share your thoughts by commenting at the bottom of this article’s page. Author: Pawel Podwojewski My name is Pawel Podwojewski and I am an architect and CG artist, owner and founder of MOTYW company. I live in Gdansk, the city in the north of Poland. I am nearly 2 years on the market with my company and we’re still evolving.
I hope one day I’ll reach a level which will make my work recognizable and lasting in people’s memory. Pawel was kind enough and prepared this article also for www.cgrecord.net, a great 3d news site you should check out. Making of HOVER '3D Grid' by Jamie Holmes. The 4th runner-up winning entry of the HOVER architectural visualization challenge was not the typical thing one would see in such events.
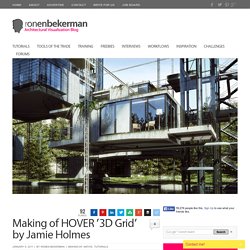
Jamie went all out with his concept and I’m very happy to publish the making of his “3D Grid Suburb” scene. In this tutorial, Jamie describes his workflow using 3D Studio Max and Mental Ray as his main tools. I hope you’ll enjoy this article, learn from it and share your thoughts by commenting at the bottom of this tutorial page. Author: Jamie Holmes Jamie participated in the HOVER Challenge, winning 4th Runner Up Award for his entry. Jamie is director and co-founder of One to One Hundred Architectural Visualization Studio. Frank Gehry-style titanium scales. I had to come up with a titanium scale material for a recent project, so I thought I’d share a few tips about how I went about creating an entirely texture-based mat versatile enough to be used in a variety of project.
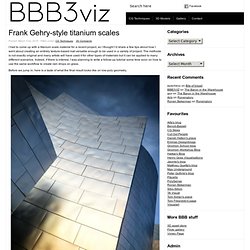
The methode is not exactly original and many artists will have used it for other types of materials but it can be applied to many different scenarios. Indeed, if there is interest, I was planning to write a follow-up tutorial some time soon on how to use the same workflow to create rain drops on glass. Making of House K by Toni Fresnedo. Toni created the ‘House K’ images, that were posted on the forums not long ago, as part of his final project during his studies at FX ANIMATION school in Barcelona, Spain.

Toni selected a great house design by 3LHD Architects, Architects that were previously visited by Javier Pintor in his Bathroom at House N tutorial. Follow along as Toni describes his process in making his renders using AutoCAD, 3D Studio Max, VRay, Photoshop and the Magic Bullet Photo Looks plugin. Author: Toni Fresnedo Toni is a 3D Artist and has recently completed a 3D Architectural Visualization Master with 3D Studio Max, VRay and Maxwell Render at the FX ANIMATION BARCELONA 3D SCHOOL.
He is currently working on some projects and expanding his portfolio. Making Interior Scene. First of all have to create help lines in Adobe Photoshop (using line tool) to set the perspective of the image. These lines should meet in one point. Open 3d Studio Max Now open Views -> Background view (shortcut ALT+B), it will allow You to select Viewport Background. Choose the reference file from hard disk and press ok.
Now You have to change render output in rendering menu to match the resolution of reference file (in our case 1025 x 819 ). Now in your selected viewport rightclick in top-left corner and select show safe frame. Next let's create a simple box in scene. This box will be a modeling base for our room. Create Vray Physical Camera in the left corner of the box. Matching camera isn't easy task. Making of Rolf Benz Vero. Making of article by Alex Vasiliuk Hi all, Alex here your VRayGuide, and today I'm going to share with you one of my latest projects: ROLF BENZ VERO. But before I start, let me just give a big hand to vray.info and all readers here for allowing me to have this honor and represent this "Making of ROLF BENZ VERO".
Introduction The idea of making this scene cames to me one day while going through the ROLF BENZ magazine, I just love their minimalistic design and calm colors. Without thinking twice I've scanned the page and started researching for more materials and references in the internet. After a while I could have the complete vision of what I wanted to create, and it was something in between these 2 images.
Modeling. Making of 3D render 'Chimneys House' by Diego M. F. – 3D Architectural Visualization Rendering Blog - Ronen Bekerman. I’m happy to bring you a new making-of article by Diego Munhoz Ferreira from Neohaus. In this article he will describe the creation of his great re-creation of Marcio Kogan’s Studio MK27 ‘Chimneys House’ design, created as a personal study. I hope you’ll enjoy this article, learn from it and share your thoughts by commenting at the bottom of this article’s page.
Material / Curtain / V-Ray. Many have asked pixela to share more information about her Curtain Material used in the “Rosso” scene. She was very kind to share this with you all here. I hope you’ll find this helpful in your next project! Hello, Many people were asking me to prepare a tutorial about how to create a curtain shader and here is the mini-tutorial I promised for Ronen Bekerman Forum which has been one of the leading and creative arch-vis sites that I feel happy to take part. First step we need to make is to define the characteristic features of our material.
I think this is the most important step for creating realistic materials and textures. We can categorize these features this way… Surface Properties ( Diffuse Color, Texture, Bumps, Holes, etc. )Reflective PropertiesRefractive PropertiesTranslucent Properties. Making of Esherick House, Part 2 - 3D Recreation with 3dsmax & Mental Ray. 111 Flares Facebook 0 Twitter 21 Pin It Share 8 Google+ 80 LinkedIn 2 inShare2 StumbleUpon 0 Reddit 0 111 Flares × Picking up where he left off in Part 1, Ludvík dives into materials setup in great detail in Part 2 of the Esherick House Making Of series.
Materails. Making of Esherick House, Part 3 - 3D Recreation with 3dsmax & Mental Ray. 31 Flares Facebook 0 Twitter 8 Pin It Share 11 11 Google+ 10 LinkedIn 2 inShare2 StumbleUpon 0 Reddit 0 31 Flares × After covering the initial stages in Part 1 and Materials in Part 2, Ludvík will now shed some light about – Lighting. This is the point in which all the hard work of setting up the scene and taking the time to fine tune the materials is being brought to life.
Making of Esherick House, Part 4 - 3D Recreation with 3dsmax & Mental Ray. Making of 3D render of GH House by Anton Cherenko – 3D Architectural Visualization Rendering Blog - Ronen Bekerman. As mentioned it the March 2010 newsletter, April is the month for the GH House articles to be posted and I’m very happy to bring you the first article by the challenge’s Honorable Mention Award winner, Anton Cherenko. I really loved the fact Anton showed the back side of the GH House, a side not so explored during the challenge. Cherenko GH House. Linear Workflow made Simple by Matt Gorner. The Secret to Creating Realistic Grass. This 22-minute video tutorial will teach you how to: Control particle strandsSave on render times by using child particlesEvenly distribute flowers across a planeEffectively use the colorband featureMake a field of uniform strands appear ‘lumpy’ The sky texture I will be using in this tutorial is from CG-Textures.com and can be obtained from here. Screenshots from the video: NOTE: This tutorial was created for Blender 2.49.
It may not be compatible with later versions of Blender. Bonus Tip: How to Animate the Grass! Add a new texture to your grass plane. Switch to the Shading panel (F5) and make sure the Wind texture is turned off. Openfootage.
Making of 3D render of GH House by Ivo Sucur Part 1 – 3D Architectural Visualization Rendering Blog - Ronen Bekerman. The second GH House making-of article is here! Written by the 2nd Runner Up award winner, Ivo Sucur. Ivo Sucur GH House. Making of House on the Coast. 3dnotos studio sheds some light about the making of their striking “House on the Coast” image posted not long ago on the forums (Done in viewport still screen capture style mostly). I love the look & feel they went for on this one, being an actual client work, and not the usual treatment one would expect… this image offers both warmth and cold feelings with a very smart placement of the women overlooking the sea from her exterior deck.
The project came to us from architect Edgardo Minond, it was due in 2 weeks and we were given a Google SketchUP 3d model, with which we worked most of the 3d. Here are some views of the model… Why raining? The scenery in which the building was set, was an incredible and sublime view of the sea, this vast and scary place, a place where a change of tides can become a disaster. CG Education. Making of Saint Benedict Chapel. 2009 Pritzker Architecture Prize Laureate – Peter Zumthor, is among my favorite architects. Explains. Hair & Fur in 3D Studio Max. Following a great thread in the finished works section of the forums, pixela was very kind to send me a little ‘How-To’ about the the use of 3D Studio Max’s Hair & Fur modifier you can see on the chair in the image above. I hope you’ll enjoy this article, even though it is just a small taste of what could be achieved with this great modifier.
Making of HOVER 'Before the Storm' by Julio Cayetano. An Archiviz Workflow Overview in 3ds Max, Sketchup, and Digital Fusion. In this Architectural Visualization workflow overview you will learn how to use Google Sketchup for photo matching, create a Vray-proxy in 3ds Max, use Max script to speed up your workflow, reduce render times when creating a large scene, set render layers in 3ds Max, and do some post production in Digital Fusion. Step 1 Start Google Sketchup 7.1 (sketchup 6.0 at least), go to (File > Import...). Use "use as new matched photo" as the import option.
Lightning.