
Shell Crochet trim. Guest post by Maya Kuzman from Little Treasures It is believed that the earliest crocheted projects in the past were finger-crocheted and evolving from traditional practices in Arabia, South America and China.
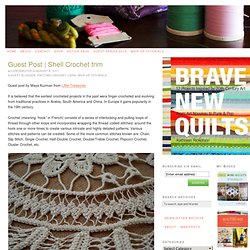
In Europe it gains popularity in the 19th century. Crochet (meaning “hook” in French) consists of a series of interlocking and pulling loops of thread through other loops and incorporates wrapping the thread (called stitches) around the hook one or more times to create various intricate and highly detailed patterns. Various stitches and patterns can be created. Some of the more common stitches known are: Chain, Slip Stitch, Single Crochet, Half-Double Crochet, Double/Treble Crochet, Popcorn Crochet, Cluster Crochet, etc. (A detail from a centerpiece crocheted by my grandmother) In the past crochet was used for decoration of the home and the clothes with which they gained a more luxurious look. Recently the crocheting of trims and edgings increased in popularity once again. Crochet Neckline; DIY Shirt Refashion. Do you know how to crochet?

Do you have a plain shirt that is in need of a little pick-me-up? Than this project is for you. Crocheting a neckline is an easy way to transform a ho-hum shirt into something with a little more interest and feminine style. I love how the openwork crochet creates a lace-like appearance without being overly fru-fru. I only used three different stitches to create this particular neckline; chain stitch, single crochet, and double crochet. To begin, I used a 1mm crochet hook to pierce the fabric of the original shirt neckline and create a crocheted foundation for my new crocheted neckline. Once you have a foundation row established, it is a good idea to find the middle of the shirt (front and back) and mark it with some contrasting yarn. From here on your stitches will depend on the look you want as well as the size and shape of your particular neckline.
My original shirt had a neckline that was very deep in front and in back. Happy Crafting! Crochet Edging onto Clothing. Materials: Old T-shirt or other fabric Scissor Size 10 thread (you may use other threads or weights of yarns if desired) Crochet Hook US 7 (1.5 mm) Note: Use a hook that is appropriate for the thread/yarn you chose to use.

The smaller the hook the easier it is for it to pierce the fabric. (Learn more about types of yarn and recommended crochet hooks) Optional: If your hook is not able to pierce through the fabric you may use a darning needle or other sharp tool to pre-poke the holes into your fabric Here is my old, plain shirt. Boring, right? The first thing I’m going to do is cut the neckband off. You can cut the neck hole bigger or wider if you desire.
Fold the edge of the neckline under approximately 1/4″ so that it hides the raw edges created by cutting the cloth. Now it’s time to crochet! Crochet trims. Today I am sharing the pattern for this trim: As you already know I love crocheting edges and trims and received many sweet comments and mails regarding the same which I adorned my old tees with. This is a pattern that is quite easy to make and it looks fabulous - whether you are going to apply it on your tees or pillows. It's a shell pattern and you will need basic crocheting skills to make it. Make the foundation by chain stitching the number of stitches you will have for your project. It usually takes twice the width of the related project. The pattern: Row1: Single crochet (sc) in every stitch until the end.
Chain (ch) 1 and turn your work. Crocheting on the edge (napkins) A super sunny DIY for a scorcher of a day.
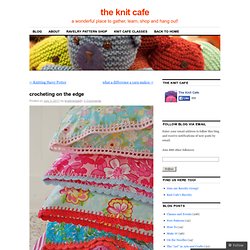
This sweet project is the brain child of Cassie and her blog You Go Girl. There is a wonderful tutorial there with clear and detailed photos on how to accomplish this crocheted edging. I was smittened right away when I saw this and decided to try my hand at it. Coincidentally I had just inherited some cloth napkins from a friend that looked like they might appreciate a little reno.
So I went to work and there were some discoveries along the way! I began with a straight from the horses mouth approach except I changed the materials slightly choosing Valdani Perle Cotton over baby weight yarn and a 3mm hook instead of a 3.75mm. With one wee ball of Valdani Perle Cotton I edged one full napkin and got 2 sides of the scallops finished on the second. This is a page from one of my favorite crochet resources- Super Stitches Crochet. Happy stitching all! Knit Trim: Garter Stitch Loops.