background preloader

Free Crochet Basketweave Bracelet Pattern

Free Crochet Basketweave Bracelet Pattern
Click on any photo to see it larger. Buttons sewn onto the first 8 rows of single crochets. Triple Crochets at the other end of the bracelet. Crochet Basketweave Bracelet My Basketweave Bracelet could also be named The Bracelet That Languished on My Coffee Table For a Month Begging to Be Finished. Basketweave Bracelet Pattern created by Gayle www.planetmfiles.com Size: Approximately 1-1/2 inches wide, make it as long as you need it. Materials: Size 10 crochet thread. Gauge: Not important Abbreviations: ch = chain, sc = single crochet, sl st = slip stitch, st = stitch, dc = double crochet, fpdc = front post double crochet, bpdc = back post double crochet, tr = triple crochet Notes: I find it helpful to use my stitch markers to mark the top of my turning chains as I make them and move the marker up as I go. Pattern: To begin: This portion of the bracelet is where you will eventually sew on the buttons. chain 14.Turn. sc in 2nd ch from hook and in each ch across – 13 each row. All Rights Reserved.

Yarnberry 
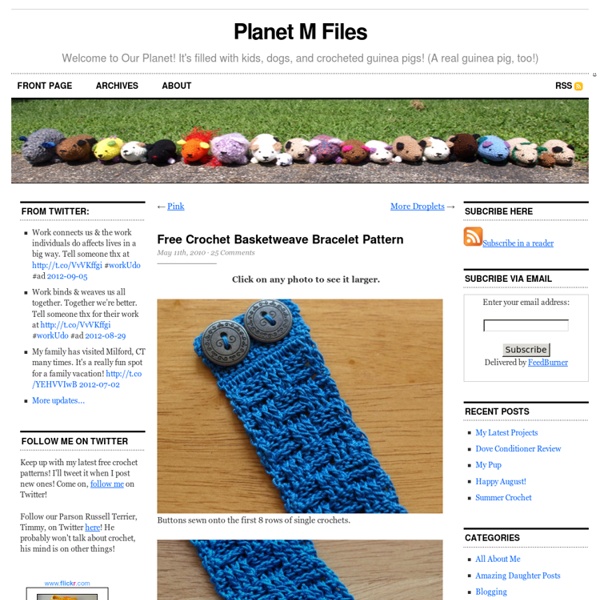
Tuto bracelet au crochet , Challenge 12 mois, 12 projets* Alors voici mon mini tuto pour confectionner ce bracelet au crochet vous aurez besoin de : - Du fils de coton - Un crochet. J'ai utiliser un crochet de grosseur 1.6mm - Une attache à bracelet - De la petite chaîne en métal - De la colle à tissus ( assez liquide et transparente) Commencer par faire 3 cercles au crochet comme ceci: Faire un anneau de 8 ml 1er tour: 12ms ds l'anneau, 1mc ds la 1ère ms. 2ème tour: 1ml, 1ms dans la ml, 2ms ds chq ms suiv, 1mc ds la 1ère ms. 3ème tour: 4ml,[1br,1ml] 23 fois, 1mc ds 3ème ml. 4ème tour: 2ml, sauter 1ml, 1ms ds ms suiv, [1ml,sauter 1ml,1ms ds ms suiv] 22 fois, 1ml, sauter 1ml 1mc ds 1ère ml. 5ème tour: 3ml, sauter 1ms, 1mc ds la ms suiv, [3ml, sauter 1m, 1mc ds la m suiv] 22fois, 3ml sauter 1m, 1mc au pied ds 3ml du début du tour. Une fois mes 3 cercles fait, je les ai assembler ensemble en me servant du bout de fils que j'avais laisser à la fin de mon ouvrage à l'aide d'une petite aiguille J'espère que cela vous à plu A+

Crochet Basket Weave Afghan Baby Blanket - Pattern & Tutorial Often, I received feedback from readers asking me where to get the yarns I used for my crochet and/or knitting projects. Frankly speaking, I bought most of my yarns from the local yarn shops around here and I do understand that it is hard for many of you to get the exact one. This time, to make my pattern more yarn-search-friendly, I used Lion Brand, a well known yarn company where you can order online or buy them from shop if they are available. This blanket is made from cotton medium worsted yarn, the basket weave pattern makes it warm and cozy in cold weather. If you need a very warm version for snowy winter, change the yarn to wool. Get the crochet pattern & picture tutorial on how to crochet this basket weave baby blanket after the jump: {Get full details on next page.} Pages: 1 2 Get all updates via email: Highlights from Our Partners

Boléros et leurs grilles gratuites Samedi 20 octobre 2012 6 20 /10 /Oct /2012 14:51 Voici des boléros unis et colorés , aux motifs assemblés ou aux points fantaisies , accompagnés de leurs grilles gratuites , trouvées sur différentes Galeries picasa et présentés sur ma page facebook " Le Crochet de Anne " ! Boléro rose décoré d'un rang de carrés et de belles bordures Boléro beige aux carrés assemblés et aux manches courtes Superbe boléro beige aux manches longues Boléro turquoise aux jolis points fantaisies Boléro beige circulaire Boléro rose fuschia et rose pastel Boléro beige fermé par 2 lanières , aux longues manches Boléro jaune aux manches courtes Boléro aux carrés granny colorés Boléro lilas , fermé par une fleur Boléro vert aux points fantaisies Je souhaite un agréable crochet à toutes celles qui voudraient réaliser ces jolis modèles !

The Boy Trifecta: Dino Spike Crochet Pattern I sort of think it does. Or at least it seems so to me. And I've definitely got the crochet bug these days. I've got a little monster running around my house these days, so I thought I'd create a hat to reflect his wild insane out-of-control hilariously adorable personality. Of course, this one modeling the hat, he's not a monster at all. I mean seriously, how can you not love those eyes? In case you have any little monsters that you would like to make this hat for, here's the dino spike pattern. Hook: 5mm (H) Yarn: Any worsted weight is fine - I used Wool-Ease. Mark the first stitch in each round. Round 1: Make a magic loop/ring, and do 6 single crochets in the loop. Round 2: Single crochet around (6 sc) Round 3: 2 single crochet in first stitch, 1 sc in next stitch - repeat around (9 sc) Round 4: Single crochet in each stitch (9 sc) Round 5: 2 single crochet in first stitch, 1 sc in next stitch - repeat around (14 sc) Round 6: Single crochet around (14 sc) Happy crocheting!

Sac en crochet chic… … largement inspiré de celui édité par la maison Gérard Darel: en pleine crochet-mania, ce sac ne pouvait que me taper dans l’oeil! Je l’ai donc pris un peu comme un défit, et me suis finalement prise au jeu car il est très agréable à crocheter. Je sais que le process de fabrication des sacs façon Darel a largement été diffusé sur la toile, mais comme je n’ai pas trouvé exactement ce qui me convenait (surtout dans le traitement des poignées) et que les copines n’arrêtent pas de me demander comment faire, voici une fois pour toutes les explications, à ma façon (diagramme en pdf en fin de post) Pour ce sac, il faut un crochet n°9 et 400 mètres de fil. Soit vous trouvez un fil épais, soit comme pour ce sac-ci vous crochetez plusieurs fils en même temps (ici 3 fils de pelotes de 110 mètres, j’ai donc acheté 12 pelotes) Le sac s’assemble à l’aiguille. Les poignées sont des poignées en cuir trouvées à la Droguerie (8 euros la paire environ) Et pour celles qui veulent imprimer, c’est possible:

Koala Bear Amigurumi I found a Koala Amigurumi Pattern in the Woman’s Day website and I have some off-white and gray organic cotton yarns on hand, so I made a pair of these small little stuffed koalas for my kids in reverse color. Some ideas to make it differently: 1. This adorable little koala is about 3-5″ tall only (depend on your yarn and the matching hook size), install a key ring on it’s head and turn it into a key chain, hang it to the bag’s zipper. 2. If we sew the limbs closer to the center of the body and insert 4 small strong magnets to the tip of each limb, you can make it “huggy” and hug on a tree branch or at the edge of your curtain or your pencil, ruler etc… 3. And, and…. instead of poly-fills, stuff beads into the body to weight it down and with the magnets of it limbs, it can be a cute memo holder on your desk too 4. Find the appropriate positions for the ears, approx at the center of the vertical cross section of the head, middle of the height. Lastly, stuff and sew the limbs to the body.

Bijoux Adorables bijoux fleuris ♥♥ colliers , bandeaux cheveux , boucles d'oreilles , écharpes ♥♥ , trouvés sur le site de " Liveinternet.ru/gelexxx " , avec ses grilles gratuites ! Clic sur les images pour les agrandir ! Clic sur les images pour les agrandir Clic sur les grilles pour les agrandir Clic sur l'image pour l'agrandir Je souhaite un bon crochet à toutes celles qui voudraient réaliser ces jolis bijoux ! ♥ Pour se faire plaisir ou offrir un cadeau ♥ How to Crochet: Honeycomb Stitch The honeycomb stitch is an classic stitch mostly used in vintage patterns for lace coverlets and tablecloths. Use this stitch for a long table runner in a fun, bright color and bring a classic stitch out of antiquity! Chain a multiple of 5 plus 2 Row 1: sc in 2nd ch from hook and in each sc across Row 2: ch 1, turn, sc into first 2 sc, (ch 5, skip 2 sc, sc in next 3 sc) across, ending with ch 5, sc in last 2 sc Row 3: ch 1, turn, sc in first sc, (5 sc in next ch-5 space, skip next sc, sc into next sc) across Row 4: ch 6, turn, skip first 2 sc, sc in next 3 sc, (ch 5, skip 3 sc, sc into next 3 sc) across, ending with ch 2, tc in last sc Row 5: ch 1, turn, sc in first tr, 2 sc in first ch-2 space, skip next sc, sc in next sc, (5 sc into next ch-5 space, skip next sc, sc into next sc) across, ending with 3 sc in ch-6 space Row 6: ch 1, turn, sc in first 2 sc, (ch 5, skip 3 sc, sc in next 3 sc) across, ending with ch-5, sc in last 2 sc Repeat Rows 3-6 until desired length is reached.

You Can Make A Lace Bowl From A Crocheted Doily Between you and me, I really can't believe I made this! I'm just thrilled, totally and completely, as you will be too if you decide to make one! A crocheted bowl that's actually usable? Yes! In retrospect, it was just a bit risky of me to try and make a bowl from a doily with so many holes, but it worked! You'll Need: 1 doily, at least 8" diameter, I crocheted mine from the link in the post here, you could use a thrifted one too, or even one that's part fabric, part lace crochet.....a medium to large kitchen mixing bowlseran wrapfabric stiffener, I used Paverpol, a great non-toxic product, that's even washable! How To: Cover your bowl in seran wrap, with as few wrinkles/ridges as possibleDunk your doily into the fabric stiffener, and when it's evenly coated, remove all the excess by running the doily between two fingers, or whatever works for you.

How to Crochet -- Woven stitch The crocheted Woven Stitch is one of my favorites to use for baby blankets and afghans since it is easy to stitch, using only chain stitch and single crochet, and it works up quickly into a nice single thickness lightweight blanket. It can be worked in one solid color, in a variegated yarn or in stripes and each combination looks great. Here's how it works: Start out with a beginning chain in multiples of 3, plus 2 extra. For the first row, skip the first 2 chains and work a single crochet into the third chain. Then chain 1, skip 1 chain, work 1 single crochet, as shown above. This is what your piece will look like after finishing the first row. Work 2 chain stitches and turn your work. This is what your piece will look like after the second row is complete. Continue as before with chain 2, turn, single crochet into first chain space. This is a side view of the sample piece showing that there is not much in the way of texture or layering with this stitch.

Crochet an Android Robot | Victoria Nece I love the Android logo guy. He’s adorable. So I thought I’d make a stuffed one! I improvised the entire pattern as I went, so this is a bit of a rough how-to, and can be adapted to make robots of all shapes and sizes. You know that little flash widget thing Google gives devs that generates infinite random robots? To make your own cuddly little robot, you will need: Crochet hook: Size K (6.5mm)Tapestry needleYarn: 1 skein (170 yards) Lion Brand Vanna’s Choice in Fern or other worsted weight yarn, and a small amount of scrap white yarnStuffing of your choice. He’s basically all single crochet, and intentionally a little asymmetrical and off-center, as I wanted to add a bit of softness to a very geometric design (also, not having to count stitches is quite satisfying). Step 1: Body Chain 20, or as many stitches as you’d like his body to be tall. Using a tapestry needle, stitch the two short sides of the rectangle (red in the illustration) together to create a tube. Step 2: Neck and Head

Related: