
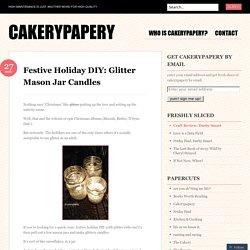
Festive Holiday DIY: Glitter Mason Jar Candles. 27 Nov Nothing says “Christmas” like glitter putting up the tree and setting up the nativity scene.
Well, that and the trifecta of epic Christmas albums (Mariah, Bieber, N’Sync. Color My Room. Want to visualize how the colors you're considering will look in your home?
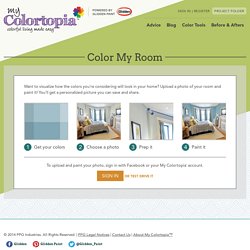
Upload a photo of your room and paint it! You'll get a personalized picture you can save and share. 1 Get your colors 2 Choose a photo 3 Prep it 4 Paint it Please update your browser to its latest version to use the Color My Room tool. Vinyl Bowl Tutorial. DIY Pebble Mat. Just finished this mat to go with my Bathroom Redo.

It has a peculiar providence, I was mooching around the CB2 website, doing a little window shopping and I spotted this fellow for $39.95 Me: 'Hey, I had that idea too! ' Lava Lamp Hookah Tutorial. Howdy Hookah friends! Our friend Tatum sent us his ingenious lava lamp hookah mod and wow, how awesome is this? Send us your own hookah mods and if we like them, we’ll post them! DIY Alien Abduction Lamp. This is an entry in the Living With Lindsay Five Dollar Challenge!
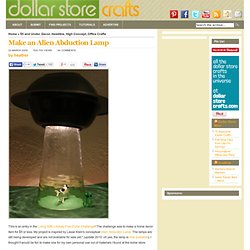
The challenge was to make a home decor item for $5 or less. My project is inspired by Lasse Klein's conceptual Alien Abduction Lamp. The lamps are still being developed and are not available for sale yet.* (update 2010: oh yes, the lamp is now available). I thought it would be fun to make one for my own personal use out of materials I found at the dollar store. When I was shopping for materials, I couldn't find any toy cows.
Photo Negative Lamp Tutorial. Star Map. Note:You can't use fishing line.

Don't even think about it. It just doesn't conduct light in the right way. [ref] You can buy optical fiber by the reel, but there are better and cheaper ways to get it*: For large star maps; a fake Christmas tree works very well! Cloud Light Tutorial. DIY Cherry Blossom Lights. Cutting glass. DIY Beach Glass Jars & Bottles. Upcycle Old Board Games. Cool Copper Projects Warm metallic hues are easy to love but often pricey.

When you create the look... Easy Doily Bowl Craft a decorative bowl from a doily picked up from a flea market, antique... Camper Birdhouse Encourage birds to stay awhile with an adorable vintage birdhouse. DIY Book Trinket Box. Diy book bookends. A few weekends ago, we celebrated my sister’s birthday at Pane E Vino for the second year in a row.

This place is just fantastic. The servers are attentive, the food delectable and the patio has a really bright and airy ambiance that makes your skin look all glowy and youthful (love that!). Glitter Balloons. We made some glitter filled balloons this morning for New Year's Eve and Hudson had fun shaking them around.

I made him play with them outside just in case they popped... All you need is: BalloonsGlitterFunnelSharpie (if you want to write on the balloons) Place the funnel inside of the balloon after you write on them. Pour the glitter into the balloon and blow it up. DIY Glitter Ornaments. I showed this to my Stampin' Up!

Club ladies and promised I would post the instructions (w/ pictures) on here for them and my other customers - I hope y'all will try these out - they're SO easy and the results are so fab!! Clear Glass Ornament Dye Re-inker (Stampin' Up! Ink used for these - I do not know how other types of ink will work with this as I've only used SU Classic re-inkers) Water (optional) Paper Towel Rubber/Latex Gloves Fine Glitter (I use SU! Dazzling Diamonds Glitter for these) Small Powder Pal OR scrap paper shaped into a funnel Small container (to drain the ink into - I used an empty plastic film container) Remove the top and hanger of the ornament (be careful as you're doing it as the glass is very thin and the hanger pops open as it's pulled out) DIY Cupcake Christmas Ornaments. It's is my absolute favorite time of the year!
Time to dust off your jingle bells, pour yourself some peppermint hot coco and make something for Christmas! I always loved making Christmas ornaments as a kid, and well, I still do! I love putting up the tree with my family and looking back at all of the ornaments I made as a kid. So many wonderful memories. Faux Stained Glass. All Thumbs Crafts A craft tutorial blog for the un-Martha: where those of us who are all thumbs and don't have a big budget can still create some nice craft projects. Thursday, March 17, 2011 Faux Stained Glass. "Stained Glass" Votive Holders. By Jenny Ryan Many times when I’m at the grocery or drug store, I can’t resist throwing a few scented votive candles in my cart.
When I’m ready to burn them, it’s easy enough to sit one on a cute little vintage china saucer, but I recently decided to try and find a fancier display solution for them. I also wanted the project to be inexpensive, and the materials used to be things I already had on hand. I was inspired by memories of making faux-stained glass in elementary school and came up with these fun little glass votive holders. $2 Frosted Centerpiece. I bought this "goblet" at the thrift store for $1.75 a while ago, and have used it for many things since then. Recently, I spotted and pinned these candles made with yarn and frosted spray paint and LOVED the way they looked. I thought rubber bands would work, too. With Christmas coming, I was looking for ideas for a table centerpiece and this seemed a good starting point. Inspired ideas. Making Memory Candles {A project from the Inspired Ideas Archives} This is such a fun way to display photographs!
The technique uses black and white photocopies and transparent contact paper to transfer images to glass votive candleholders. Transferring Ink to Candles. Acrylic Paint Transfer Tutorial. Rainbow Rice Tutorial. Glass Marble Magnet Tutorial. Tiny Polaroid Magnets. Hi there! It’s felt like forever since I’ve last blogged, and has felt like an eternity since I’ve done anything crafty and nifty. Since my morning sickness has gone into full speed (yes, we’re expecting our third this fall!) I haven’t felt like myself.
But nothing like inspiration to wake one out of a reverie — or nightmare, in my constantly sick state. I came across these DIY Pantone chip magnets on How About Orange and wanted to do something similar. You will need: Cardboard (mine was the backing of a sketchbook — much thicker than the back of a regular spiral bound notebook) or 2-3 sheets of white cardstock or poster board spray-mounted together to use as a sturdy backing to the magnetsOpaque white marker (necessary only if your cardboard is not white) Craft knife Metal straight edge/ruler Clear packing tape or frisk film. Step 1: Download a Photoshop file of the Polaroid frames below. Step 2: Print out photos onto photo paper. Step 4: Trim out photos with craft knife. 487 Comments. Alphabet Magnets. Now, no offense to those of you who have the traditional alphabet magnets on their fridge (you know, the brightly-colored plastic magnets shaped like letters), but don't these magnets spice things up a bit?
Tiny Terrarium Tutorial. Tinted Mason Jars in Rainbow. Mason Jar Foaming Soap Dispenser. DIY Glow Jars Tutorial. DIY Sun Jar. Colorful Wall Art. Stencil Art. Crayon Wall Art. Bird and Text Collage Wall Art. Cherry Blossom Wall Art.