
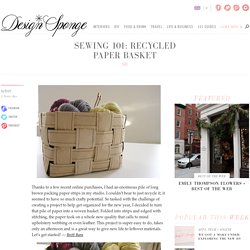
Sewing 101: recycled paper basket. Thanks to a few recent online purchases, I had an enormous pile of long brown packing paper strips in my studio.
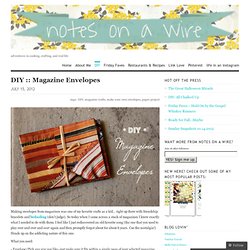
Envelopes. Making envelopes from magazines was one of my favorite crafts as a kid… right up there with friendship bracelets and bedazling (don’t judge).
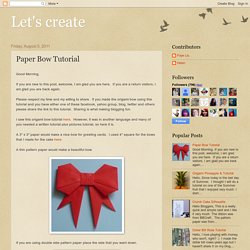
So today when I came across a stack of magazines I knew exactly what I needed to do with them. I feel like I just rediscovered an old favorite song (the one that you used to play over and over and over again and then promptly forgot about for about 6 years. Cue the nostalgia!) Heads up on the addicting nature of this one. A Bow. In gift wrap emergencies when you've got the present but need some wrapping, here's an idea for turning a magazine page into a bow.
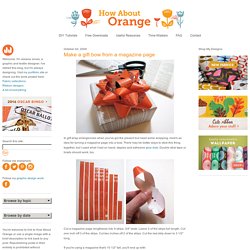
There may be better ways to stick this thing together, but I used what I had on hand: staples and adhesive glue dots. Double stick tape or brads should work, too. Cut a magazine page lengthwise into 9 strips, 3/4" wide. Leave 3 of the strips full length. Cut one inch off 3 of the strips. If you're using a magazine that's 10 1/2" tall, you'll end up with: 3 strips, 10 1/2" x 3/4" 3 strips, 9 1/2" x 3/4" 2 strips, 8 1/2" x 3/4" 1 strip, 3 1/2" x 3/4" Twist each strip to form a loop at both ends and staple it in the center.
Layer the three longest pieces on top of each other, spacing them evenly and securing each with a glue dot. Use other papers, like a map of your city. Gift Bags. When I bought something at a store recently, the clerk handed me my purchase in a bag made from a newspaper.
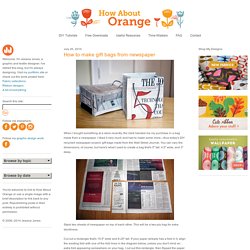
I liked it very much and had to make some more—thus today's DIY recycled newspaper project: gift bags made from the Wall Street Journal. You can vary the dimensions, of course, but here's what I used to create a bag that's 5" tall, 4.5" wide, and 3" deep. Stack two sheets of newspaper on top of each other. This will be a two-ply bag for extra sturdiness. Cut out a rectangle that's 15.5" wide and 8.25" tall. Make Stylish DIY Envelope Liners. A great way to personalize your wedding invitations, party invites, and thank you cards is to add a colorful envelope liner.
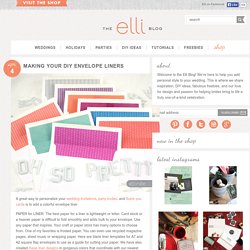
PAPER for LINER: The best paper for a liner is lightweight or letter. Card stock or a heavier paper is difficult to fold smoothly and adds bulk to your envelope. Use any paper that inspires. Paper Bow Tutorial. Good Morning, If you are new to this post, welcome, I am glad you are here.
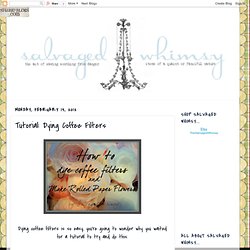
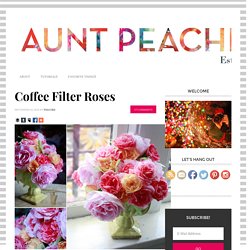
If you are a return visitors, I am glad you are back again. Please respect my time and my willing to share. If you made the origami bow using this tutorial and you have either one of these facebook, yahoo group, blog, twitter and others please share the link to this tutorial. Sharing is what making blogging fun. GoOrigami. Tutorial: Dying Coffee Filters. Dying coffee filters is so easy, you're going to wonder why you waited for a tutorial to try and do this.
What you'll need: * 1-2 packages (200-300 filters) of 8-12 cup coffee filters *large bowl *water *dye of choice - coffee, food coloring, craft paint, etc *2 large cookie sheets *oven (or lots of time) * rubber gloves (optional) Coffee Filter Rose Tutorial - Emmalee Elizabeth Design. I’ve had some requests to do a tutorial on the coffee filter roses I made for my wedding.

So here it is. Like I said they really are easy once you get the hang of them. A bit of practice and you’ll have beautiful roses in no time. The supply list is simple. You will need: floral wire 22–24 gauge white cone shaped coffee filters floral tape scissors pen Petal template (Martha Stewart and Cassie Mae Chappell have a great one, click here to download it) Trace the petal patterns onto the coffee filters and cut them out. Tip: Make sure that you keep the different petals separated. Coffee Filter Roses. Back in my failed former days as a window dresser, I got some good advice from Tanja, the Grand Dame of the cosmetics department.
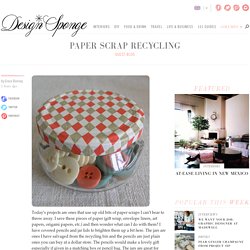
Originally from Romania, Tanja was widely renowned for her eyebrow waxing skills and had arrived at a point in her career when she only had to take one appointment a day, then happily dragged it out all afternoon. Most of the time was spent smoking and laughing and singing gypsy folk songs about beet salad, then more smoking and dispensing advice about important things like men, business, and unwanted hair. Of the many things I learned from Tanja, there are three golden nuggets that stand out; Never brush your teeth with blue toothpaste.Men with excessively bushy eyebrows are likely to cheat on their wives.Women will buy anything wrapped in roses. *Women married to men with excessively bushy eyebrows should expect a lot of roses. A week after Tanja dropped that old chestnut, my new boss gave me the task of revamping a central display table. SHAZAM! Budweiser Box Cardboard Wall Mounted Mail Holder. Paper scrap recycling. Today’s projects are ones that use up old bits of paper scraps I can’t bear to throw away.
I save these pieces of paper (gift wrap, envelope liners, art papers, origami papers, etc.) and then wonder what can I do with them? Decorative Paper Lanterns. On the Cheap: Scrapbook Paper iPhone Covers. How To Make a Secret Hollow Book: The first step into making the hollow book is to select a book. Make sure this is a book your own, and not one belonging to the library, or your family. I suggest rummaging through books at yard/garage sales. Make sure it is a hardback; otherwise you will cut all the way through the other side when you are cutting out the insides.You'll also need: Elmer's white gluea container to hold glue solution (I've chosen a film canister)X-acto knife, and/or box cutter.
Both if you have thembrush to apply glue solutionpencil/penruler, or other rigid straight edgeSelect a page that you want to be the first one cut out, and save that page to be cut out at the end. Mix a solution of white glue and water. Holding the remaining pages together, brush the edges with the glue solution - enough to soak in pretty well, but not too drippy. Allow this to dry, but use a spacer so the first couple pages, and the front cover don't get stuck. When dry, open the book to the first glued page. Happy hiding. Wind-up paper butterflies are my fave (guest post from amelia) I had a baby so I’ve invited some fave guests to take over for me while I spend time with the little guy. Today’s post is from super crafter and cute mom, Amelia of The Homebook. Growing up, I had an aunt who lived in Canada.
How to Make Leaf Skeletons. I wanted to share with you a project from one of my readers who shares with us how to make leaf skeletons. I LOVE this! I have several leafs in various forms displayed in my home and knew I needed to make some of her leaf skeletons to add to my decor. I love how a pattern of leaves can enhance the beauty in your home. So I asked Heather if she would mind sharing her project with you. You can find more great projects from Heather at her blog The Other White House. I have spent hours and tried various ways of making these. You need washing soda, not baking soda! Gather your leaves. Crayon Hearts. {Valentines day} pixelated popup card.
I‘ve been scratching my head trying to come up with a card for my hubby {AKA the non-romantic type}. I finally decided to make this pixely popup heart card! They are really minimal (which I love) and take about 20 minutes to make (that includes the card, insert and envelope). DIY : Scratcher Lotto Ticket. Tissue Paper Pom-Poms How-To. Realistic Duct Tape Rose. DIY storybook paper roses.
How to Make Paper Flowers: Peony.