
320 * Sycamore. Here are our Valentines this year, inspired by the Winter Olympics!

I did a quick design on picmonkey, then we just printed them off (free printables for you here-b&w or here-color), cut them out – there are 4 per sheet, put a tiny bit of hot glue on the back of a Rolo candy, and round mint chocolate, and then attach the ribbon and gold chocolate coin with hot glue as well. We used about 5 inches of ribbon for each “medal.” For the gold coins, check the dollar store, party stores, and grocery stores that have bulk candy.
We’re going with the black and white because hey, printer ink is expensive. Are you loving the Olympics? Betsy Speert's Blog. Eat. Sleep. Decorate. Simple Dimples. RoadKill Rescue. Letter Photo Art for Christmas! Hey everyone!
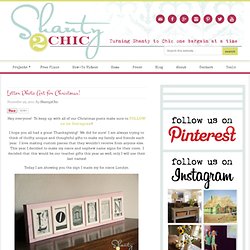
To keep up with all of our Christmas posts make sure to FOLLOW us on Instagram! I hope you all had a great Thanksgiving! We did for sure! I am always trying to think of thrifty, unique and thoughtful gifts to make my family and friends each year. I love making custom pieces that they wouldn’t receive from anyone else. Today I am showing you the sign I made my for niece Londyn. I found a GREAT flickr photo site on Pinterest. I bought 6 4×6 frames at the Dollar Tree for a buck a piece. I removed all the plastic and glass from the frames like this… I gave them all a coat of my very favorite… Rust-Oleum Painter’s Touch You can get it at Home Depot. I used Heirloom White for the frames… Here they are drying… While those were drying, I started on my wood.
I used a 2×10 for my sign. I paid $4.50 for an 8ft board and made 2 signs from it. I cut a 36″ piece and painted it Sweet Pea. While that was drying I finished up my frames. The result… What do you think? Collection: Letters. Goodbye, house. Hello, Home! Homemaking, Interior Design Blog, Staging, DIY. Metrodeco - a storm of 1930s glamour, afternoon tea, online tea shop. 320 * Sycamore. Thrifty Decor Chick. Thrifty Decor Chick. Hello all!

How was your weekend? I could not believe how cold it was here – I’m still looking at frost out my window as I type! Since we (sorta, kinda, mostly) completed the basement finishing process over the summer, I’ve held off on doing any decorating down there, just because there is SO much left to do. But I just couldn’t handle it any more – I had to throw a little something together! I’ve had all of the pieces for quite some time now, it just took a little time to make them work together. A quick back story behind this barn sale – two local ladies (Kara and Johnna) run a furniture refurbishing business called Lila’s Pockets. (By the way, I just found out they’re having another sale in a couple weeks – visit their Facebook page here if you are in central Indiana and want more info! AnyHOO, isn’t that cabinet awesome? It does have storage inside, we use it for puzzles.
Next up, it needed a lamp. Then it needed some art – and I wanted it big. Ahh, yes. So much better: Addicted 2 Decorating » WP Touch Pro Landing Page. The Inspired Room - Home Decor, Decorating Blog, Best Interior Design Blog, Homemaking. Dynamic Science Education. Under The Table and Dreaming. The Glamorous Housewife. IHeart Organizing. House of Hepworths "hoh" 504 Main by Holly Lefevre. Thrifty and Chic. DIY Faux Curled Rosewood Wreath {Made From Rolled Recycled Book Pages} I have seen various versions of Faux Rosewood Wreaths in just about every store and catalog for the upcoming season; most with a price tag running upwards of $40 or more.

Some are crafted of paper and other of real wood shavings. Last year I made a few rolled flower gift toppers from recycled book pages and they remind me so much of the curled wood roses I thought they would make a good substitute. {with a much lower price tag} Materials Needed:Foam Wreath FormRecycled Book PagesLots of Hot GlueRibbon to Hang The full step by step tutorial I posted last year can be found {here}.Basically you layer three book pages together and draw a spiral circle. Starting with the outside of the spiral, roll the paper inward to create the flower shape. Give the wreath form a light coat of white {or light color} spray paint to help camouflage any see-through spaces.
It seriously takes quite a few roses to fill the entire wreath, however I think the finished project has such a unique look. {Simply Lovely} The Shabby Creek Cottage - interior design and home remodeling on a budget. Creative DIY Tips & Project Ideas For Homemakers.