
Julia Rutherfurd
Embroidery How To Backstitch: Love Letters Thirty Handmade Days. Bird and Text Collage Wall Art. [ Close Privacy Policy ] Privacy Policy / Your California Privacy Rights Revised and posted as of March 4, 2013 Prime Publishing, LLC ("Company," "we" or "us") reserves the right to revise this Privacy Policy at any time simply by posting such revision, so we encourage you to review it periodically.

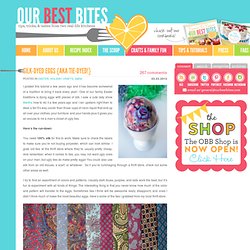
In order to track any changes to this Privacy Policy, we will include a historical reference at the top of this document. This Privacy Policy will tell you, among other things: Your California privacy rights. ACKNOWLEDGEMENT/YOUR AGREEMENT Company websites are not intended for use by individuals under the age of 18 or those who are not legal residents of the United States. Silk-Dyed Eggs {aka TIE-Dyed!} I posted this tutorial a few years ago and it has become somewhat of a tradition to bring it back every year!
One of our family Easter traditions is dying eggs with pieces of silk. Homemade Twinkies Recipe. Knitting Bee – Free knitting tutorials – Free knitting patterns. So you have just began knitting and want to learn to cast on, or you want to learn to knit cast on using beads, perhaps your pattern calls for some more advanced casting on techniques such as a loop cast on or a tubular cast on.

Whatever cast on method you are looking for you are sure to find it here! An extensive list of tutorials regarding various different cast on methods from beginners to advanced techniques. Casting On Learn to make a slip loop, a single cast on and the two-needle method. Click here for tutorial. My Wedding Workbook - Packages and Pricing. DIY Macrame Bracelet.
Growing up by the beach in Southern California, the ability to knot a macrame bracelet was practically a right of passage.

Although those days are long behind us, we’ve never forgotten the ever-so-simple square knot technique. This time, however, we’re replacing hemp and wooden beads for more updated elements like colorful nylon cord and glossy metal charms. Happy knotting! You’ll need: Start by cutting the knotting cord into two 30 inch, two 20 inch and one 10 inch lengths. Center the 30 inch cord under the two middle strands. Mad in crafts: DIY Fire & Ice Lanterns. The old becomes new: A new variation on the outdoor lantern.

We have had an unusually warm winter in Michigan this year, and while the temps have been nice, I have had to hold off on this project idea until we got a cold snap. We finally got some snow and cold earlier this week, so I was able to try out this fun winter project. Wedding Seating Arrangement: Ideas On Place Card Holders And Seating Cards. Stay Updated to the Latest Blog Post!

SUBSCRIBE NOW FOR FREE! Prior to organizing your wedding seating arrangement, see to it that your wedding guest indeed confirmed their attendance from the wedding invitation that you sent out. In the event, some of your party guest haven’t made it to the RSVP deadline, do get in touch with them and let them know that you need confirmation before finalizing your wedding plan. Part of the thrill of a delicious meal being served at the reception is the visual ambiance of your party celebration. A crucial factor as well is the location where the wedding party guests must be seated in order that they don’t have to move in and around every single table to get their seat. Table place cards really are a necessity to be certain that your wedding guests sit at the right table and have the appropriate meals.
Two Ways For A Sleek Seating Arrangement 30 Wedding Ideas On Place Card Holders And Seating Cards 1. Smocking a honeycomb texture. Self-watering planter from found dresser drawers. Materials:*- (3) found dresser drawers ***Before you get the other materials, take careful measurements and know what you're working with. The length and width of any drawer determines the size of the screen/basket(s) you'll need; the height of the bottom drawer determines the height of the ABS pipes, etc. - 1 piece of 2" diameter PVC pipe (length should be the total height of all drawers stacked, or slightly longer)- 3 pieces of 3" diameter ABS pipe (about 1/3 of the total height)- 2 plastic baskets (or something stiff and porous enough to serve as a nontoxic, waterproof, weight-bearing screen)- outdoor stain & sealant combo wood finish, or paint for waterproofing- brush- wood glue- drill- utility knife- wire, string, or cable ties- landscape tarp, opaque plastic bag, or river rocks- potting mix- fertilizer- plant(s) or seed(s) *from the hardware store, .99 store, nursery, your local curb, or the Craigslist free section.
Giant paper flowers from ruche. You may remember the wedding of our lovely D*S contributor Brittany Watson Jepsen.

Her huge paper blooms made such a splash that she started selling them in her shop, and just recently Brittany wrote a great article for Brooklyn Bride about the paper flower trend. I’m thrilled that this is a growing phenomenon; I adore anything made in exaggerated scale, so I feel that the more giant flowers and plants there are in the world, the better. Could you get mad at these faces? Just images of some precious, adorable little bastards with which to warm your very heart and soul today. Now if you’ll excuse me, I have to go punch several surrounding walls just to feel manly again.
Last two images via ( Daily Puppy ) Before & After: Crazy Beautiful Toy Kitchen. 23.2K Flares23.2K Flares × LOOKING for more DIY play kitchens?

Click here for a roundup with lots more projects, photos and ideas, including a DIY toy workbench for a little boy! And if you like this post, Subscribe to Green Your Decor for more DIY projects and green ideas! Cupcakes. All natural red velvet cupcakes Since last year, when I posted my all natural red velvet cake, which I made without red food dye, dozens of people have tried my recipe.

For some, it worked well, and for some, it did not. Making a cake is hard enough without the addition of carefully balancing the pH levels, and it seemed everything affected the outcome of the color, whether it was the type of flour used, the type of cocoa, fineness of the ground beets, and on and on and on. People in Europe, for some reason, had the most difficult time with it, and I have yet to hear of a reader across the Atlantic who got a red cake at the end of it. caramel filled hi hat cupcakes Or pure sugar.
Though I had trouble eating these with all their sugar, I must have had at least four of them. Bake sale week: chocolate mini bundts I own a mini bundt pan. Vanilla bean cupcakes with strawberry buttercream. Top 20 Skinny Recipes For 2011. Whew, the Holidays are almost behind us, I can finally exhale and slow down for the next few days and reflect about what a great year it has been for Skinnytaste and myself in 2011. When I started this blog back in 2008, it was just a hobby that I really enjoyed. Never in my dreams would I have imagined what was to come. In March of 2011, I left my full time job and career in the city which allowed me to give my 100% to Skinnytaste and spend more quality time with my baby.
Mingmakescupcakes.yolasite. Chocolate Pudding Teacups. Christel Shoes. Pasta Pie. Cheesy, delicious and impressive Pasta Pie will have your family and friends amazed by your effots.

Believe it or not, it's simple to put together. Give it a try. The Tea Room www.thetearoom.com.au. Her new leaf. Little guiding stars. DIY - MAKE YOUR OWN WAX FOR HAIR REMOVAL.
Getting started. Jamaican Banana Fritters - ThatsSoYummy.com. There’s a thing in my house that when you have ripe ol bananas either you make banana bread or banana fritters. These delicious tasty treats can be eaten morning, noon, or night, as a snack or as dessert. Homemade nutella. Felt Baby Shoes.