
Tutorial: How to make clay rollers & stamps........... Polymer clay tutorial. On request of one of my russian blog readers I made a quick tutorial on how to make coin beads.We'll be making these beads: Start with measuring out equal amounts of scrap clay for each bead core.
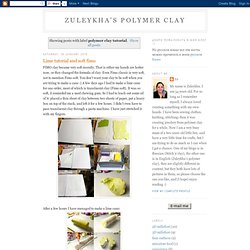
Roll scrap clay into balls. Roll out a very thin sheet of pretty clay, which will be a background for your canes' slices. In order to get millefiori beads all of the same size, you have to be sure that at each step you add the same amount of clay: same size of a bead core, same size of a background wrap clay, same amount of canes' slices on each bead. Wrap a bead core into a background clay sheet. Pinch the ends of pretty clay, hiding scrap clay. Roll bead into a ball. The ideal spherical shape of the beads is not necessary at this step. Slice your canes. Put equal amount of cane slices on each bead. Roll bead into a ball, trying to make it as spherical as possible this time. Now beads are ready to be turned into coins: Prepare a surface for flattening the beads.
Put your beads between the tiles.
Make Your Own Colourful Polymer Clay Necklaces. Polymer clay necklaces are bang on trend and you can easily make your own to match your outfit or mood.
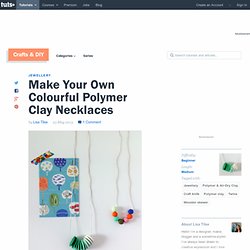
They also make really brilliant gifts. In this tutorial you'll learn how to make an ombre disc necklace and a colourful bead necklace. Read on for the how-to. Supplies Polymer clay.Craft knife.Skewer.Baking paper.Oven tray.Oven.Twine or leather thonging. 1. Step 1 Lay a piece of baking paper on your work surface. You'll need green (or any colour of your choice) and white polymer clay.
Cut a few pieces measuring roughly 12mm (half inch) square from both colours. Keep one piece of each colour intact, and cut the remaining pieces in to increasing increments, as demonstrated in the photo below. Step 2.
DIY Mokume Gane Texturized Effect. PoLEIGH Talking - Skinner Blend 1. The Skinner Blend has become one of the best tools we have for shading our work with Polymer Clay!
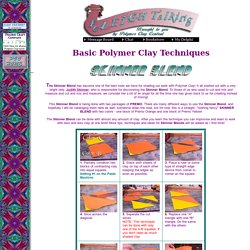
It all started out with a very bright lady, Judith Skinner, who is responsible for discovering the Skinner Blend. To those of us who used to cut and mix and measure and cut and mix and measure, we consider her a bit of an angel for all the time she has given back to us for creating instead of mixing! This Skinner Blend is being done with two packages of PREMO. There are many different ways to use the Skinner Blend, and hopefully I will be cataloging them here as well, sometime down the road, but for now, this is a straight, "nothing fancy" SKINNER BLEND with two colors - one block of Premo Orange and one block of Premo Yellow! The Skinner Blend can be done with almost any amount of clay.