
Create a Mobile Phone Music Player Interface. In the following tutorial you will learn how to create a mobile phone music player interface.
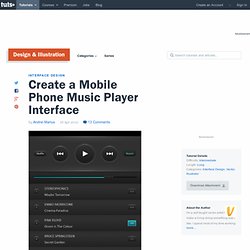
We'll build the interface using pixel perfect alignment, quality vector shape building techniques, as well as gradient and lighting control. Step 1 Hit Command + N to create a new document. Enter 640 in the width box and 960 in the height box, then click on the Advanced button. Select RGB, Screen (72ppi), and make sure that the Align New Objects to Pixel Grid box is unchecked before you click OK. Create a Christmas, Knitted Text Effect in Adobe Illustrator. In the following steps you will learn how to create a knitted text effect in Adobe Illustrator.
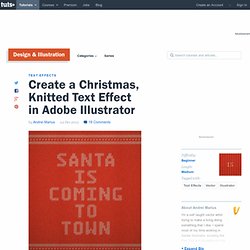
For starters you will learn how to setup a simple grid and how to create a set of art brushes. Next, using these little brushes, some basic grouping techniques and two Transform effects you will create the main knits. Moving on, using a bunch of Transform effects and a simple rectangle you will create the knitted background and text. Finally, taking full advantage of the Appearance panel and using two raster effects along with some basic blending techniques you will learn how to add the subtle fabric texture. 1. Hit Control-N to create a new document. Enable the Grid (View > Show Grid) and the Snap to Grid (View > Snap to Grid). Creating an Environmentally Friendly Green Type Treatment.
Create a Set of “Almost Flat” Modern Icons in Adobe Illustrator. With this tutorial I would like to show you a few tricks on creating clean lines and edges when working with the flat design trend, in Adobe Illustrator.
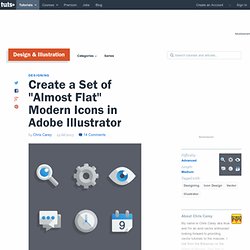
Simple layered styles and reusing Graphic Styles to help your workflow are most efficient, so you should be able to create a set of matching icons in no time. 1. Setting Up Your Document To start, let's create an art board that is 500 x 500px. Since our icons are rather module and have a lot of straight lines it would be best to work with a grid to ensure perfect pixel crisp shapes. 2. While making your icons try to keep in mind the use of the icon itself and where it will be placed. Step 1 I'll be creating the wireframe of these icons with basic shapes then adjusting the style of the shapes using a handful of Graphic Styles.
Step 2 Next, select the Ellipse Tool (L) and create several concentric circles. Step 3 Select the Rectangle Tool (M) and draw a few that cover half of the shapes we just created. Create a Vinyl Record Player Icon in Adobe Illustrator. Create an iOS 7 Inspired Flower Icon Using the Rotate Tool. Here are a few quick tips for rotating objects in Adobe Illustrator.
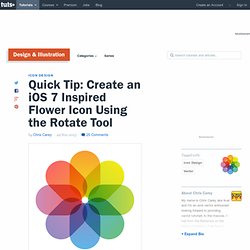
We'll be using these tips to recreate the new Photos App Icon in iOS 7. 1. Set Up Your Document. Create a Forest Scene with Livebrush. For this tutorial, we'll use Livebrush's innovative motion brush feature to create abstract shapes.
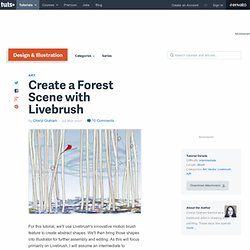
We'll then bring those shapes into Illustrator for further assembly and editing. As this will focus primarily on Livebrush, I will assume an intermediate to advanced knowledge of Illustrator. If you haven't seen the Introduction to Livebrush, you might want to read that first. Let's get started!
Step 1 When you first open Livebrush, a new project is started by default. Step 2 Since we're going to draw strokes in Livebrush for export to Illustrator, we can get rid of the parchment "Paper" layer. Step 3 The pre-set brush styles can be modified in infinite ways. When you select it in the Styles palette, you'll see the three-tabbed Tool Settings palette below it. Create an Alphabetti Spaghetti Text Effect in Adobe Illustrator.
Create a Summer Inspired Stroke Art Typography Piece using Sketch. In this tutorial I will show you how to create a trendy typography piece using only strokes and flat colors.
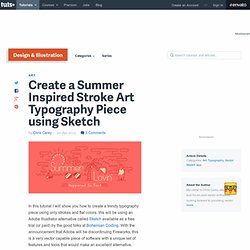
We will be using an Adobe Illustrator alternative called Sketch available as a free trial (or paid) by the good folks at Bohemian Coding. With the announcement that Adobe will be discontinuing Fireworks, this is a very vector capable piece of software with a unique set of features and tools that would make an excellent alternative. With this tutorial I will try to use as many basic tools and features as possible so you can better acquaint yourself with this (possibly) new software.
How to Create a Clear and Concise Brand Identity Guide. Today we’re going to talk about creating a Brand Identity Guide.

You’ll learn why it’s so important to have, and how to create one. This guide can be applied to a company, theme, client website or anything that requires brand consistency. So let’s get started! Why a Brand Identity Guide is Important If you’re wondering why an identity guide is important, then you may as well be wondering why you should even have a website. The reason you need an identity manual are as follows: To stay consistent without distorting the brand It will improve your marketing efforts and show that you’re confident You’ll understand you’re own tone, expression and character better. Sometimes you’ll hand your project off to someone else who knows nothing about your brand. Make sure that anyone who’s involved with your brand studies and understands the Identity Guide, you’ll be much happier for it. Creating An Elegant Looking Resume With InDesign. This tutorial show you how to create a modern looking resume with Adobe InDesign.
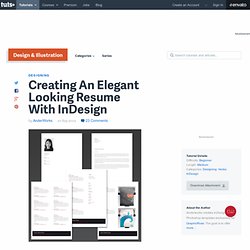
You will learn how to create paragraph styles, how to set a baseline grid and how to import and place images. Let's begin! Step 1. Create a Sticky Summer Typography Printable Poster in Illustrator. In this tutorial I would like to show you a few techniques on how to create a typography poster perfect for closing of summer.
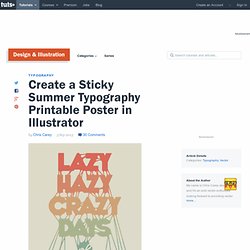
We'll be editing a pre-made font, adjusting a pre-made pattern and using quick and easy techniques to turn a simple illustration into a beautiful poster. 1. Set Up Your Document. Create On-Trend Flat Type with a Nautical Theme in Adobe Illustrator. Nothing beats the beauty of painstakingly crafted hand lettered type but not all of us have the patience or ability to create such lovely letterings. With this tutorial I hope to show you a few techniques you can use to adjust pre-made fonts and break them apart to create your own masterpiece in Adobe Illustrator. For this tutorial I will be using some fonts that you can find at the following locations: Tip: Please be aware that you may have to install fonts before you open Illustrator in order for it to show up in your list of fonts. 1. Create a New Document The size of your document for this project is entirely up to your purpose with the finished product. 2.
With our document created let’s begin by creating the background of our piece.