
Hat Size Chart for Preemie through Adult {Free Printable} Free Patterns: The Moogly Crochet Alphabet. The Moogly Crochet Alphabet has been a labor of love!
So many letters, some easy, some a challenge, but all fun! These applique letters are great for the Perfect Party Pennant Garland, but they have unlimited uses. Monogram a blanket, make toy blocks, make puffy letters for beginning readers, decorate a child’s bedroom – you name it! And there are crochet number patterns available now too! Click below for the coordinating free applique patterns: The specific yarn weight and hook size doesn’t really matter for these, as long as you use a hook size a couple sizes smaller than you normally would for that yarn. The Moogly Crochet AlphabetAdd this pattern to your Ravelry Queue US – F, 3.75mm hookWorsted weight yarn, amounts varyVideo Tutorials for all stitches and techniques are available here.Klik HIER voor de Nederlandse vertaling van de Moogly Alfabet, met dank aan Elke Wellens!
THE LETTER A (This one is particularly tricky! Row 1: Ch 30, sc in the 2nd ch from hook, sc in the next 12 ch. How to Get a Straighter Seam Working HDC in the Round. When making a hat my preferred stitch is the half double crochet; the only problem with working hdc in the round is the running or diagonal seam that is created when rounds are joined.
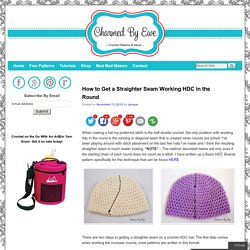
I’ve been playing around with stitch placement on the last few hats I’ve made and I think the resulting straighter seam is much neater looking. *NOTE* – The method described below will only work if the starting chain of each round does not count as a stitch. I have written up a Basic HDC Beanie pattern specifically for this technique that can be found HERE. There are two steps to getting a straighter seam on a crochet HDC hat.
The first step comes when working the increase rounds; most patterns are written in this format: {make 2 hdc in first stitch, hdc in next stitch} repeat around Since the HDC naturally slants to the right, working increases at the beginning of the set is going to accentuate the slant, so you will want to reverse the instructions, placing the increase at the end of the set like this: StitchinCrochet™ ASHLEY pdf de modèle châle au crochet par BernioliesDesigns. Biscuits and Jam. Kati Crafts. Abbreviations: Materials: Yarn: I used Novita’s crochet yarn for this particular rose.
The yarn is 100% mercerised cotton. (You can pretty much use any yarn you wish.) I find that a rather thin yarn works best. Hook: Depending on thickness (weight) of your yarn, use whichever hook suitable. And a needle to stitch it all up! Instructions: Note 1: You can either leave a long tail of yarn at the start or at the finish of the rose (or both ends), to stitch the strip of petals together. Row 1: Make as many chains as you wish, in order to create a rose the size you wish. For this example rose: make 118ch.
(You should have 39 V-shapes at the end of row 1.) Row 2: First 3ch (counts as the first dc). Row 3: This is the row that creates the final petals. Start row 3 straight away with double crochet stitches after turning, working the double crochet stitches into the 2-ch spaces, and then attaching each petal to the next 2-ch space with a sc. Assembling the rose Right side up: Wrong side up: Alterations: Tallulah Tassel Hood pattern by CassJames Designs.
Autres. Trucs. Vieux projets. Classique. Pantoufles.