
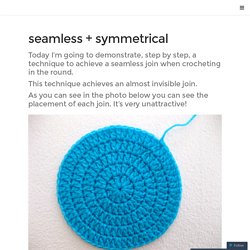
Crochet Instructions - Crochet basics and Crochet abbreviations. Seamless + symmetrical. November :: mystery crochet project Hooks at the ready!
Let's get started with this month's mystery crochet project. To make this project all you need to know how to do is to make a basic granny square. Don't worry if you're just starting out and you are more of a beginner, this post has been… With 43 comments Wool-Eater CAL 2012 Effective, textured, an absolute show-stopper the Wool-Eater has become a favourite among many! With 225 comments Wool-Eater Motif CAL 2013 In 2012 we hooked a square or oblong Wool-Eater . . . 2013, and I thought it would be nice to hook a Wool-Eater Motif Blanket! Invisible Decrease. Invisible Decrease Link easily to this tutorial in your patterns: www.planetjune.com/invdec If you’ve been making amigurumi, you may be lamenting the gap or bump that forms when you decrease.

The standard methods of decreasing are to sc2tog, which can leave a bit of a bump and a small gap, or to skip a stitch, which leaves an obvious gap. Tutorial: Tie It Off and Hide Your Tails. I can hear you all now ..

Do we Really need a tutorial for how to Tie Off our projects!? Yeah .. maybe. Cause I know how to make it Invisible. I’ve got a picture of the standard cut and tie off to go here .. but my camera just told me that its battery is dead so I will have to add this soon as I get it charged. See the knot? Now Hide Your Tail. I can fix that :D Complete your Final Stitch. Look at your Perfect Edge! Can you see any knots? Toss the piece in the air and let it fall will-nilly. Now Hide Your Tail! Weave in the ends .. No, I don’t have a magic solution or technique to make this ‘go away’. You’re going to either thread a large needle and weave the end /tail between your crochet stitches, thus hiding your tail. My tips for Effective Tucking of Tail? Never hide a Straight Tail. Any hook, that is smaller than the size you worked your project with, will slide through the stitches better for hiding tails. Crochet Loop Stitch (right-handed version)
How to Crochet the Crocodile Stitch: Video and Photo Tutorial. The Crocodile Stitch, aka the Scale Stitch, is the most requested video tutorial on the Moogly Facebook page – and you all know how I love to take requests!

But I decided to take it one step further, and include not only a video and written instructions, but a photo tutorial as well! There are a variety of ways to make the Crocodile Stitch, and I’ve attempted several of them myself. What I show here is the method that I believe is easiest. Even so, this is definitely an advanced stitch. You should be comfortable with both double crochet and post stitches before you start with the Crocodile Stitch. Video Tutorial: How to Crochet the Crocodile Stitch Written Instructions and Photo Tutorial for the Crocodile Stitch This pattern for the Crocodile Stitch is worked best in a multiple of 10 plus 1.
Row 1: Ch to desired length (see note above). Row 2: Ch 1, and start working into the first pair of dc sts, skipping the single dc if that was the last st of the previous row. Tunisian Crochet How-To… Basic Tunisian Crochet Stitch. Welcome friends!
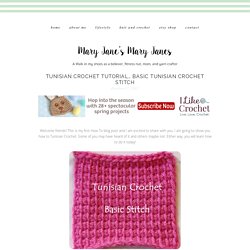
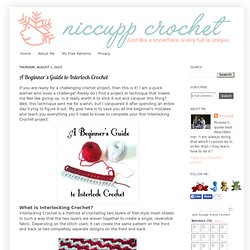
This is my first How-To blog post and I am excited to share with you. I am going to show you how to Tunisian Crochet. Some of you may have heard of it and others maybe not. Either way, you will learn how to do it today! Tunisian Crochet is a fabulous way of mixing crocheting and knitting. A Beginner's Guide to Interlock Crochet. If you are ready for a challenging crochet project, then this is it!
The ultimate finish for amigurumi. Would you prefer to see the video tutorial demonstrating this method?

If not, read on: I’ve written before about how there are several ways you can finish off a closed piece in amigurumi, and there’s no one ‘best’ method for closing that remaining hole to give the neatest finish. I’d like to officially change my opinion on that point! Here are my previous results: Since I wrote that post, I’ve been doing more experimenting, and I think I’ve finally found the definitive method to give the best possible finish to a closed piece in amigurumi. Where’s the hole? (Of course, to get the best finish, you’ll also want to use the Invisible Decrease instead of sc2tog for all your decreases – but that goes without saying, right?) Ultimate Finish for Amigurumi The almost-finished stuffed piece, with 6 sc remaining: Cut the yarn, leaving a long yarn end.
You’ll be using the front loops only for the next stage; those are the loops that are furthest from the hole: The Magic Adjustable Ring: A Better Way to Begin Crochet in the Round.