
DIY: Beaded Appliqué Headpiece. Things you need for this DIY:❂ an appliqué, I used this one❂ unfinished chain (if your chain is finished, you can use jump rings)❂ pliers❂ glue Total time: 15 mins.

So easy! First, cut a length of chain that is the circumference of your head. Then cut a length of chain that fits over the middle of your head (front to back). Attach it to the circle at opposite ends. Lay the "T" of the chain onto the appliqué. Glue along the chain. And done! DIY Stitched Hat. If I had a nickel for every time my mom has warned “the sun is not your friend,” I could retire tomorrow.

Honestly. Instead, my closet is full of sun hats, fedoras, cowboy hats, visors, and various other sun shielding apparati. While it may not suffice as an alternative to sunscreen, kudos to Lola Ehrlich for transforming a simple straw hat into a chic stitched fedora and inspiring us to add a little pizzaz to one of our many hats! Supplies List Start by cutting the ribbon or band off the hat. Pull the thread through the back side of the hat, leaving an inch of slack. Using the brim as a guide, start stitching along the edge of the hat.
Pick another color and stitch several rows along the band of the hat. Give it some character by adding a little something along the band . . . why not? Your stitched fedora is finished! (top photo from here, rest of images by Honestly…WTF) Gorgeous! Sparkling Accessories for Your Next Formal Affair. Finally, bedazzling is cool again!

No, seriously. We’re not talking about bright pink and blue gemstones here – we’re talking about gorgeous sparkling accessories that call on earthier tones, rich textures, and a bit of romance. Each of these three accessories is the perfect thing to take that little white sundress to a way more formal level, whether you’re heading to a springy cocktail party or getting married to the person of your dreams. Materials:- 1/4 yard off-white, sage, or gray tulle – 1/4 yard off-white muslin – gold mini ball chain – silver mini ball chain – copper chain – gold chain – gold seed beads – silver seed beads – acrylic rhinestones – printable necklace template Tools:- needle nose pliers – dowels or kebab sticks (for dabbing glue) – scissors – E-6000 craft glue This project is definitely on the more time intensive side. 1. First, print out our necklace template and trace it onto your muslin.
You can also surround the rhinestone with seed beads using the same method. DIY Spike Comb. We first fell in love with Jennifer Behr‘s dinosaur headbands after seeing them on the runway at Fendi. Then, we crushed hard on this Maison Michel metal spiked hair comb spotted on Elena Perminova in Paris. Perhaps we can blame our attraction on our stegosaurus obsession (yes, this is true). Or it could simply be because these spiked hair accessories are so badass and bananas (also true). Either way, a DIY was definitely in order. You’ll need: Start by adding a small amount of liquid super glue to one end of the comb. Glue another spike to the other end of the comb. Continue glueing each spike, alternating from one side to another. Stick the spiked comb in a bed of teased and tousled hair! Wire Birthday Crown DIY. I spotted a darling little crown via Pinterest so I whipped one up for Kai the day of his birthday. 7!
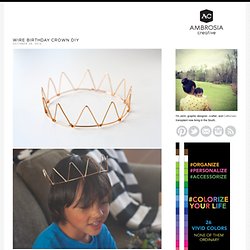
Wow he’s grown! And looks so much like his younger siblings here. You will need: 12 gauge gold jewelry wire Wire cutters Pliers Sticky-back felt to cover up plier teeth Ruler E-6000 Clear Craft and Jewelry Glue Step 1: Measure size of your child’s head. Step 2: Gently straighten a length of wire sized to your child’s head. Step 3 (optional): If you’re using non-jewelry pliers like me, you may want to stick some felt over the teeth. Step 4: Form the crown base into a circle with your long piece of wire you just cut out.
Step 5: Gently straighten out some fresh wire from off the roll. Step 6: Bend this metal in half (I used my ruler to get the exact middle) against your thumb fingernail. Step 7: With pliers, bend the ends up about a 1/4 inch and spread out the point ends about 2 inches apart. Step 8: Attach crown points to base by hooking the bent ends under the base. 14 Comments.