
Transferir imágenes con cinta adhesiva. Con este tutorial aprenderás a transferir fácilmente imágenes de un soporte a otro.
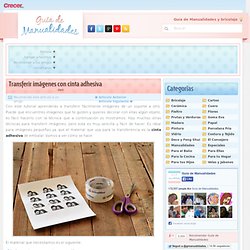
Puede que encuentres imágenes que te gusten y quieres decorar con ellas algún objeto, es fácil hacerlo con la técnica que a continuación os mostramos. Hay muchas otras técnicas para transferir imágenes, pero esta es muy sencilla y fácil de hacer. Es ideal para imágenes pequeñas ya que el material que usa para la transferencia es la cinta adhesiva de embalar. Vamos a ver cómo se hace. El material que necesitamos es el siguiente: Imágenes impresas con impresora láser.Cinta de embalaje transparente.Tijeras.Un recipiente con agua.Adhesivo en spray. Cortamos la cinta de embalaje en una tira un poco más larga que la imagen que deseamos transferir, para poder trabajar más cómodamente.
Pasamos el mango de las tijeras o cualquier objeto duro sobre la cinta para conseguir que la cinta se adhiera perfectamente al papel que tiene la imagen impresa. Vía: lilblueboo. Great idea. DIY Hand Stitching, part 1 - Leigh-Ann. One of my favorite crafts is hand stitching-- it's fun, addictive, expressive and relaxing :) Over the next few weeks, I'm going to share easy ways to make your own patterns for hand stitching along with some tips and ideas :) These are some samples of my past projects-- I like to draw patterns freehand and use my handwriting.
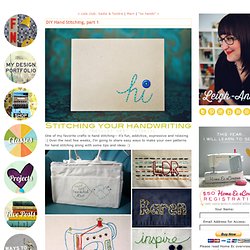
However, sometimes I adapt clipart type images to make a more complicated pattern, like the sewing machine or I just stitch the outline of an image I love, like the Goonies "Hey You Guys" silhouette :) I use a Back Stitch for all my hand stitching because it's very versatile and I like the look but you can use any combination of stitches for your projects... there's lots of fun ones! Today, we're going to start with handwriting & transferring your pattern :) You will Need: - Card-stock or Thick Paper (I cut a piece of 6x8" card-stock & folded it in half to create a greeting card) - Needle & Scissors - Embroidery Thread - Scrap Paper & Pen - Thumbtack or Piercing Tool.
{Valentines day} pixelated popup card. Woven gift-wrap // pastel edition ^_^ By Kate on August 8, 2012 I noticed that the woven gift-topper I made last year was doing the rounds again on Pinterest so I thought I would make an updated pastel version (pastels seem to be the new neon at the moment).
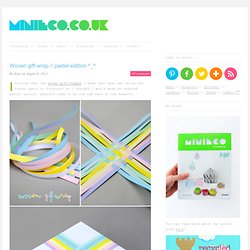
I bought some quilling strips (0.5cm) to use this time which reduces the labour by about half (I’ve also been working on some more intricate woven ‘things’ for another project…more to come soon). Anyway check out the previous post if you want full instructions. Above: Mischevious hands – the unseen backdrop in all my photo’s ^_^ While I took photos today my boys were making their own presents by wrapping boxes in newspaper. Finally, the font used on these images is called soymilk and it’s free to download …yay! 101 Simple Handmade Gift Tutorials. Gift Ideas for poor creative souls (6) You know how it goes, a friend calls you and invites you to dinner at the last minute.
OMG! What gift can you take?! You scrabble around the cupboards trying to find a box of chocolates or a bottle of wine but find that most of the chocolates have been eaten and the wine has gone. {Everything} In A Jar – Handmade Gifts. With just a little over 10 weeks until Christmas, it is already time to start thinking about gifts! The more gifts that can be taken care of ahead of time, the easier the holiday season will be. I came up with a really fun idea that can be customized to pretty much any person or occasion called: {Everything} In A Jar Today, I am going to show you the ones I made for teachers!
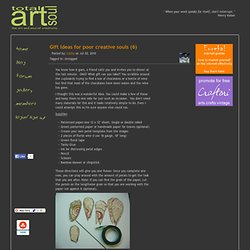
Teachers spend so much time at school so I tried to think of items that could be used at school. {energy} in a jar Peanuts White Chocolate Hot Drink Mix Suisse Mocha Latte Mix White Chocolate Macadamia Nut Energy Bar Milk Chocolate Truffles. 39 DIY Gifts You'd Actually Want To Receive. DIY Party Animal Candles. Hi there, it’s Jenny from Hank + Hunt with a fun and super easy diy today!
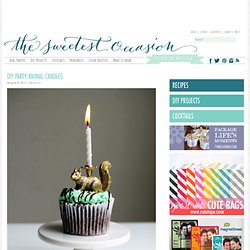
As soon as I thought of making these I got a huge kick out of naming them Party Animals. Hilarious, but if you hear groaning…it’s coming from my house. Regardless of how cheesy the name is, these turn out awesome. Your kid’s favorite animal holding that birthday candle minus those red eyes that are oh so typical for plastic creatures, awesome. Supplies - plastic animalsplastic candle holdersdrill with 1/8″ drill bitpliersgold spray paint For the plastic animals, you can use any kind you can find. Hold the animal with the pliers and drill a hole straight down, being careful not to pop out the other side.
Spray paint the animals in a few light coats, rotating them to cover all sides. I also painted the candle holders to match. That’s it. {Photos by Hank + Hunt for The Sweetest Occasion.}