
Blog Archive » easiest knitted sweater zipper install ever. One of the more dreaded knitting finishing techniques is installing a zipper.
I admit it, I’ve never been a fan either. There are multiple helpful zipper tutorials out there, and I’ve used a few of them. I always came back with the same issue though; you lay out the sweater, you center the zipper underneath and try to baste in the zipper. The problem is as soon as you pick up a piece of knitted fabric, it does what knitted fabric does. It stretches and drapes and wiggles out of that straight taut line. I think I’ve found a solution though. Sweaters and then I used it again last week finishing Pump Jockey. Hold on while I blow your mind at the simplicity. Blocking wires. Chainless Foundation Single Crochet. Crochet bind off. I can't stand to watch Icarus continues to drag along.
I've working out why it's making me batty. The yarn is fine enough that I can't "feel" what I'm knitting, so even thought the pattern is simple right now, I can't just zoom while I watch TV or read. I have to watch every stitch to make sure that everything goes as planned. I don't mind this when there is tons of intrigue in the knitting... like with patterned yarn overs and charts, but it turns out that if all I have to do is watch plain columns develop, I can't stand it. Tutorial: Invisible Provisional Cast-on.
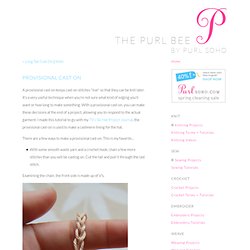
Here’s a little photo tutorial on how to do my favourite provisional CO, the invisible CO.

A little background: there are a few different methods of provisional CO, all with the same goal – to provide a starting point for your work, and to leave your first row of sts on a strand of waste yarn which can be easily removed, so that you can put the bases of your sts back onto a needle and either knit in the opposite direction or simply BO. This is really useful for a number of reasons… if you want both ends of a scarf to match, you could start with a provisional CO, knit to the end, BO, and then go back to the beginning, unpick your provisional CO and use the same BO.
That’s just one example; there are many more. Provisional COs are really, really useful in lace-knitting, too. A very handy skill to have in your bag of tricks! The crochet provisional CO is very widely known, indeed, it was the first one I learnt. So, here we go. Then bring your needle over the main yarn: Like this: 2x2 Invisible Ribbed Bind-Off. Tutorial: Sewn Kitchener Rib Bind Off. Don't forget the Sneaky Sale is still on!

Through Saturday, June 6, 2009, take 15% off your $15 or more purchase at Designs by Romi. Enter coupon code CLIP at checkout! Meet my new favorite bind off! I've been meaning to try this bind off ever since seeing it in Katharina Buss' Big Book of Knitting. Once I had done it, I modified it to work in the round, and it is my new favorite bind off for an edge where you need extra stretch. 1. 2. 3. We'll be starting with the first two stitches of the round. 4. Pull yarn tight. 5. The knit stitch is still on your first needle. 6. 7. 8. 9. 10. Italian cast on. Cast On: Provisional. A provisional cast-on keeps cast-on stitches "live" so that they can be knit later.
It's a very useful technique when you're not sure what kind of edging you'll want or how long to make something. Adding a new ball of yarn in the same color. Today: "Joining yarn," or "What to do when you're at the tail end of the old ball of yarn, and you need to add in a new ball of the same color.
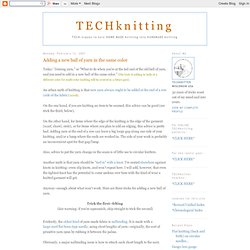
" (The trick of adding in balls of a different color for multi-color knitting will be covered in a future post). An urban myth of knitting is that new yarn always ought to be added at the end of a row (side of the fabric) (scroll). On the one hand, if you are knitting an item to be seamed, this advice can be good (see trick the third, below). On the other hand, for items where the edge of the knitting is the edge of the garment (scarf, shawl, stole), or for items where you plan to add an edging, this advice is pretty bad. Working in ends on multi-color knitting. Several readers have e-mailed recently, asking how to work in ends.
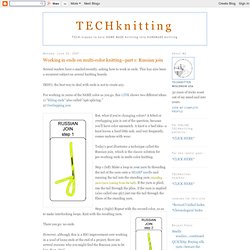
This has also been a recurrent subject on several knitting boards. IMHO, the best way to deal with ends is not to create any. For working in yarns of the SAME color as you go, this LINK shows two different ideas: 1) "felting ends" also called "spit splicing. " 2) Overlapping join But, what if you're changing colors? A felted or overlapping join is out of the question, because you'll have color mismatch. Today's post illustrates a technique called the Russian join, which is the classic solution for pre-working ends in multi-color knitting. Step 1 (left) Make a loop in your yarn by threading the tail of the yarn onto a SHARP needle and running the tail into the standing yarn (standing yarn=yarn coming from the ball). Step 2 (right) Repeat with the second color, so as to make interlocking loops.
BACK to the back join. The back join (subject of a previous post) is a method for working in the tails AS YOU GO in multi-color knitting.

The back join is NOT confusing, but judging from the e-mails in the TECHknitting in-box, the first post about it WAS confusing. It would be a pity to obscure such a useful technique with badly-written instructions, so here's another run at it--with an additional illustration showing the back join as it is being knitted. The back join (one more time) How to Join Yarn: Russian Join Method. Weaving in Ends. I have some good news.

And, I have some bad news. Good news first: there is no one right way to weave in your ends. So, chances are, you haven’t been doing it wrong! Provisional crochet cast-on. Thank you all so much for the kind comments on my little cutie.

He is an amazing person and I am learning so much from him. So now that he is the ex-Dr. Destructo, what nickname shall I give him here? Any ideas? Let me know, 'cause I am fresh out of cleverness, I'm afraid! Onward. :) This past weekend, I took a Busman's Holiday of sorts. What I can show you, however, is my favorite provisional cast on technique: crocheting onto a knitting needle. To begin, choose a smooth cotton yarn. With a crochet hook, chain two or three stitches. Next, lay a knitting needle alongside the hook and wrap the yarn over both needle and hook. Pull the yarn through the loop on the crochet hook. Www.queenkahuna-creations.com/kitchenerstitch_socktoes.pdf. k1p1 invisible bind-off tutorial « crankygrrrrrl. This being my first real adventure in toe-up socks, i was a loss as to what bind off to use. sensational knitted socks didn’t have a recommended bind-off (did it?) …and i’ve read enough blogs to know that i needed something stretchy. a quick google search didn’t turn up much, although i did rediscover laurie b’s toes and heels webpage (it’s a fantastic collection of links for different toe and heel techniques…thanks!).
Sideways Edge Cast-On, a knitting unvention! plus, Swerve! So I just released a new pattern (Swerve!) And you’ll notice how the cuffs and hands are knit in opposite directions (or, perpendicular directions really) – but hey guess what! There’s no picking up stitches and no seaming! Picking up along a garter edge. Pick-up Lines. Perfecting the Perpendicular Join. The photos below show closeups of two entrelac joins done with the same needles and the same yarn by the same knitter (me). The first photo shows one common way to join two pieces of knitting in entrelac. The beige piece was knitted first, and the green piece was joined, every two rows, by working a ssk, using the last stitch of a right-to-left green row and a free loop from held beige stitches. For a neater join, the first stitch of the return left-to-right row is slipped, with the yarn in back.
Notice that there is beige showing through the green stitches. This show-through, also called grinning, is pretty inevitable when you are forming a decrease (ssk) with two colors of yarn. Perpendicular Pickup on Stockinette. In a previous post, I described how to join knitted pieces at right angles to each other, in such a way that the join is as neat as possible.