
Tumblr_n6o91phmYv1sqz9quo1_500. DIY charm braclet. Fredag, 27 juli 2012 Her får I DIY indlægget som lovet til at lave et farverigt armbånd af kun to dele!
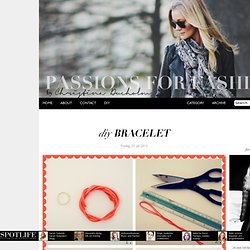
Det er meget nemt at lave og ovenikøbet også super billigt! Jeg synes selv det ville være en fin og personlig gave at give til veninderne eller som værtindegave! :) Jeg har som sidst prøvet at vise hvordan jeg har gjort trin for trin, men I spørger bare, hvis der er noget I er i tvivl om. Det er ret vigtigt, hvilken vej I binder knuderne, så de lægger sig flat ned mod armbåndet! Hvad man skal bruge: SaksTændstikkerLineal/målebånd Hi guys! Chain & safety pin braclet. How to Make a Fork Bracelet. How to Use Key Rings, Washers & Lace to Make Chic Accessories - Brit & Co. - Style. The bracelet is back.
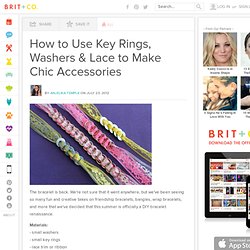
We're not sure that it went anywhere, but we've been seeing so many fun and creative takes on friendship bracelets, bangles, wrap bracelets, and more that we've decided that this summer is officially a DIY bracelet renaissance. Materials: - small washers - small key rings - lace trim or ribbon - scissors - tape The materials for this one couldn't be simpler. In fact, you probably have a few spare washers in your toolbox and ribbon in your sewing box. For this bracelet, we'll use 5 washers and about 12 inches of lace trim. Use tape to create a needle or shoelace end on one end of your trim. Now, pull your ribbon up over the second washer and weave it through the first washer. Pull it all the way through, and then weave back through your second washer. To fasten, simply tie an adorable bow around your wrist. Done! For the second bracelet, we used two pieces of lace trim and some extra small key rings leftover from our DIY Camera Strap. Copper braclet.
On a hunt for some chunky curb chain to use for another DIY project I had in mind, I found and bought this very thin copper chain of the same shape but very tiny in size.
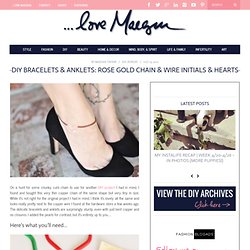
While it’s not right for the original project I had in mind, I think it’s lovely all the same and looks really pretty next to the copper wire I found at the hardware store a few weeks ago. The delicate bracelets and anklets are surprisingly sturdy, even with just bent copper and no closures. I added the pearls for contrast, but it’s entirely up to you… Here’s what you’ll need… * Rose gold chain I used 3.6mm Flattened Curb Chain* 20 gauge Copper wire* Wire cutters* Faux pearls * Use your wire cutters to snip off a few inches of copper wire. * String a few pearls or beads on, because it’s easier to do it before you create your design — and make sure your ends are curved in. * Bend your wire into a design… I created a simple cursive “M” with 3 pearls… trim any excess wire away. ** Notice how my ends are curved IN.
DIY Braided TShirt Bracelets. Nut braclet. Baseball braclet-for nicole. Wrap Bracelets. Wrap bracelets are all the rage right now, and friendship bracelets (or friendship cords!)
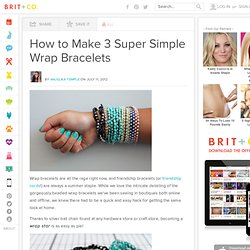
Are always a summer staple. While we love the intricate detailing of the gorgeously beaded wrap bracelets we've been seeing in boutiques both online and offline, we knew there had to be a quick and easy hack for getting the same look at home. Thanks to silver ball chain found at any hardware store or craft store, becoming a wrap star is as easy as pie! Materials: - silver ball chain - silver ball clasps - embroidery floss - scissors - tape - optional: leather lacing, yarn For our first wrap bracelet, we used teal embroidery floss and light blue yarn. Take a length of chain that suits you. Lay the chain next to the yarn and tie the embroidery floss around the two. We wrapped each section 3 or 4 times. We used yarn to give the bracelet a funky texture, additional color, and because it helped the embroidery floss stay in one place. Next up, we used leather and got a little knotty. Wire bow ring. DIY Pop Tab Bracelet. Yesterday night I felt creative and made this cute bracelet!
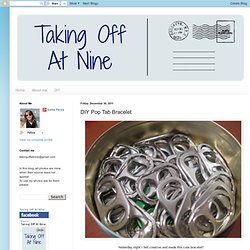
Me and my sister have been keeping pop tabs for weeks and it was time to do something with them. Then I bought some satin ribbons. I had an idea how I wanted my bracelet to be, but I didn't know how to start. So I found this video in Youtube where it's all very well explained. Hope you like it and you do it because it's easy and fun to do! Ayer por la noche me sentí creativa e hice esta pulsera tan mona!
Mi hermana y yo hemos estado guardando chapas de las latas de refrescos durante semanas y ya era hora de hacer algo con ellas. Tenía una idea de como quería que fuera la pulsera, pero no sabía como empezarla. Espero que os guste y que os animéis a hacerla porque es fácil y divertido!