Magic soda can keychain. Keychain. Evanora's Emerald Necklace. Crochet Circle Necklace. MMMMM Fried Marbles..... - JEWELRY AND TRINKETS. Wizard of oz necklace. Easy DIY Knotted Cord Bracelet. While in the States for my conference, I squeezed in a (too short) visit with the lovely Erica, from Wicked Bride.
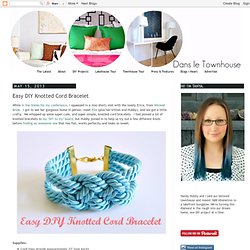
I got to see her gorgeous home in person, meet Ella (plus her kitties and Hubby), and we got a little crafty. We whipped up some super cute, and super simple, knotted cord bracelets. I had pinned a lot of knotted bracelets to my "DIY to try" board, but Hubby joined in to help us try out a few different knots before finding an awesome one that lies flat, works perfectly and looks so sweet. Supplies: Cord (two strands approximately 22" long each)Two 1" gold ribbon crimp ends (they also come in silver)Lobster clasp with tag connector and two jump rings Needle nose pliersGel Epoxy (E-6000 glue works too)Toothpick & scrap cardboard (to mix the epoxy)ScissorsTape Before you get started, open up the crimp ends a little, using pliers.
Take one length of cord, fold it in half. Sneak your second length of cord (also folded in half), under the loop. P.S. Awwwww. Shrinky dink jewelry. Gifts for mom are really hard.
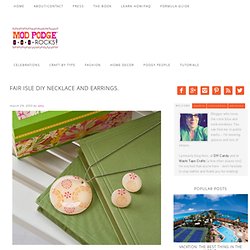
I never know what to get my mom for Mother’s Day, because she can buy everything she wants herself. That is why handmade jewelry is such a great gift for my mom. I can customize to what she likes and know she doesn’t have anything else like it . . . and even though I’m 36 years old, she still appreciates my crafts as gifts! I love using Shrinky Dinks in my crafts, and I tried to make them look upscale in this one.
How do you think I did? Gather These Supplies Shrinkable craft film – I used Shrinky Dinks Shrinkable Plastic in AlmondMod Podge Dimensional MagicPaint markers – I used Sakura PermapaqueMartha Stewart Crafts Adhesive Stencil – Fair Isle DotsJewelry findings – 2 earring backs, 1 large jump ring and 1 silver chainCircle cutter or other circular items to make a template3/4” hole punchJewel glueScissorsPencil You will first need to cut your shrinkable plastic into three circles – one larger for the necklace and two smaller for the earrings. Woven friendship bracelet tutorial.
I love the summer friendship bracelet trend that i keep seeing in blog land, so i thought it would be fun to share with you another way to weave a friendship bracelet. one of the parents at work showed me this technique of using a circular cardboard loom and i love how quick it goes, you can easily finish a bracelet in one sitting. - cardboard - something small and circular (like a teacup or ramekin) - scissors, ruler, pen - embroidery thread in pretty colors , thin yarn, or ribbon trace a circle onto your cardboard, and use a ruler to draw 8 lines cut a small ways into each line, between 1/2 an inch to an inch and make a hole in the middle of the circle where all the lines intersect. cut 7 strands of embroidery floss, about 24 inches long and tie them together with a slip knot. pull your thread bundle through the hole in your cardboard with the knot right up next to the hole and use a little piece of tape to hold it in place while you start.

5 Ways to Make Trendy Rope Bracelets. It’s officially rope week here at Brit + Co!
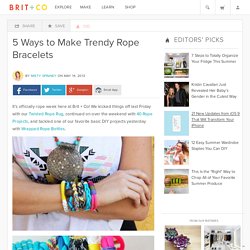
We kicked things off last Friday with our Twisted Rope Rug, continued on over the weekend with 40 Rope Projects, and tackled one of our favorite basic DIY projects yesterday with Wrapped Rope Bottles. Today we’re turning our attention to style, in the form of bracelets! As summer approaches, it only makes sense that we return to a summer camp classic: the friendship bracelet. This time, we’re taking a chic, stacked, and studded approach that we think you’ll love. Materials:- paracord rope – embroidery floss – cord ends – clasps – keychain – wooden bead – studs – E-6000 glue Tools:- scissors – lighter – hot glue gun – needle nose pliers For all of these, you’ll need to use a lighter to seal the end of the rope after you cut it. 1. Cut six pieces of rope so that they fit around your wrist. The turquoise color is great for summer – so beachy! 2. We love the contrast of hot pink with a sort of industrial-looking keychain. 3. 4. 5.
DIY Mardi Gras Accessories You’ll Actually Wear. Mardi Gras is about a lot of things.
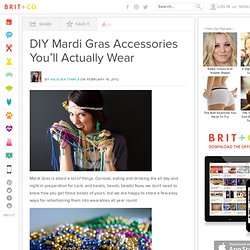
Carnival, eating and drinking the all day and night in preparation for Lent, and beads, beads, beads! Now, we don't need to know how you get those beads of yours, but we are happy to share a few easy ways for refashioning them into wearables all year round. Materials: - Mardi Gras beads (available on Bourbon Street, Amazon and Oriental Trading) - thread - string: shoelaces, ribbon, t-shirt strips, etc - scissors - hot glue - old hoops or bangles - chopsticks or dowels Green Bauble Hoops For these festive beauts, perfect for St. Glue one end of the necklace to one end of the hoop. Next up, the Chunky Blue Bangle. This couldn't be easier. Black & Fuchsia Statement Necklace For this little black number, we employed an old pair of black shoelaces. Golden Chopsticks.