2.8″ Touch LCD SPI for esp8266 (nodemcu) Hey, just finished playing with my new 2.8″ SPI touch TFT and getting it to work with a esp8266 (nodemcu) within the Arduino in windows… It wasn’t something that ‘just worked’….I tried to get it to work a couple different ways and finally found a working solution.
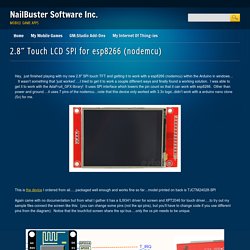
I was able to get it to work with the AdaFruit_GFX library! It uses SPI interface which lowers the pin count so that it can work with esp8266. Other than power and ground….it uses 7 pins of the nodemcu…note that this device only worked with 3.3v logic..didn’t work with a arduino nano clone (5v) for me. This is the device I ordered from ali…..packaged well enough and works fine so far…model printed on back is TJCTM24028-SPI Again came with no documentation but from what I gather it has a ILI9341 driver for screen and XPT2046 for touch driver….to try out my sample files connect the screen like this: (you can change some pins (not the spi pins), but you’ll have to change code if you use different pins from the diagram).
TFTP bootloader arduino esp8266. Arduino-er: Hello World 0.96 inch 128X64 I2C OLED, on Arduino Uno, using u8glib library. It's a 0.96" 128X64 OLED, I2C (or IIC) interface, with SSD1306 driver, 3.3/5V compatible.
There are 4 pin on the OLED module, GND, VCC, SCL and SDA. Vinduino water pressure meter - Van der Lee Vineyard. Measuring water pressure in agricultural irrigation systems is standard practice.
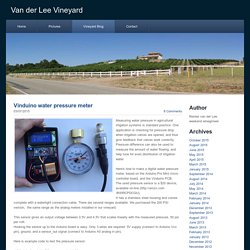
One application is checking for pressure drop when irrigation valves are opened, and thus give feedback that valves work correctly.Pressure difference can also be used to measure the amount of water flowing, and help tune for even distribution of irrigation water.Here's how to make a digital water pressure meter, based on the Arduino Pro Mini micro controller board, and the Vinduino PCB.The used pressure sensor is a $20 device, available on-line ( It has a stainless steel housing and comes complete with a watertight connection cable.
There are several ranges available. We purchased the 200 PSI version, the same range as the analog meters installed in our vineyard. This sensor gives an output voltage between 0.5V and 4.5V that scales linearly with the measured pressure, 50 psi per volt.Hooking the sensor up to the Arduino board is easy. Here is example code to test the pressure sensor: void loop() { 1-Day Project: Arduino Uno and I2C OLED Display Challenge. ESP8266-Sketches/Onboard.ino at master · jeffryr/ESP8266-Sketches. ESP8266 WiFi configuration manager library for Arduino IDE. The burden every headless wireless connected device needs to overcome is how to connect to the network without having to hardcode any credentials in it’s firmware.
For the ESP8266 based devices programmed with the Arduino IDE, I have put together this little library that tries to make connecting as seamless and quick as possible. It’s called WiFiManager. WiFiManager‘s Features: user friendly setup of esp8266 devicesno need to hardcode credentials anymoresimple and self contained, get started with a couple of copy/pastescaptive portal so you get the configuration page as soon as you connect to the WiFi from mobile devicesconfiguration portal is mobile visible/usable. Battery Powered ESP8266 WiFi Temperature and Humidity Logger. I wanted to have a few portable and long lasting temperature and possible humidity sensors I could just throw around hand have them working with as little hassle as possible.
Enter the Battery Powered ESP8266 WiFI Temperature and Humidity cloud logger. UPDATE Unfortunately after numerous attempts, DHT22 and deep sleep do not seem to go well together. After some time, no matter what code and library I uses, it would stop sending data. I have had help from other community members as well testing this, and the results are always the same, the DHT dies after a number of deep sleep cycles. For powered projects that don t sleep it is fine. JavaFX Delight. #include <ESP8266WiFi.h> #include "Adafruit_MQTT.h" #include "Adafruit_MQTT_Client.h" #include <Wire.h> #include <Adafruit_Sensor.h> #include <Adafruit_BMP085_U.h> #include <Adafruit_TSL2561_U.h>

ESP8266 WiFi Development kit connect TFT LCD Display. MoreEven more from Google Sign in Join Google+ Share the right things with just the right people.
Home Profile People. Public Lab: Calibrating DHT11 sensors. What I want to do I bought a handful of DHT11 sensors.
Before putting them in different locations to measure statistically significant differences between the locations, it is important to ensure the sensors have comparable performance. My attempt. GitHub - tzapu/WiFiManager: ESP8266 WiFi Connection manager with web captive portal. Seeed Recipe - Primary IoT Make with NodeMcu ->ESP8266<- 1.The things you need to prepare A NodeMcu v2.
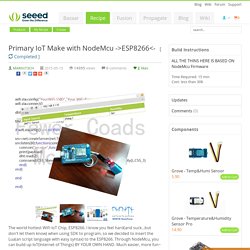
Board[Why my NodeMcu looks different from you? Answer: Beacuse I am still using Dev 0.9(v1) board][As for me, I was using Dev1(0.9), but the core of the board is remain constant-> ESP8266]An DHT11 or DHT22 sensor[In the following pic, it is a DHT11]And the always... Some cablesYour mind and handA HOT HEART ON ESP8266 (VERY IMPORTANT) 2.Flash the NodeMcu Software into the Board You can find the instruction HERE 3.Connect the DHT11/22/21.. to the NodeMcu Board 4.Download the NodeMcu IDE Here is the address->[ LINK] 5.Download the program.
Seeed Recipe - WiFi Scanner -Know the WiFi Signal around you. 1.The things you need to prepare A NodeMcu Dev.
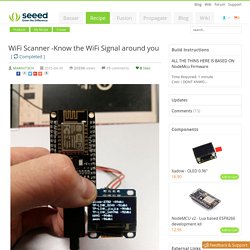
Board An I2C OLED Some cablesYour mind and handA HOT HEART ON ESP8266 (VERY IMPORTANT) 2.Flash the NodeMcu Software into the Board (If you have already done it, just jump.) a. Download the newest integer version of NodeMcu. Public Lab: Calibrating DHT11 sensors. ESP8266. WiFi MQTT Display with the ESP8266. Like many people I have been playing with the Espressif ESP8266 WiFi modules over the last few months. I’ve had a couple of modules running for a while now, one connected to an Arduino pro mini clone with a 2×16 OLED display and one running directly on the ESP8266 using the NodeMcu Lua interpreter controlling a relay over an HTTP REST-like API.
One thing I was really hoping for was a native MQTT implementation as it is the protocol I use for my home automation and sensor network. ESP8266 weather monitor. Programming an Arduino via WiFi with the ESP8266. This is experimental and not exactly for beginners, something may be wrong. Proceed with caution or you can break something! I’ve been working on a new robot called RoDI for a summer course at my Alma mater.
RoDI is a low cost wireless robot to teach robotics and programming I started developing last year (reminder to self: I still need to post about it), but it wasn’t until a month ago that I started to work on it more often. The first version used a HC-06 Bluetooth module to communicate with the computer. I wanted to to use WiFi, but the cost of the WiFi modules was a problem, since the idea was that the entire robot would cost less than 30 USD. ESP8266 Power Consumption - ESP8266 Developer Zone. Hi everyone, The following is the test data of power consumption of ESP8266. 20150112172151.jpg (67.4 KiB) Viewed 6356 times Currently ESP8266 can support three low power modes: Light Sleep, Modem Sleep and Deep Sleep. ①:Modem-Sleep requires the CPU to be working, as in PWM or I2S applications.
ESP8266 Projects: PART3 - I2C Driver - MCP9808 - Temperature Logger - ESP8266 CBDB. As it was requested from you, my readers, in Part 3 of our CBDB saga, we will start building a simple, high precision, Temperature Data logger based on the MCP9808 chip, a ±0.5°C Maximum Accuracy Digital Temperature Sensor. As far as I know this is the first time NodeMCU float version I2C Driver for MCP9808. Features. EEPROMWriteAnything. Reading and Writing Data Structures to EEPROMdiscussion about optimized version In the Arduino library versions through 0013, the only way to read and write the built-in EEPROM memory was through functions that only support one byte of data at a time.
When saving a number from 0-255, this is sufficient. When saving a larger number, you have to call the EEPROM routines more than once, to save a "high byte" and a "low byte" for 16-bit numbers, or even more often for bigger numbers or other data types that cannot fit in one byte. With the following code, you can write any data structure or variable, using any number of bytes of EEPROM to do it (of course, only as many bytes as your chip holds), all in a single call.
Start up an AP if unable to reconnect to last network. ESP8266 WiFi relay switch (Arduino IDE) ESP8266 Not working with Emoncms.org... EasyIoT Server installation. ESP8266 - Easiest way to program so far (Using Arduino IDE) Yep, another post on the ESP8266 is here (By the way, Have you heard about our Facebook page already? Like us and get updates! Build. Esp-03.jpg (JPEG Image, 511 × 334 pixels) ESP8266: Reflash Dance! Posted by: Dave Vandenbout 3 years, 8 months ago.
Guibom/ESPTempLogger. Read vcc voltage : esp8266. Read vcc voltage : esp8266. Data.sparkfun.com - Public Streams. Esp8266/Arduino. ESP8266 Introduction. Back to tutorial index. Sleemanj/ESP8266_Simple. ESP8266 Introduction. ESP8266: Reflash Dance! ESP-03 programming. ESP8266 Community Forum. Arduino TFT Forecast Weather Station with ESP8266.
$3 Wifi module part 10: A World Record?! Node Red in 5 minutes. SOLAR POWERED ARDUINO WEATHER STATION. The weather data does not change frequently.So we can take reading at an interval of 5mins.As we are taking readings at regular intervals, it is a fantastic way to save lots of power. Send sensor data (DHT11 & BMP180) to ThingSpeak with an Arduino, using cable or WiFi (ESP8266) Esp8266/Arduino. Installing and Building an Arduino Sketch for the $5 ESP8266 Microcontroller. Installation of the custom build of the Arduino IDE really couldn’t be simpler. I’m on a Mac, and at that point it comes down to downloading the pre-built binary release from GitHub. The custom binary will live quite happily alongside your existing stock Arduino development environment — in fact, as well as the ESP8266 build, I think I’ve got six or seven other versions of the environment installed at the moment, with version numbers ranging from 1.0.x up to to latest 1.6.x build.