
Shelving Fresh Cut Flowers. Cool Copper Projects Warm metallic hues are easy to love but often pricey.

When you create the look... Easy Doily Bowl Craft a decorative bowl from a doily picked up from a flea market, antique... Camper Birdhouse. Glass Etching. Have you ever done any glass etching?
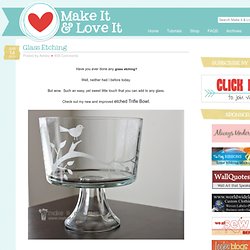
Well, neither had I before today. But wow. Such an easy, yet sweet little touch that you can add to any glass. Check out my new and improved etched Trifle Bowl. The perfect bowl for desserts of all kinds…..and even a great place for fresh fruit on the counter. Two Minute Chocolate Peanut Butter Cake. This, friends, is where procrastination gets me.
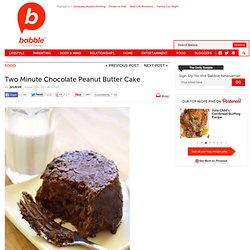
I was staring at the computer, mired in writers’ block. I clicked on that Stumble button I installed in my toolbar but never use. Oh look! A new webpage has popped up! On it, a recipe for single-serving peanut butter cake you mix and microwave in a minute. The chocolate:peanut butter ratio wasn’t quite right, and so I made the cake chocolate with a spoonful of cocoa. Chocolate chips are a must – they turn into gooey pockets of melted chocolate in the finished product. How to Make 6-Pointed Paper Snowflakes. This step by step guide will teach you how to make SIX pointed paper snowflakes.
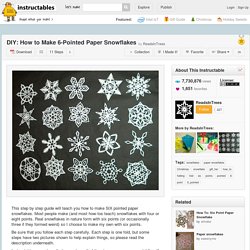
Most people make (and most how-tos teach) snowflakes with four or eight points. Real snowflakes in nature form with six points (or occasionally three if they formed weird) so I choose to make my own with six points. Be sure that you follow each step carefully. Each step is one fold, but some steps have two pictures shown to help explain things, so please read the description underneath. Classes: pretty paper. true stories. {and scrapbooking classes with cupcakes.}: This Year. With your desk all piled with bits and pieces ready to go, here’s the last prompt: your finishing notes!

Download them here. When you’ve completed your little book, please take a picture or two and post a link in the comments here. I’d love to put together a little gallery and share how everyone made the project their own. It’s just a little tiny project, but it’s still lovely to see the results! Thanks so much for joining me on this little project! Here’s everything in one place in case you’re just finding the time to join us: Here’s our class schedule:Prompt one: Supply checklistPrompt two: Journaling worksheetPrompt three: Construction notesPrompt four: Construction notesPrompt five: Finishing notes xlovesx Delicious. Dog of the Day - Every day a new dog photo and story. Tutorials for Recycling T-Shirts. So way way back, in June, I wrote this Studio Organization post, about starting the process of organizing my studio by cleaning out the closet full of junk.

Well, it's September and...let's just say the closet is a work in progress. Some of the things that are taking up space in the closet are shirts that I never wear anymore. Shorts. Most favorited all-time. DIY Doily Lamp. Stay hungry my friends. Plastic Bag Bags are where it's at. Bodyrock.tv workouts search. Crazy paper thing. Shoe Makeover.
I love the simple, carefree style of laceless tennis shoes, especially in the summer. They're the best shoes to slip on before running errands, shopping, being outside, or really anything. I've been drooling over these Keds for a while now... However $50 for one pair of shoes really isn't in my budget. So when I saw plain white Keds knock offs at Walmart for only $5 , I knew exactly what I wanted to do. Materials Needed: Plain White or Off White Tennis Shoes (Walmart has them for $5 and Target has them for $9)RIT or other brand Fabric Dye1.5 " wide ElasticStrong Needle and Thread (in coordinating color) Although I love the muted colors that Keds sells.
First take out the laces In a large pot Boil your water. Rinse your shoes off in the sink with hot water When your water is boiling, turn it down to more of a simmer and add your dye. Watermark Tee by Sweet Verbana. Hello U-Create readers!
D.I.Y. Curls // How To Rag Roll Your Hair. I love the look of naturally curly hair!

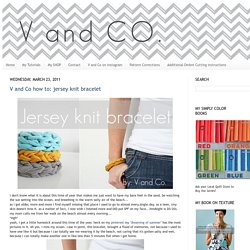
My sweet friend, Katie, told me about rag rolling. It's a quick and simple way to get natural looking curls without using a curling iron! I asked her to share her method here on A Beautiful Mess because I knew you'd be itching to learn like I was! Enjoy... You'll need some cut fabric strips, a comb and some water. How to rag roll your hair- First, dampen the bottom of your hair (the part you plan to roll) using a spray bottle. V and Co how to: jersey knit bracelet.
I don't know what it is about this time of year that makes me just want to have my bare feet in the sand, be watching the sun setting into the ocean, and breathing in the warm salty air of the beach...as i get older, more and more i find myself missing that place i used to go to almost every.single.day. as a teen.
You knew i was going to make one. They are all over pinterest....
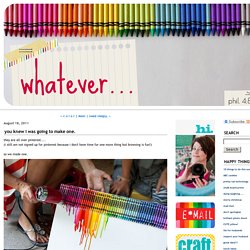
(i still am not signed up for pinterest because i don't have time for one more thing but browsing is fun!) So we made one. i took a box of 64 crayons and took out the blacks and browns.i used another small box and doubled up on the good colors i liked and hot glued them to the top of our canvas. then we turned our blow dryer to hot on high. not long after you set the hair dryer by the crayons they get shiny and then the wax starts to melt! And it dries really quickly too. 5 days of favorite projects {day 1} Do-it-Yourself DIY String Wedding Lanterns Yarn Chandeliers. Jessica of Wednesday Inc shows us how to make those gorgeous twine chandeliers from the inspiration shoot she shared with us this morning. Using balloons, glue and twine, you can also make these lanterns for your wedding – and then bring it home and use it as your very own mid century lampshade.
What you will need are: balloons, glue, yarn, tray for glue, corn starch 1/2 cup of Corn starch, 1/4 cup of Warm water, clear fast drying spray paint, hanging lamp cord or fishing line (depending on your desired final product), and a lighting kit if you’re looking for a fully functional lantern. Jessica recommends using a sharpie to mark on the inflated balloon how much room you need to leave for the lighting cord. She also recommends coating the balloon with vaseline prior to wrapping the yarn coated with glue so it doesn’t stick on the balloon once it’s dry.