
Create a Mixed Media Style Design In Photoshop. Learn how to create this creative mixed-media composition in Photoshop!

You will learn how to combine different graphic elements with extensive use of layer masks. This is a great tutorial for designers who want to experiment with a more modern approach to digital collages. Preview of Final Results Create a Mixed Media Style Design In Photoshop Resources. How to Create a Watercolor Portrait in 3 Simple Steps. Recently I began experimenting with a quick technique for creating a watercolor style portrait with some of the brushes that we’ve created here at WeGraphics.

After some trial and error I’ve come up with a 3 step process that ends in a nice effect that works on just about any portrait. Here’s a look at what we’ll be creating. I’ve used an assortment of watercolor brushes available here at WeGraphics, including the free set linked below. Free Watercolor BrushesInsane Watercolor Brush Set Step 1 – Create the Texture For the portrait, I’m using this free image from Stock.Xchng. Open the image in Photoshop. To create the texture, I used a custom brush of solid text. Create a new blank document 700×700 pixels and fill the document with a block of black text. Now click (Edit | Define Brush Preset) to create the custom brush. Fill the layer mask with solid black, which will make the girl disappear. Step 2 – Add the Watercolor Step 3 – Add a Little Color Related Posts.
Windows Vista Aurora Effect Photoshop Tutorial. If you’re a Windows Vista user, you’re probably familiar the eye catching graphics shown off on the box, and in some of their wallpapers/screensavers.
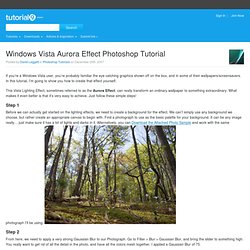
In this tutorial, I’m going to show you how to create that effect yourself. This Vista Lighting Effect, sometimes referred to as the Aurora Effect, can really transform an ordinary wallpaper to something extraordinary. What makes it even better is that it’s very easy to achieve. Just follow these simple steps! Step 1 Before we can actually get started on the lighting effects, we need to create a background for the effect. Step 2 From here, we need to apply a very strong Gaussian Blur to our Photograph. Step 3 Now we are going to drastically change our background by adding a Color Balance Adjustment Layer.
Step 4. Create a Colorful Grunge Portrait in Seconds. This effect is so simple and fast, but produces such a stunning and unique appearance, that you’ll instantly love it.
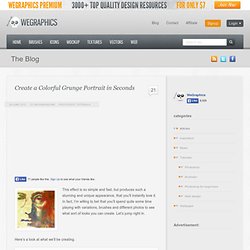
In fact, I’m willing to bet that you’ll spend quite some time playing with variations, brushes and different photos to see what sort of looks you can create. Let’s jump right in. Here’s a look at what we’ll be creating. Step 1 – A Good Texture Base First off, you need a good worn paper texture. Step 2 – Apply Your Portrait I found this great portrait of John Lennon to use for this example. Next, I bumped up the contrast using ( Image | Adjust | Levels ), the amount will vary based on your photo. Step 3 – Begin Painting. Dark Grunge Photo Effect. Step 1 Lets start by taking a look at the photo I’ve chosen for today’s tutorial.
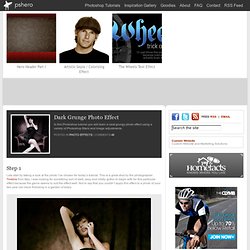
This is a great shot by the photographer Tinebra from Italy. I was looking for something sort of dark, sexy and mildly gothic to begin with for this particular effect because the genre seems to suit the effect well. Not to say that you couldn’t apply this effect to a photo of your two year old niece frolicking in a garden of tulips. Step 2 Lets begin by duplicating our Background layer by pressing Command-J (PC: Ctrl-J), not only to preserve the original image incase we need to come back to it, but because we’re about to apply 4 quite destructive filters to the image and we’ll need to have a copy of the original underneath for masking purposes later.
Creating an Embedded Concrete Effect Using Layer Styles Only. It’s amazing what you can accomplish with layer styles.

It’s a feature of Photoshop that is fun to play and experiment with. The short tutorial below is the result of some of my experimentation spending a few minutes with layer styles. Tutorial: More Texturing- Photoshopcontest.com. By: ledirlo This tutorial demonstrates an effect that gets so photorealistic it led to some cheating controversies in the past. Aside from the interest of the created effect it also gives key layer technique information. The only material needed is these two photos, the crumpled paper and what we want printed on it. Let's start by opening the two photos and moving the grass photo above the paper's layer; you can turn the grass layer into multiply mode and transform it to get the correct placement. In this case I chose to avoid the darkest tree parts as they don't produce a great effect on the paper. Once finished, press CTRL+I so you invert the layer mask.
The selection's edges have very little chance of being perfect already so I used the smudge tool with a large soft brush to push or draw the layer mask so it fits the paper edges perfectly. Now time for using the layer blending modes.