
How to Create Contemporary Abstract Background of Geometric Shapes in Adobe Photoshop CS6. July 12th, 2013 by admin Posted in Adobe Photoshop, Designing, Drawing Techniques Combine by groups all the layers composing each tetrahedron (press CTRL button to select the necessary layers and hold on the left mouse’s button while dragging the selected layers on Create a new group icon from bottom part of the Layers panel).
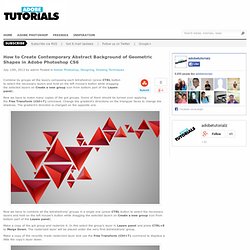
Now we have to make many copies of the got groups. Some of them should be turned over applying the Free Transform (Ctrl+T) command. Change the gradient’s directions on the trianguar faces to change the shadows. The gradient’s direction is changed on the opposite one. Now we have to combine all the tetrahedrons’ groups in a single one (press CTRL button to select the necessary layers and hold on the left mouse’s button while dragging the selected layers on Create a new group icon from bottom part of the Layers panel). Make a copy of the got group and rasterize it. Set Fill to 20% for this layer. Creative mixed-media composition in Adobe Photoshop CS5. Creative mixed-media composition in Adobe Photoshop CS5 April 16th, 2013 by admin Posted in Adobe Photoshop, Photo Editing, Special Effects This tutorial uses some basic layering and masking techniques, coupled with some 3D elements that we’ll montage together to create an interesting mixed-media collage with lots of depth.
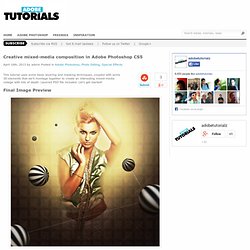
Layered PSD file included. Let’s get started! Final Image Preview. Medieval Metal Text Effect in Photoshop. Last week I saw the movie Immortals and before the movie I was walking around at the movie theater checking some poster.
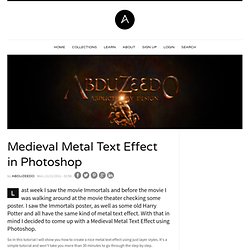
I saw the Immortals poster, as well as some old Harry Potter and all have the same kind of metal text effect. With that in mind I decided to come up with a Medieval Metal Text Effect using Photoshop. So in this tutorial I will show you how to create a nice metal text effect using just layer styles. It's a simple tutorial and won't take you more than 30 minutes to go through the step by step. Step 1 Open Photoshop and start a new document. Step 2 Search for some metal textures. Step 3. Realistic Letterpress Effect in Photoshop. For the first tutorial of 2012 we wanted to have a really good one and the most important thing a very easy one because our goal for this new year is to provide good tutorials with simple techniques that achieve great outcomes.
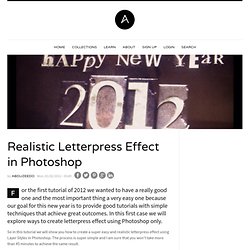
In this first case we will explore ways to create letterpress effect using Photoshop only. So in this tutorial we will show you how to create a super easy and realistic letterpress effect using Layer Styles in Photoshop. The process is super simple and I am sure that you won't take more than 45 minutes to achieve the same result. Step 1.
Clash of the Titans Text Effect in Photoshop. A few weeks ago watched Clash of the Titans.
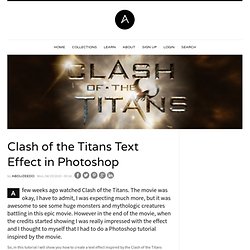
The movie was okay, I have to admit, I was expecting much more, but it was awesome to see some huge monsters and mythologic creatures battling in this epic movie. However in the end of the movie, when the credits started showing I was really impressed with the effect and I thought to myself that I had to do a Photoshop tutorial inspired by the movie. So, in this tutorial I will show you how to create a text effect inspired by the Clash of the Titans posters and artworks. We will use layer styles and basic filters to achieve the effect. It will not take you more than 45 minutes to achieve the effect, but the outcome is really cool. Wrath of the Titans in Photoshop CS6. We always try to publish tutorials based on effects we like especially from movies, posters and other sources of inspiration.
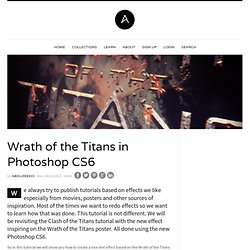
Most of the times we want to redo effects so we want to learn how that was done. This tutorial is not different. We will be revisiting the Clash of the Titans tutorial with the new effect inspiring on the Wrath of the Titans poster. All done using the new Photoshop CS6. Hipster Text Effect in Photoshop CS6. A few weeks ago we posted a tutorial showing how to create a hipster text effect using Pixelmator.
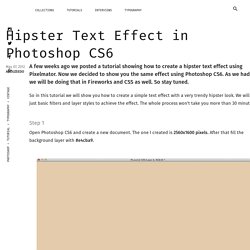
Now we decided to show you the same effect using Photoshop CS6. As we had said, we will be doing that in Fireworks and CSS as well. So stay tuned. So in this tutorial we will show you how to create a simple text effect with a very trendy hipster look. We will use just basic filters and layer styles to achieve the effect. Step 1. Double Exposure Style in Photoshop. We've featured quite a few posts and images with the effect most call double exposure.
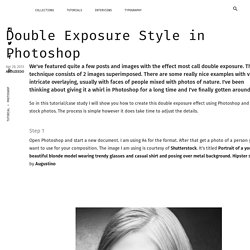
This technique consists of 2 images superimposed. There are some really nice examples with very intricate overlaying, usually with faces of people mixed with photos of nature. I've been thinking about giving it a whirl in Photoshop for a long time and I've finally gotten around to it. So in this tutorial/case study I will show you how to create this double exposure effect using Photoshop and some stock photos. The process is simple however it does take time to adjust the details. Easy Chalk Ornament Typography in Photoshop. We are heading to the last weeks of 2012 and nothing better than getting ready for the new year with a Photoshop tutorial playing with the number 2013.
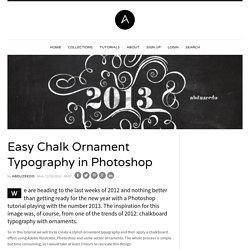
The inspiration for this image was, of course, from one of the trends of 2012: chalkboard typography with ornaments. Oblivion Inspiring Artwork in Photoshop. Following our movie poster inspired tutorials, today we bring to you an image inspired by Oblivion, the new Tom Cruise film we can't wait to check out.
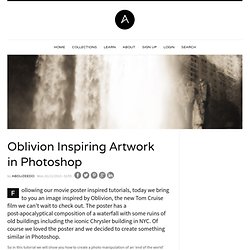
The poster has a post-apocalyptical composition of a waterfall with some ruins of old buildings including the iconic Chrysler building in NYC. Of course we loved the poster and we decided to create something similar in Photoshop. So in this tutorial we will show you how to create a photo manipulation of an 'end of the world' style image. To do that we will use stock photos and adjustment layers to make sure the image looks legit. Classic Light Effect in Photoshop. Light effects are my favorite type of effect, I don't know why but I always liked to play around in Photoshop trying to recreate them.
Then once I discovered the power of the Blend Modes, especially the Color Dodge, creating this effects became much easier. Double Exposure Style in Photoshop. Christmas ornament balls. Christmas ornament balls November 6th, 2008 by ART-D Posted in Adobe Photoshop, Designing In just a few simple steps, we will learn how to create nice ornaments for Christmas themed graphics and designs. Final Image Preview For the beginning create a new file (File>New) of 1280×1024 px and 72 dpi. Select after that the Paint Bucket Tool (G) and give the new file the color #7EC21D Next select the Rectangle Tool (U) and represent several vertical lines that will form the wallpapers.
Next choose the Custom Shape Tool (U) and pick up a fir tree’s figure: Place them on the basic picture by copying them firstly (Ctrl+J) as it is represented below, selecting the color of the lines. Place them also on the lines, choosing the color of the background this way getting the wallpapers we want: Next take the Ellipse Tool (U) and draw three circles of the same sizes, later becoming nice fir tree’s balls: Follow all the settings from below: We’ve got finally a ball: You should get the same thing from below: Fresh Christmas Tree.
Fresh Christmas Tree December 13th, 2007 by ART-D Posted in Adobe Photoshop, Designing This tutorial teaches you how to create a stylized Christmas tree design with stars. Final Image Preview Begin by creating a file that would have 1024х768px and 72dpi. Paint the new made file with the next shown color’s code – #06377A and the usual instrument applied in these cases – Paint Bucket Tool (G). Next we shall create a new layer (Create new layer) and paint it in white color, using the earlier applied tool – Paint Bucket Tool. Beautiful Christmas Vision Tutorial And Wallpaper. It’s been a while since I haven’t done any tutorial for Photoshop, but my Christmas spirit is telling me, I must do something to change that. Yes, I am totally deep in heap of snow and I am throwing one snowball to You too! Actually this is just my first attempt to create something like that, so don’t be harsh, but hey – maybe You can just smile and accompany me in this simple Christmas wallpaper tutorial?
We will learn how to use pen tool, use paths, smudge tool and yes – how to create 3D effect in Photoshop in joyful way! This is what we are going to create this time, finished result: Click on the wallpaper to view and download it full sized. Step 1 Create a new document, I wanted this to use later as wallpaper, so I used 1920×1200 resolution, 72 dpi. Creating a Chalkboard Christmas Card in Photoshop and Photoshop Elements. I LOVE the look of chalkboard art! It is an ART and one that I cannot do freehand! Thankfully, I have Photoshop skills (to quote Peppermint)! I have seen lots of chalkboard Christmas cards on Pinterest and thought our readers might like to create this look on their own. I haven’t really seen this trend pop up on layouts too much...yet! I thought a Sunday, un-digi post would be the perfect time to share this technique . 2) Type your text. 3) Select your text using the magic wand and clicking on your text. 4) Marching ants will appear around the text (it should appear inside the enclosed letters too (P,R,A,O, etc.
Christmas Greeting Card - Christmas Green Tree on Red Background in Adobe Photoshop CS6. 80s Christmas Artwork in Photoshop. It's beginning to look a lot like Christmas and it's time for our holiday tutorial. Photoshop « 5/143. Planet Photoshop: Special Effects Text. Create An Airforce Inspired Mesh Pattern Overlay. Not too long ago I stumbled across the US Air Force site, and was immediately struck by it’s style and slick patterns. The inner pages of the site focus on large background images with a cool mesh overlay. Recreating Bar Code by Using Photoshop.
Give Your Photos a Retro Comic Book Effect. How about a fun effect for your incredibly boring photo albums? Creating a old comic book effect for your photos is easy and the results are visually appealing. More fun is achieved when adding captions to your photos using comic book fonts and design elements. This tutorial will show you how to give a comic book look to your photos using a couple of filters and some additional decorations.
Create a Vintage Sci-Fi Movie Poster In Photoshop. Intro: Photo manipulation is always a fun to work on. Surreal Fantasy Photomanipulation. Intro: Photo manipulation is always a fun to work on and also has the scope to explore more interesting techniques to get and interesting and unique output. Create a Vintage Polaroid Effect in Photoshop. I love anything graphic design that has that vintage grunge kind of look. How to Create Brilliant Light Streaks. Seriously Cool Photoshop Explosion Effect. Pop Art. Create an Awesome Floating Face Manipulation with Fiery Hair in Photoshop. High School Tutorials - Photoshop Tutorials - Basic. 3D Pixel Stretch Effects in Photoshop. Stretching a single line of pixels is an easy way to create special digital effects in graphic design.
Create Cool Watercolor Effects in Photoshop. Retro Colors. Create a Wicked-Worn Vintage Pop Art Design. Faking miniature photographs with photoshop. Awesome digital bokeh effect in Photoshop. High School Tutorials - Photoshop Tutorials - Basic. Photoshop Basics - Tutorials for Photoshop Beginners. Photoshop Basics Tutorials. 35 Basic Tutorials to Get You Started with Photoshop. 12 Beginner Tutorials for Getting Started With Photoshop. Getting Started with Photoshop.