
Lovely Wire Knot Ring Tutorial. You can make this lovely ring (or a version of this design) yourself, using just some basic tools, wire and a lip balm! Yes, in this tutorial I am going to demonstrate that just basic beginner tools and a wire from Michael’s can go a long way! Wouldn’t this ring make a great present?? For the purpose of this tutorial I am going to be using the very basic, cheap tools that are available almost everywhere.
Diy {bird nest necklace} I have been seeing a lot of bird nest jewelry around lately.
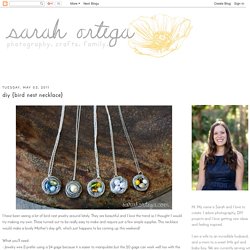
They are beautiful and I love the trend so I thought I would try making my own. These turned out to be really easy to make and require just a few simple supplies. This necklace would make a lovely Mother's day gift, which just happens to be coming up this weekend! What you'll need: - Jewelry wire (I prefer using a 24 gage because it is easier to manipulate but the 20 gage can work well too with the help of some round nose pliers) - pearls or glass beads - necklace chain - jump ring and a clasp Select the beads you want, string them onto your wire and arrange them as you'd like. {macramé: half knot spiral} washer & wingnut bracelet. By Kate on October 25, 2011 Hello there!

DIY Bracelet Tutorials. DIY of the Month: Braided T-shirt Bracelet. DIY Macrame Bracelet. Growing up by the beach in Southern California, the ability to knot a macrame bracelet was practically a right of passage.

Although those days are long behind us, we’ve never forgotten the ever-so-simple square knot technique. This time, however, we’re replacing hemp and wooden beads for more updated elements like colorful nylon cord and glossy metal charms. Happy knotting! You’ll need: Start by cutting the knotting cord into two 30 inch, two 20 inch and one 10 inch lengths. Center the 30 inch cord under the two middle strands. Pull tightly and slide the knot up to the top. Finish the 2nd half of the square knot by folding the left cord over the middle strands and under the right cord. Pull tightly and repeat the steps – left, right, left, right . . . Woven Bracelet & Necklace.
I’ve been itching to make myself some jewelry inspired by Aurélie Bidermann’s “Do Brasil” line.

Since I don’t have 300 Euros lying around, this looked like a design I could recreate on my own. I was primed to put together a DIY Tutorial for you all when I discovered that Honestly WTF had already done the honors. I picked up the gold necklace and the two bracelet chains from an antique shop for $5 a piece, and had the embroidery thread on hand. I only needed scissors and two bobby pins to see this project through.
Pretty amazing results, no? Jump on over here for the tutorial. NECKLACE: I used shades of pale blue and turquoise embroidery thread, and wove through one side of the chain to mimic this necklace. Most favorited all-time. Feather Extensions. So the long awaited post is here!
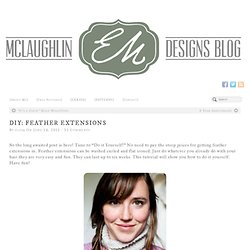
Time to “Do it Yourself!” No need to pay the steep prices for getting feather extensions in. Feather extensions can be washed curled and flat ironed. Just do whatever you already do with your hair they are very easy and fun. They can last up to six weeks. Materials Needed: 1. The Wool Acorn: Magic Fence with marbles. Rnflower Blue: serendipity (otherwise known as a diy laundry bag) Solid perfume pocket watch locket. Try as I might, I cannot seem to grasp even the most basic of feminine beauty rituals.
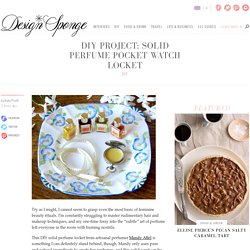
I’m constantly struggling to master rudimentary hair and makeup techniques, and my one-time foray into the “subtle” art of perfume left everyone in the room with burning nostrils. This DIY solid perfume locket from artisanal perfumer Mandy Aftel is something I can definitely stand behind, though. Mandy only uses pure and natural ingredients to create her perfumes, and this solid scent can be easily applied with no risk of over-dousing. The old pocket watch appeals to my tomboy side, and I love its versatility; you can wear it as a necklace or pin, or simply tuck it into your pocket or purse. I can’t wait to make one and give my feminine sensibilities a little boost :) Thanks for sharing this tutorial with us, Mandy! Read the full how-to after the jump! Creating your own solid perfume is extremely satisfying. Materials Instructions 1. 2. 3. Hot Cinnamon Milk. When the weather gets cooler, there are tons of things we look forward to.

Hot cocoa is definitely up there on my list! I’m always craving hot beverages, but I try not to drink coffee after 5PM. So hot chocolate is my go to. Last winter I found this recipe over on Spatula and Spoons and it’s replaced my hot chocolate. It’s creamy, yummy and a nice break from the normal hot chocolate. DIY Pinata Cookies. Running With Glitter: Jar of Happiness for my Birthday. Tuesday is my thirty-something birthday and I wanted to make something fun for myself.
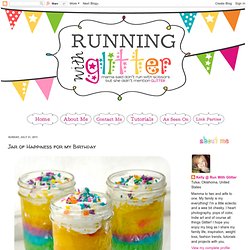
A little happiness in a jar for my happy day please! Elastic Waist Skirt Tutorial – Mama Edition. With pockets!

This tutorial is very similar to the lil' mama elastic waist skirt tutorial, with a few changes. If you want you can mash-up the two tutorials and come up with your own version, which I would love. I would suggest that you play with the two tutorials a little and take away from both of them what will work for you. Materials needed: 2-3 yards of fabric elastic, I used the 2 inch wide variety coordinating fabric for the pockets straight pins Now take your measurements, you will want to measure: your natural waist from your waist to your knee or mid thigh, however long you want your skirt. A Small Snippet: wanna make a dress??
I am PUMPED today!

Wanna know why? Cause i’m gonna show you how to make quick, easy, and inexpensive dresses just like these! I know what y’all are thinking…no way that’s quick and easy. oh…you are SO wrong. it really is! I might even venture to say that its one of the easiest sewing projects i’ve ever done. go ahead…try it…and try to prove me wrong! Llevo el invierno ♥: M.a.k.e. Alitas ! Inspirada en estas fotos que vi en Burdastyle,dibuje mi propio patrón para poder hacer estas alitas de pájaro para mi pequeña Emma, les comparto el patrón porque se acerca la primavera y en esta estación siempre se necesitan disfraces para los niños. Simple & handmade: splash dyed for spring.
T-shirt pom poms. Learn how to turn old t-shirts into pom poms! T-shirt Pom Poms are so much more durable than tissue paper ones. SewSweetStitches: Handmade Tissue Paper Flowers and Pompom Garland. You'd think after making hundreds of these for my wedding, I'd be completely sick of them. But I can't help it, I love them so much! I'm a little sad that I didn't save a bouquet of paper flowers from my wedding, but I never thought I'd want to see them again.
So I made some for home, only this time as a garland... ...And as bedroom decor... Purplecarrotkc.com: DIY Frame Key Holder. Time for my first official DIY post ever. Let me start off by saying I do not consider myself to be a crafty person, though I aspire to be one, ha. Do-it-Yourself DIY String Wedding Lanterns Yarn Chandeliers.
Jessica of Wednesday Inc shows us how to make those gorgeous twine chandeliers from the inspiration shoot she shared with us this morning. Using balloons, glue and twine, you can also make these lanterns for your wedding – and then bring it home and use it as your very own mid century lampshade. What you will need are: balloons, glue, yarn, tray for glue, corn starch 1/2 cup of Corn starch, 1/4 cup of Warm water, clear fast drying spray paint, hanging lamp cord or fishing line (depending on your desired final product), and a lighting kit if you’re looking for a fully functional lantern.
Jessica recommends using a sharpie to mark on the inflated balloon how much room you need to leave for the lighting cord. She also recommends coating the balloon with vaseline prior to wrapping the yarn coated with glue so it doesn’t stick on the balloon once it’s dry. You can see all the details on Jessica’s blog. Stephane TARTELIN - freelance illustration and graphic design - Paris, France.
Riusuke Fukahori Paints Three-Dimensional Goldfish Embedded in Layers of Resin. First: watch the video. Japanese artist Riusuke Fukahori paints three-dimensional goldfish using a complex process of poured resin. The fish are painted meticulously, layer by layer, the sandwiched slices revealing slightly more about each creature, similar to the function of a 3D printer. I really enjoy the rich depth of the pieces and the optical illusion aspect, it’s such an odd process that results in something that’s both a painting and sculptural. Wonderful. Stereographic Drawings. Glowing jar project – varázslat a lakásban (EN/HU) Fourth of July Star Jars.
These transformed mason jars are a fun way to both decorate an outdoor table for a 4th of July celebration or a safe way to entertain the kids during fireworks. Red spray paint Mason Jars Star stickers Newspaper Scatter star stickers onto the mason jar, make sure they’re stuck on very tight Screw on the mason jar lid and cap and place on top of a table covered in newspaper in a well ventilated area Spray with the paint from a nice distance around the entire jar until it’s coated well but without drips. Wait at least a couple hours for the jar to dry and carefully peel off the star stickers. DIY Glow Jars Tutorial.
Posted on October 19, 2011 by Christina.