Song Lyric Wall Art / D.I.Y. Project
A couple weeks ago, I found a paint-by-number at an unbeatable price. I can't pass these things up even though I already owned this particular design. I thought that I could maybe use it to make a fun D.I.Y., but my new rule is that all thrifts that I purchase with the intent of restyling need to get done right away. I have way too many half finished projects in my life.
DIY Inspiration: Wooden Tape Dispenser
Love washi tape? Perhaps you have a growing collection and need a way to organize it? (If not, pop on over to Omiyage and get yourself some!)
page corner bookmarks
This project comes to you at the request of Twitterer @GCcapitalM. I used to believe that a person could never have too many books, or too many bookmarks. Then I moved into an apartment slightly larger than some people’s closets (and much smaller than many people’s garages) and all these beliefs got turned on their naïeve little heads. But what a person can always look for more of is really cool unique bookmarks.
My DIY Wedding
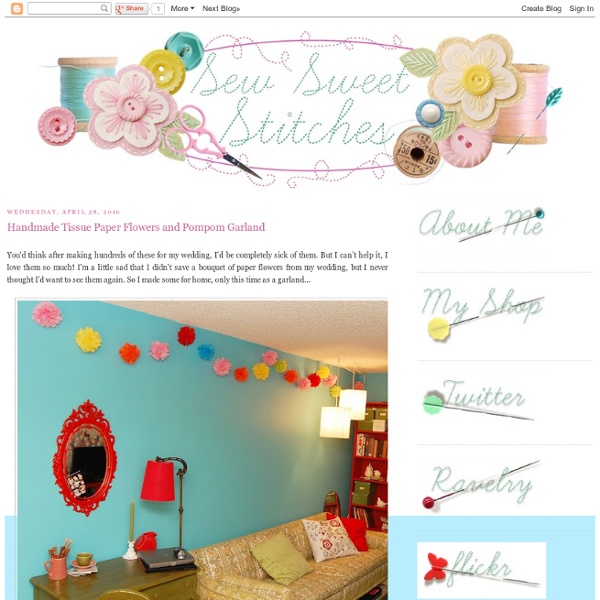
My husband (and business partner) Danny and I are both very artistic and crafty people by nature. So naturally, a lot of elements at our own wedding were handmade. Here is a peek at some of what we did in the hopes it will inspire you to infuse a little bit of the do-it-yourself spirit into your wedding day. While I didn’t actually make my own dress (you gotta draw the line somewhere), I did make a few really easy alterations to it.
Jewelry Box D.I.Y.
I love this D.I.Y. by our beautiful contributor, Amanda of Indie Jane. Try this cute jewelry box with lumberjack flannel or soft floral fabric for a different look! Supplies needed: wooden crate, cork tile, fabric, tape measure, scissors, hot glue gun, cup hooks, T-pins, sawtooth hangers. If painting or staining your crate, do this beforehand to allow it time to dry thoroughly. These crates can often be found in antique and thrift stores, but you can also get them in various sizes at craft stores. Step 1.
Art You Can Do: Band of Butterflies - Today's Nest
I could have also called this post "What I Did With The Scraps From Yesterday's Project". I had plenty of wood left over from the DIY palette picnic table, so I decided to keep creating. I had an idea for an Art You Can Do project, but I wasn't certain that it would work. I am pleased to present you with the result. This band of butterflies is more lovely than these pictures can show.
Lucky Wishing Stars Tutorial
You’ve probably seen these little puffy origami stars before. They are really quick to make, and you don’t need any special materials to make them. You can buy lucky star pre-cut strips from origami stores, but you can just as easily make your own from medium weight coloured paper, e.g. scrapbooking paper, or even strips cut from magazine pages – as the strips are so narrow, the original text or image won’t be obvious in the finished star. Anti-clockwise from top left: pre-cut strips, paper cutter, scrapbook paper, magazine page. Now on to the tutorial!
inspired ideas
Petit LanternsA project from inspiredfriend Constance Muller This swag of paper lanterns is a easy project and a quick one to complete too.Appropriate for ages 7 and up. For the Petit Lanternsyou will need: Paper~ Origami is a good choice, however any paper will work.Paper~ Card stock that coordinates with paperGlue sticksScissorsMiniature hole punchGlue gun and glue gun sticks or staplerRibbon or twineRaffia The Method: ~ Cut nine squares of card stock 4" wide x 5" long~ Cut nine squares of colorful paper 4" x 4"~ Using glue stick, glue colorful square centered on card stock.
{every}nothing wonderful: Tutorial: Recycled, Repurposed Ruffles (Scrap Embellishments)
A funny thing happened...the post about making envelopes from magazine pages? It got a pretty wildly unexpected response rate. Glad you seemed to like it! Here's a fun idea for a next-step: ruffles! If you are using your repurposed envelopes for gift giving or hand-delivered mail a little embellishment can go a long way. While usually I have an aversion for all things needle and thread, this couldn't be easier, faster, or more simple - and adds a great touch to envelopes, bags, or other packages.
How To Make Hair Bows: DIY (jr.)
Hello! I'm excited to introduce you to a cute new weekly feature DIY jr. It's a quickie DIY that you can do in an hour or less! Hair bows are one of my favorite accessories and this tutorial has been requested a lot over the past year. I hope you enjoy...