
Ben Lazreg Amel
Ingénieur en Informatique industrielle _communication des systèmes embarqués
Freecss_greenmint - Free HTML template - Live template preview. Tutorial: Client/Server on the Raspberry Pi. DzikuVx/raspberry_temperature_log. Feasibility of 433 MHz ASK RF module. Raspberry Pi. My immediate thought of what to do with my RPi was to set it up so that I could stream audio to the kitchen.
I wanted to be able to listen to my music collection (stored on an XBMC server) and podcasts (from my phone), and be able to control everything from my phone. I achieved this by setting up the RPi as a UPnP media renderer, with XBMC as the UPnP media server and my phone as the UPnP control point (and media server). It runs the very minimal GMediaRender on the RPi Debian image. Below is a little tutorial on how I did it: Packages. Tutorial. To use dygraphs, include the dygraph-combined.js JavaScript file and instantiate a Dygraph object.
Here's a basic example to get things started: <html><head><script type="text/javascript" src="dygraph-combined.js"></script></head><body><div id="graphdiv"></div><script type="text/javascript"> g = new Dygraph( // containing div document.getElementById("graphdiv"), // CSV or path to a CSV file. Installer un serveur WEB sur raspberry (http,php,mysql,ftp) [TUTO] - Réseaux, Internet, Téléphonie et Services en Ligne. Le but de ce petit tutorial est de monter un serveur WEB (html, php, mysql, phpMyAdmin et serveur ftp) sur un raspberry où a été préalablement installée la distribution raspbian.
![Installer un serveur WEB sur raspberry (http,php,mysql,ftp) [TUTO] - Réseaux, Internet, Téléphonie et Services en Ligne](http://cdn.pearltrees.com/s/pic/th/installer-raspberry-telephonie-96250744)
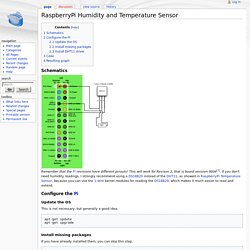
Au final, il s'agit donc d'héberger son site sur un raspberry! RaspberryPi Humidity and Temperature Sensor - Wurst-Wasser.net. Schematics.
w26nufcy.jpg (JPEG Image, 901 × 690 pixels) Decode 433 MHz signals w/ Raspberry Pi & 433 MHz Receiver. Adding 433 to your Raspberry Pi. In this blog post I'll show you how to add RF 433MHz to your Raspberry Pi.
Requirements. Send & Receive 433MHz Signals For Home Automation. Hi, i´ve decided to work on some home automation project with raspberry pi, i want to controll all kind of 433MHz Devices like power plugs.
I´ve got no expirience in working with 433MHz senders or receivers and RPi cabling so i decided to do a simple test setup before i start with the real project. Monitorer la temperature avec un Raspberry Pi. Piloter des dispositifs sans fil. Électronique | Informatique Niveau: Avancé Jonathan Schemoul. Piloter vos récepteurs volets OTIO avec un Raspberry Pi. Cet article est le premier d’une longue série sur la mise en place d’une centrale domotique pour piloter des périphériques de ma maison (volets roulants, détecteurs de mouvements, lumière, …).

Je commencerais par quelques expérimentations autour de la technologie RF avec le Raspberry Pi ou l’Arduino puis par la mise en place d’une interface Web de contrôle. Mais ça, ce n’est pas pour demain Je possède des volets électriques Somfy à mon domicile. Seulement, ces volets ne sont pas pilotables sans fils mais uniquement via les interrupteurs muraux filaires. J’ai donc installé des micro-récepteurs sans fils afin de pouvoir les piloter à distance. Électronique en amateur: Communication RF 433 MHz entre Raspberry Pi et Arduino.
Nous avons déjà abordé la communication entre le Raspberry Pi et l'Arduino au moyen d'un câble USB, ce qui imposait une certaine proximité entre les deux cartes.
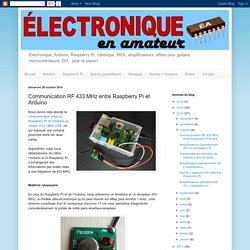
Aujourd'hui, nous nous débarrassons du câble: l'Arduino et le Raspberry Pi s'échangeront des informations par ondes radio, à une fréquence de 433 MHz. Matériel nécessaire En plus du Raspberry Pi et de l'Arduino, nous utiliserons un émetteur et un récepteur 433 MHz, le modèle ultra-économique qu'on peut trouver sur eBay pour environ 1 euro. Une antenne constituée d'un fil conducteur d'environ 17 cm vous permettra d'augmenter considérablement la portée de votre paire émetteur-récepteur.
Installation des bibliothèques Du côté de l'Arduino, j'ai utilisé la bibliothèque VirtualWire même si elle n'est plus mise à jour par son auteur (je ne me suis pas encore converti à RadioHead). Gpiosb.png (PNG Image, 960 × 720 pixels) Optimiser la portée RF - La taverne d'Idle. Sommaire : Raspberry PI & Arduino, domotique, robotique, et pleins de trucs en “ique” 10 : Commander le raspberry Pi par radio. Ce post est le dixième d’une liste de tutoriels sur le raspberry PI, cliquez ici pour accéder au sommaire !
Nous avions brièvement abordé l’émission/transmission radio via le raspberry pi lors de notre tutoriel n°8. Je vous avais promis une application concrète et plus poussée, nous allons donc aujourd’hui donner des ordres au raspberry PI via une télécommande radio achetée dans le commerce. Construire une sonde de température radio pour moins de 7€ - merciidleman.over-blog.com. Le principe L'Arduino Pro Mini (petit carré noir avec tout plein de pattes) va aller interroger toutes les 3 secondes le capteur DS18B20 (plus petit carré noir à trois pattes, en forme de transistor) afin de récupérer la température de la pièce, puis va envoyer, à travers l’émetteur RF 433 mHz (petit circuit à 3 pattes), l’information au Raspberry PI.
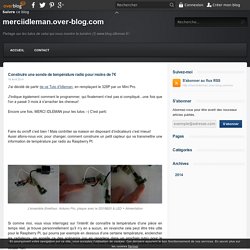
Le Raspberry PI, qui écoute en permanence les ondes radio à travers son récepteur RF 433 mhz, va détecter le signal, récupérer la température et la donner à une page PHP qui va la stocker dans un petit fichier texte (au format json), accessible depuis l’interface web et depuis Yuri. Piloter vos récepteurs volets OTIO avec un Raspberry Pi. Cet article est le premier d’une longue série sur la mise en place d’une centrale domotique pour piloter des périphériques de ma maison (volets roulants, détecteurs de mouvements, lumière, …). Je commencerais par quelques expérimentations autour de la technologie RF avec le Raspberry Pi ou l’Arduino puis par la mise en place d’une interface Web de contrôle. Mais ça, ce n’est pas pour demain Je possède des volets électriques Somfy à mon domicile. Seulement, ces volets ne sont pas pilotables sans fils mais uniquement via les interrupteurs muraux filaires. J’ai donc installé des micro-récepteurs sans fils afin de pouvoir les piloter à distance.
Du côté Hardware. 1pcs NEW PRO Mini ATMEGA328 Board 5V 16M Arduino Compatible Nano NEW M23. J h min s. 1pcs NEW PRO Mini ATMEGA328 Board 5V 16M Arduino Compatible Nano NEW M23. RFD21733 RF Digital Wireless. Adding 433 to your Raspberry Pi. Construct the wireless base station receiver - PrivateEyePi Project. This project assumes you already have a Model A or B Raspberry Pi, power supply, HD card, screen, keyboard, network etc. Raspbian Wheezy OS. In this project you will build a wireless base station receiver that can receive communications from a multiple wireless sensors like a temperature sensor, door contact or motion sensor. Wireless Projects - PrivateEyePi Project. Wireless sensors and a RaspberryPi open up a world of possibilities. The Internet Of Things (IOT) is phenomenon sweeping the world at this moment where everyday things (cars, homes, household appliances, plants) are being connected to the IOT where we can monitor, control and alert in ways not possible before.
RF communications can be a complex subject, but I have eliminated all the complexity by using pre-programmed devices that have the RF communication libraries already loaded. 10 : Commander le raspberry Pi par radio. 12 : Allumer des prises à distance. Ce post est le douzième d’une liste de tutoriels sur le raspberry PI, cliquez ici pour accéder au sommaire ! Avant que la fin du monde (un peu tardive), ou une trop grosse cuite du nouvel an ne nous sépare, je tenais à vous offrir ce petit tuto sur le “télécommandage” (ça se dit ça?) De prises électriques depuis le raspberry PI. Nous allons donc reproduire notre tuto 7 “éteindre/allumer une lampe avec le raspberry PI” mais cette fois ci, sans utiliser de fils. Démonstration. 15 : Créer sa propre prise radio (et autres périphériques) pour 6€ 18 : Construire une sonde de température radio pour 7€ Ce post est le dix-huitième d’une liste de tutoriels sur le raspberry PI, cliquez ici pour accéder au sommaire ! Faire du on/off c’est bien !
Mais contrôler sa maison en disposant d’indicateurs c’est mieux ! Résultats de recherche. Je me rends bien compte que je suis aussi bon en communication qu’en orthographe ! Mais je vais tenter de rectifier le tir avec un petit post permettant de répondre aux question les plus courantes sur mon système yana. Mes derniers posts parlent beaucoup de domotique, notamment à l’aide du Raspberry PI, le tout relié par des signaux radios.
Au cours des questions qui m’ont été posées ces derniers mois sur le tuto, je me suis rendu compte que le concept de la radio semblait encore un peu flou pour certains. Notamment j’ai vu […] Article rédigé par le lecteur Geoffrey ENJOLRAS Salut à tous, Autant être franc, je suis loin d’être un fin connaisseur en informatique (ah la la mon seul défaut…). Une carte 2 canaux E/S analogique pour le Raspberry Pi chez ABelectronics. La petite dernière de chez ABelectronics va peut-être vous intéresser. Elle fait partie de la série des cartes empilables que je vous avais présentées en octobre 2013.
w26nufcy.jpg (JPEG Image, 901 × 690 pixels) RPi Tutorials. Back to the Hub. Community Pages: Tutorials - a list of tutorials. Send & Receive 433MHz Signals For Home Automation. Decode 433 MHz signals w/ Raspberry Pi & 433 MHz Receiver. Adding 433 to your Raspberry Pi. Maven et industrialisation du logiciel. FAQ Maven, le club des d veloppeurs et IT Pro. Spring Security,Spring Security Tutorial,Spring Security Authentication,Spring Security Download, Spring Security Example Code, Security Spring example. Spring Security Tutorial, Acegi Implementation 0inShare Acegi is the most used web project security tools in respect of Java web development.
Acegi is a security framework for authentication, authorization and role based authorization of the users. Spring Security is an implementation of Acegi referral API. Spring Security Framework provides a lot of facilities to take care of the java web enterprise security management. Dependency Injection via Constructor in spring. .java.Above Country class contains object of this class.Copy following content into Capital.java This class contains main function.Create ConstructorDIMain.java under package org.arpit.javapostsforlearning.Copy following content into ConstructorDIMain.java.
Spring 3 Dependency Injection via Constructor and Setter. In this tutorial we are going to demonstrate the Spring Framework implementation of the Inversion of Control (IoC) principle, that is also known as Dependency Injection (DI). Dependency injection (DI) is a process whereby objects define their dependencies, that is, the other objects they work with, only through constructor arguments, arguments to a factory method, or properties that are set on the object instance after it is constructed or returned from a factory method.
The container then injects those dependencies when it creates the bean. DI exists in two major variants, Constructor-based dependency injection and Setter-based dependency injection. Tinyos/tinyos-main. [Tinyos-help] Raspbian and TinyOS. Installing tinyos on Raspberry Pi. Installing TinyOS on Raspberry PI - FOSSterer - Quora. REST et SOAP: Quand les utiliser ? SOAP vs. REST : choisir la bonne architecture web services - Le blog de Clever Age. Utiliser des détecteurs sans-fils - Gladys Project. Prise en main du Raspberry Pi B+ Découvrez Wiser, la box pour gérer votre énergie. Raspberry pi : Créer une passerelle homecinema multifonctions. Domoticz. Utiliser des détecteurs sans-fils - Gladys Project.
Piloter sa maison grâce au web. 07 : Allumer/éteindre une vraie lampe OU comment faire de la domotique low cost. Internet de Objets communicants. Raspberry Pi : fabriquons des trucs! - Topics perso et Community Management. Raspberry Pi : fabriquons des trucs! - Topics perso et Community Management. Station météo avec le Raspberry Pi (Page 1) / Tutoriels / Projets / RaspFR. Applescript surveillant l'état d'un programme. Home Automation, Home Security, and Peace of Mind. Envoyer des SMS avec un Raspberry PI. SMS Gateway : une passerelle SMS à la maison. RPi VerifiedPeripherals. Voyant pour indication de la température. Top 10 Things to Connect to Your Raspberry Pi.
Fabriquer un émetteur FM pirate avec un Raspberry Pi. Se passer de serveur DNS grâce au Multicast DNS. Présentation de ma Raspberry PI. My Raspberry Pi project. Installing Raspbian on the Raspberry Pi & using SSH and VNC to remotely connect to the Raspberry Pi. Raspberry Pi – Comment mettre à jour le firmware ? Utilisez votre Raspberry Pi avec Open Z-Wave. Raspberry pi : Créer une passerelle homecinema multifonctions. PiTFT un écran tactile 2,8 pouces pour le Raspberry Pi chez Adafruit. Raspberry Pi et SMS – milillicuti – communication & publicité – home automation. NotiPi. Random Geeky Ramblings: Raspberry Pi as a SMS Gateway using Gammu. Passerelle SMS avec un Raspberry PI et mail2sms. Blogging about tech, mostly.: The Raspberry Pi and Wireless RF (XRF) Temperature Loggers.
Sensor - Temperature XRF development sensor - THERMISTOR. Wireless Projects - PrivateEyePi Project. Construct a wireless temperature sensor - PrivateEyePi Project. Wireless Temperature Sensor Project - PrivateEyePi Project. Raspberry Pi and Wireless Sensor. Raspberry Pi Temperature Logger via Radio. Rtl-sdr – OsmoSDR. Raspberry Pi Temperature Sensor. Merbanan/rtl_433. Building a Wireless Sensor Network in Your Home.