
Create a light Effect in Photoshop. Step 1 Create a new document in Photoshop and fill the background with black using the Paint Bucket Tool (G).
Then go to Layer - New - Group to create a new group and name it "bg". Create a new layer inside this group and fill it with the color #1f0959. Name this layer "bg" and set its opacity to 50%. Step 2 Create a new layer inside the "bg" group. Step 3 Right-click on the layer you created at the previous step and select Convert to Smart Object. Step 4 Duplicate the "color" layer by dragging it over the 'Create a new layer' button from the bottom of the Layers panel (or right-click on it and select Duplicate Layer). Double-click on the new "color" layer to open the Layer Style window and add a Color Overlay using the color #ffd200.
Step 5. Multi-shirt/pant /suit de-wrinkler (steamer) Old Sony Ericsson phone as GSM shield, clock, display, keyboard, BT, audio, more. You can use an old Sony Ericsson phone as free or dirt cheap GSM “shield” for sending and receiving messages (turning on/off some device), sending collected data (as e-mail, SMS, MMS) to any location, receiving or initiating calls – for example if an alarm is triggered, or to listen what is going on in remote location - but also by using ordinary AT commands it is possible to set and read phone’s timer, clock, calendar, use basically any phone’s available function.
This is where it gets even more fascinating… You can use camera, keypad as input device to Arduino, audio recorder/player, some voice control (“magic word” function), Bluetooth (it is limited to sending notes, files and contacts – but it can be used in some projects). $400 DIY Drawer Slide CNC Machine. Facebook. How to make a mini milling machine- manual or CNC! I think one of the best things about tools is that they can be used to make more tools! I decided to build a miniature milling machine for machining plastic parts, creating wax patterns and for drilling really small precise holes.
I also wanted to design it so that I could convert it to CNC for machining circuit boards and for doing repetitive work. The finished mill has a 11" x 18" footprint and is about 19" tall. Depending on the motor used it is capable of machining plastic, wax, wood and non ferrous metals. Right now my motor is a bit underpowered due to the power supply I had on hand. How to Make a Three Axis CNC Machine (Cheaply and Easily) A salute to those who have laboured through to this point (and to demonstrate that it is reproducable) Here are some pictures of other peoples machines.
Photo 1 - Chris and his friend put together this unit; laser cutting the parts out of half inch acrylic. Not only does it look super it must weigh a ton. But kudos, anyone who's worked with acrylic knows laser cutting it is great but it is a very very unfriendly material to drill and there is a lot of side drilling in this design. Good job guys, check out more details (and photos including some testing with circuit boards) on Chris's blog rainbowlazer.com. Building a Small Format Vacuumformer from an Old Toaster Oven : Sourcing materials. Materials for this project will vary slightly depending on several factors.
The size of the heating elements mentioned in step 1 will determine the general scale of your project and, in turn, the amount of materials needed to finish your machine. Generally, the following materials will be necessary: Wood, in various sizes - I used a combination of 1x6, 1x4, and 1x2 poplar along with 3/8" and 1/4" MDF. 16ga grounded home electrical wire, approx 20ft Wire nuts, approx 10 Wood finish, shellac, sealer or paint Screws 4x bolts w/ nuts & washers. Arduino-controlled RGB LED Infinity Mirror. Update 11/22/2013: Thanks to everyone who voted for this project in the Microcontroller Contest!
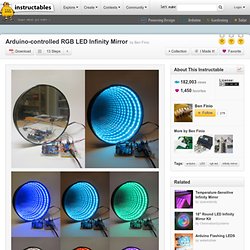
It was one of three first-prize winners. Update 9/17/2013: Thanks to everyone who voted for this project in the Arduino contest (I was one of ten "second prize" winners)! If you want to try this project with an addressable LED strip instead of an analog strip, check out the Rainbow Jar project (also an Arduino contest winner). This is my take on a combination of two classic projects: RGB LED control with an Arduino, and an Infinity Mirror. It's an RGB LED infinity mirror that lets you toggle between an adjustable-speed color-fade mode and a direct-control mode where you individually set the red, green, and blue LED brightness levels. I've done my best to gear this project towards newbies by providing an exact list of materials I used and the exact procedure that I followed.
So, on to the materials list. Materials: Electronics Arduino UNO R3 with mini breadboard and jumper wires.