
Dip Dye Clothing DIY – Do It Yourself Dip Dye. This week we’re sharing some of the blog’s greatest hits!
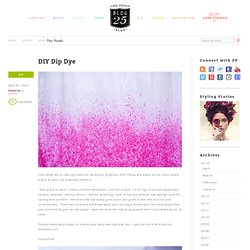
These are some of our most loved posts by you, our amazing readers. “She drips in color” comes to mind whenever I see this trend — it brings a certain happiness to tees, dresses, shorts, shirts… almost anything! And, it has become an eye opener look for spring and summer. We love how dip dying your basic tee gives it new life in a fun and creative way. There are so many different ways you can experiment with this technique that you can kind of get carried away – here we love the subtle approach with a sprinkled burst of color. Follow these easy steps to create your very own dip dye tee — you can do it with cotton dresses too!! Inspiration: What you need: A tray, 1 measuring cup, salt, Dylon dye of any color (not the machine washable ones), heavy duty cleaning gloves and a basic white tee. Mix a quarter of the Dylon dying powder into the tray with 4 cups of warm water and 4 tablespoons of salt. Hang to dry. Orecchini.
So today I thought it would be a fun challenge to work with paperclips.

You can’t get much more mundane than a paperclip! After much thought, I came up with paperclip earrings. If you have paperclips and some pretty cotton string, you can create these beauties. They’d probably look pretty cool as a necklace too. Here is a diagram to show you where to open the paperclip to create this triangular shape. You are basically unbending the clip at all three of the curves. Once you’ve got the triangular shape, you need to glue the ends together. Fig 1: Winding the string around // Fig 2: Starting to wrap the string around the earring, secured with Liquid Stitch Once you’ve wound all the way round and secured with glue, you can then take another length of string and wind around the width of the “earring” creating horizontal stripes or you can create a more messy look by creating a “net” design (see below).
Then just clamp on a pair of earring hooks. Categories: Art, DIY, Fashion. Specchio 2. Well that’s a mouthful!
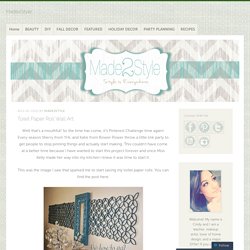
So the time has come, it’s Pinterest Challenge time again! Every season Sherry from YHL and Katie from Bower Power throw a little link party to get people to stop pinning things and actually start making. This couldn’t have come at a better time because I have wanted to start this project forever and once Miss Kelly made her way into my kitchen I knew it was time to start it. This was the image I saw that sparked me to start saving my toilet paper rolls. You can find the post here. I literally have been saving my rolls for. ever. Here’s what my toilet paper wall art turned into! Ok let’s get down to the nitty gritty. Next, I cut them up. Then, I took 4 pieces and glued them together using a hot glue gun. I continued doing this until I had about 40. Then I took the mirror I was going to use (10″ mirror purchased at Joann’s for $8) and placed it on the floor and started adding all the circles around keeping in mind that I wanted to keep it in a circle. Linking Up To:
Specchio 1. As I already showed you, paint sticks is a great material for a DIY sunburst wall mirror.
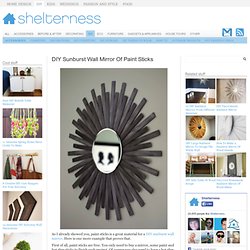
Here is one more example that proves that. First of all, paint sticks are free. You only need to buy a mirror, some paint and hot glue sticks to finish such project. Of course you also need to have a hot glue gun and a wire cutter at your home. Although if you are interested in making your own sunburst wall mirror you definitely should have such simple tools lying around. For full instructions for the project visit Our Humble Abowed. Christmas Trees Paper. Regali homemade.