hanging picture sticks
Step 4: Hang and Enjoy! This quick and easy art project is ready to hang and enjoy. You can play around with a variety of different looks and styles using nothing more than empty frames and branches from the backyard.
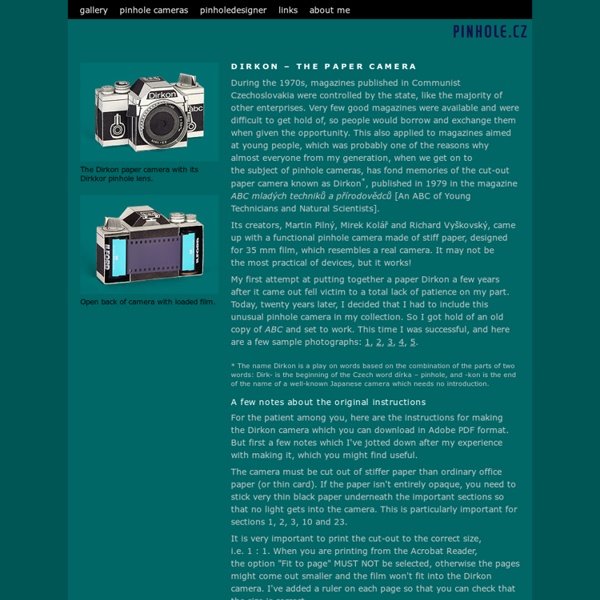
Paper Hasselblad Camera
It’s not often that we run across a piece of paper art that is also functional, but that’s just what we have here: set designer and paper aficionado Kelly Angood has recently designed a strikingly lifelike Hasselblad camera made entirely of paper and corrugated cardboard. As you can see from the results below, the pinhole camera gives some very stylish and classic results on it’s medium format 120 film. Want to build one of your own? Angood has been so kind as to share printable plans for a 35mm film version of the camera which should make procuring and developing film much, much easier. Below: a schematic and video detailing the 35mm version. Via: strictlypaper.com Known in some circles as the most amazing man in the universe, he once saved an entire family of muskrats from a sinking, fire engulfed steamboat while recovering from two broken arms relating to a botched no-chute wingsuit landing in North Korea.
Freezer Paper Transfer {Tutorial}
I wish I could take credit for this ingenious idea. But, I can't. NOPE.I learned the technique from But today, I'm going to show you how I made these pillows from grain sack scraps. Specifically, this pillow because it's the only one that I took pictures throughout the process... Okay... Let's get started. First of all, what do you need? 1. 2. 3. And yes, you really need the spray adhesive. I tried the cheap-o way out and tried to simply tape the freezer paper to the printer paper. Yeah. Doesn't work. Spray the piece of paper with the Spray Adhesive and adhere your freezer paper to the printer page PAPER SIDE DOWN. The waxed side of the paper should be facing out. This is the side you're going to print on. Next, you're going to find an image online to use. but I would imagine any image online would work. For sake of illustration and because it's what I used, here's The Graphics Fairy. For an image, she gives you a couple of options. For this particular illustration, I use an iMac, so if you have a PC, 1. 2.
Mug Gingerbread Houses
Earlier I made gingerbread houses meant to perch on the edge of a mug, but I wanted to work on a few more things. First, since these are meant to be eaten I wanted to cut down on the amount of royal icing. I still used it to assemble the houses, but to get sugar decorations to stick to the roofs I decided to use simple syrup. Second, I added a chimney. I think it turned out very cute, though I found that the taller chimneys looked incongruous, so I’ll stick to very short chimneys. Third I decided to see what whole happen if I moved the door shape, the part that fits over the mug, off to one side to allow more of the house to hang on the outside of the mug. Last I wanted to see if it would work out using sugar cookie dough.
Pic on wood & metal
Below you will see how to make:Personalized Hand SanitizersStoring your BootsWrapped LettersShredded T-ShirtChristmas Photo TagsPhotos on MetalPhotos on WoodRemovable Snap On & Off Lace ShortsDinner Menu BoardStamped Coasters from Bathroom Tiles Photo Magnets from Glass Gems or MarblesSticky Notes Clipboard from CoastersJewelry Holder out of FrameQuick Poodle Skirt Personalized Hand Sanitizers What you’ll need: Bath & Body Works hand sanitizersLabel TemplateColor PrinterGlueRibbons My mother-in-law and I were helping with a bridal shower and so we wanted to give out favors that would be cute but something people would ACTUALLY use. 1. Then I went online and searched free digital scrapbook paper to create my labels on photoshop. - - - If you are new to digital scrapbooking…here's a free video tutorial for beginners. 2. 3. 4. 5. 6. Storing your Boots Pool Noodle (I got mine at the Dollar Tree!)
Hardwood Bookmark
I was squaring up a block of mahogany, and I shaved off several “scrap” strips: thin, almost flexible sheets of hardwood. I couldn’t let something so interesting go to waste. “Business cards?” I thought… No, I don’t really have a business. “Name plaque for my office door?” Perfect. Materials o Thin sheet of wood (see below for ideas)o Small 1x1x1/4ish” wood blocko Permanent markers or wood burnero String, yard, or cordo Wood stain and paste wax or polyurethane clear coato Electric drill and 1/8” and 3/8” drill bit 1. 3. 4. 5. Tagged : bookmark, book, handmade, wood, woodworking, mod, read
Giant Picture
Giant Picture, for cheap, take 2. Using my previous tutorial (sort of). Eek!! I am in love with this- - I'm sure you recall that I've done a tutorial on a DIY giant cheap picture - it's of my girls and still hangs in their room - looks just as good today as the day I posted about it: I love that picture and the project - the problem is that it is upstairs and in a bedroom, so most people who come into my home don't see it and it's fabulousness (unless I drag them up there to show it off - which I do occasionally). So when I redid my living/dining room, I knew I wanted to do a family picture, Giant Picture style. First off, take a picture. Then, I printed it as an "engineer's print". The one of my girls I stuck onto a cheap piece of styrofoam. The board was bigger than the picture to create that border. I was lazy and only painted the edge, which you can see in this next picture. At this point it looked pretty good, but a little plain: Have you made a Giant Picture yet??
Recycled Kraft Package
Hi fellas and ladies! This is Mandi with a useful and fun DIY project for you. I'm constantly packaging goodies for my vintage shop customers and friends across the world, but buying packaging products is expensive and also contributes to environmental waste. I wanted to find an inexpensive and sustainable way to personalize pretty packages without paying for envelopes, tape, and labels. I ended up coming up with a kraft package made from recycled grocery bags. To obtain supplies, all I need to do is say "paper" instead of "plastic." For this project, you will need: 1 paper shopping bag 1 pair of scissors 1 black gel pen A sewing machine with thread Leftover rub-ons (optional) These are made by Hambly Screen Prints. Step One: Cut open the sides of your bag and fold the flaps over to maintain an even width across the length of the paper. Step Two: Use some leftover rub ons from past scrapbooking or craft projects to decorate your paper. Step Three: Step Four: Trim the uneven sides of the bag
Instagram Canvas Wall Art
I whipped this project up for our home last week. We have moving on the brain, so all of the home decor projects I'm taking on this summer will be super easy to transport to a new space! I think summer is a great time for home decor project, don't you? 1. Supplies Needed: Instagram photos (I used 4x4 prints provided by PostalPix a great app for printing your instagrams and having them sent right to your doorstep!) and a paint brush. 2. There you have it!