
Blender Jiggle Physics Softbody. Blender 3D: Noob to Pro/3D View Windows - Wikibooks, open books for an open world. 3D View windows in Blender are used to visualize 3D scenes.
You’ll do a lot of work in these windows, so you will need to learn your way around. In this module, you'll learn: to recognize 10 things commonly seen in viewportsto tell which mode Blender is inhow to change viewport options and viewpointshow to position the 3D cursor You'll also learn the fundamentals of: visibility layers The Viewport and its Contents[edit] Aside from its header, the remainder of a 3D View window is its viewport. Viewports are busy places. Launch Blender.Just so we're all looking at the same scene, load the factory settings using File → Load Factory Settings.Confirm the “Load Factory Settings” popup with LMB (or Enter ).If the NumLock indicator on your keyboard is unlit, press NumLock so that numpad hotkeys will work properly. Texture paint Blender 2.72, Stencil, Palette, Brush Fill. Mode Texture Paint Blender 2.72 Note : En premier lieu, pensez à configurer l'interface de Blender tuto sur • Pour la partie Mode Texture : rendez-vous dans les User Preferences en passant par File (fichier et préférences des utilisateurs) et activez en cochant l'Add-On "Texture Paint Layer Manager" & Palette Paint".
Mémo : Avant de peindre, n'oubliez pas de valider le Scale de l'objet (la taille de l'objet) afin d'obtenir un dépliage proportionnel à votre objet mesh → (donc une uvmap correcte). Ensuite, pour peindre ou texturer votre objet, il faudra évidemment déplier votre mesh et donc parfois faire des coutures et appuyer sur "U" pour unwrap (dépliage). • Un nouveau système a été mis en place dans la partie mode texture paint.
. • En mode «Matérial», le système inclut du code pour créer automatiquement un matériau, uv carte (si manquant) et la texture diffuse pour la peinture. . • Vous pouvez visualiser en temps réel le travail effectué par la normal bump. Tuto blender comment faire une animation. Débutez dans la 3D avec Blender. Depuis quelques années maintenant, la 3D a envahi notre quotidien : au cinéma (effets spéciaux, cinéma d'animation) à la télévision (publicité..), dans les jeux vidéo... elle est partout !
Mais alors, comment on fait de la 3D ? Est-ce difficile, réservé aux professionnels ? Je peux en faire moi ? Faut-il se procurer des logiciels à prix d'or ? Materials/Properties/Diffuse Shaders. From BlenderWiki Mode: All Modes Panel: Shading/Material Context → Diffuse A diffuse shader determines, simply speaking, the general color of a material when light shines on it.
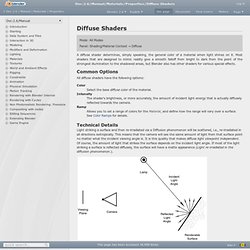
Most shaders that are designed to mimic reality give a smooth falloff from bright to dark from the point of the strongest illumination to the shadowed areas, but Blender also has other shaders for various special effects. Common Options All diffuse shaders have the following options: Color Select the base diffuse color of the material. Intensity The shader's brightness, or more accurately, the amount of incident light energy that is actually diffusely reflected towards the camera. Ramp Allows you to set a range of colors for the Material, and define how the range will vary over a surface. Technical Details Light striking a surface and then re-irradiated via a Diffusion phenomenon will be scattered, i.e., re-irradiated in all directions isotropically. Light re-irradiated in the diffusion phenomenon.
Shader Names. Modeling/Objects/Groups and Parenting. From BlenderWiki There can be many objects in a scene: A typical stage scene consists of furniture, props, lights, and backdrops.
Blender helps you keep everything organized by allowing you to group like objects together. When modeling a complex object, such as a watch, you may choose to model the different parts as separate objects. However, all of the parts may be attached to each other. In these cases, you want to designate one object as the parent of all the children. Set Parent To pop-up menu To parent objects, select at least two objects (select the Child Objects first, and select the Parent Object last), and press CtrlP.
The last object selected will be the Active Object (outlined in light orange), and will also be the Parent Object. The Set Parent To popup dialog is context sensitive, which means the number of entries it displays can change depending on what objects are selected when the CtrlP shortcut is used. For non-inverse-mode, press ⇧ ShiftCtrlP instead. The online portfolio of Enrico Valenza - Softbody for Rigged Characters. How To Create Augmented Reality Apps. How to make elastic constraints? View Full Version : How to make elastic constraints?
Hello people! I have problem with Constraints in Blender 2.61 So, imagine this situation: You would like make a physical Constraint in Blender Game Engine. In this situation you can use Rigid Body Joint for make it. But: Rigid body joint is good fot physical Constraint, but it have some limits... That is the problem: Rigid body is really rigid, but it is not elastic, you can't simulate with it springs, trampolines and other.
I can't find any tutorial in internet for this (i have searched this for two weeks) Can anybody advise me, please? I'm fairly certain you'll need to use multiple objects, some set as rigid body and others as soft body. This is reason why i ask: Is here any solution for combine soft body and rigid body (car shock with car body, etc.)? If you want to use shape keys, I'm pretty sure you would have to do all the physics yourself in Python. Ok, that's true.