
Untitled. Eftersom jag vet att inte alla som läser min blogg också läser tidningen "Allt om trädgård"så kommer här ett gör-det-själv tips i repris från Marie som har den vackra trädgården på hur du gjuter egna trampplattor i betong. Publicerades också i Allt om trädgård nummer 6. Blanda ihop cementen (finbetong) tills att det liknar havregrynsgröt. Blandningsförhållandena mellan vatten och betong står anges också på förpackningen. Rör i cirka 10 minuter.Såga av ett pappersrör i lämplig storlek. Dessa finns att köpa på välsorterade byggvaruhus.
THIS.IS.WHAT I.DO. How to Recycle Magazines into Jewelry. September 23rd, 2010 Email 419 users recommend Experiment with various coil sizes, and even glue coils together!
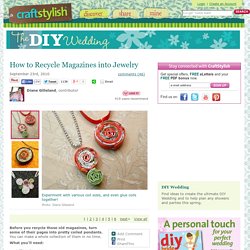
Diane Gilleland Magazine paper lends itself well to this colorful little project. This pendant is made with parts of three different pages. There are tons of design possibilities... Photo: Diane Gilleland 1 | 2 | 3 | 4 | 5 | 6next> View all Before you recycle those old magazines, turn some of their pages into pretty coiled pendants. What you'll need: Magazine pagesScissorsBone folderThin wooden skewerLow-temp glue gunWhite craft glueEye pinBlank cardstockClear acrylic sealerJump ring A note on glue: After much testing, I've found that my low-temp hot glue gun works well for this project.
As an alternative, you can glue your coils with white craft glue, but you'll have to hold the work in place for a few minutes to let the glue set. First, you'll need several magazine pages. View 3 member project galleries posted in: necklace, paper, recycled magazines. How to Make a Snowstorm. November 25th, 2013 Email 355 users recommend Say goodbye to hand-cut snowflakes taped to windows.
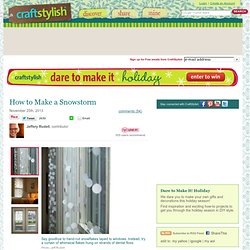
Instead, try a curtain of whimsical flakes hung on strands of dental floss. Jeff Rudell A guestroom plays host to a man-made snowstorm. Hung like beaded curtains in front of windows, these snowflakes make a subtle, modern, and whimsical addition to any seasonal room décor. Photo: Jeff Rudell A friend of mine visiting from the tropics wanted, more than anything, to see snow. So, in contrast to my chandelier post, I offer a low-skill, high-impact project sure to surprise your guests (and your family) and help put you in the spirit of the season (regardless of whether the weather is cooperating with you or not). View 4 member project galleries posted in: Stay connected with CraftStylish.
Zinc inspired letters. March 22, 2011 | Projects | Comments We’re loving these Anthro-inspired zinc letters!

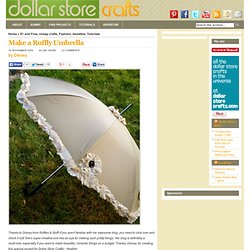
Kristin, a very lovely Charmer, sent over this easy and affordable craft project. We’ve all seen the silver letters at Anthropologie and other darling stores, but it’s so easy to make your own for a fraction of the cost! Kristin bought seven letters for less than the price of one at Anthropologie! You go girl… we love a great deal ; ) Check out the tutorial below and thank you Kristin for sending this adorable project over! Supplies: Black acrylic paint, Folk Art pearl paint, cardboard letters and a paint brush. Directions: Paint the letters all black and let them dry. Photo Credit: Kristin for Sugar and Charm. Make a Ruffly Umbrella. Home » $1 and Free, cheap crafts, Fashion, Headline, Tutorials 16 November 2009 44,380 views 23 Comments by Disney Thanks to Disney from Ruffles & Stuff!
If you aren't familiar with her awesome blog, you need to click over and check it out! She's super-creative and has an eye for making such pretty things. Hello everyone! Tutorial: A Yarn Painted Greeting Card. As you will soon discover (if you haven't already), I love making things using stuff I find around the house and in the recycling bin, one of my favourite places (especially since I cleaned it, yesterday).
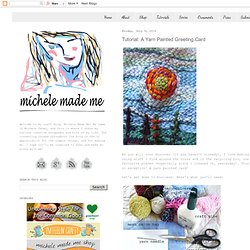
This project is no exception! A yarn painted card! Let's get down to business. Here's what you'll need: Take your sheet of card stock. Take your mesh bag and cut a piece of mesh that is a bit larger than your card: about 1 inch wider in both length and width. Now you can, on a separate sheet of paper, draw out a design, but I just jumped in and improvised to my heart's delight! I took my yarn needle and threaded in some yarn. I wove in a little yellow circle going in and out of the mesh in a spiral. Um, time for another colour! Oh. And now I've filled the whole thing. So now, I machine-sew the mesh to the card, roughly a 1/4" from the edge of the card and all the way around. This is what it looks like from the front so far. See the white machine stitching there... So it looks like this.
Faux Stained Glass.