background preloader

Functional

Facebook Twitter

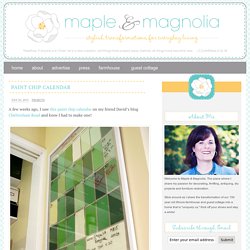
Paint chip calendar | Maple and Magnolia. A few weeks ago, I saw this paint chip calendar on my friend David’s blog Cheltenham Road and knew I had to make one! It combines two things that I love…stylishness and organization. And the fact that it utilizes paint chips? Even better. I mostly followed David’s tutorial with just a few modifications. That’s the beauty of this project…it’s totally customizable. Since I planned for this calendar to hang in my office, I chose paint chips that would coordinate with the room and with the pin board that hangs on the adjacent wall. Here’s my version. materials needed: poster frame, fabric, hot glue gun, 35 paint chips, paper trimmer, corner rounder, fabric glue, foam brush 1) Purchase a poster frame (mine came from Target…$9.99). 2) Remove the edges from the frame. 3) Cover the cardboard insert with fabric using hot glue to secure it on the back, pulling tightly to keep the fabric smooth. 4) Trim the paint chips with a paper trimmer (I chose to leave the paint color names but cut off the brand).
The Magic With Corks. If you enjoy in good wine and you didn’t trow away the old corks you can create interesting home gadgets that are both interesting and creative. Home decorating can be improved using one of the 25 home ideas with corks we presented here. You don’t need to spend money for your home, you can easily recycle and reuse the old corks for coasters, maths and much more.

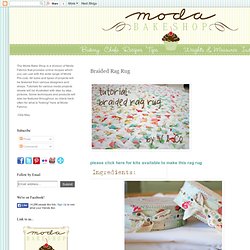
Stamps Thread Spool Corks Wreath Magnetic Cork Planters Cork Ball Key Chains Coasters Cork Letter Placecard Holders Trivet Bathmat Plant Marker Cheese Knives Cork Candles Cork Candle Votives Simple Cork Necklace Embroidered Cork Necklace Wine Corkboard Champagne Cork Knobs Wine Charms Lampshade Fridge Magnets Animal Sculptures Cork Pen Journaling corks arts, corks usage, diy corks. 22 Perfect DIY Gifts For Stressed-Out Moms. 14 Creative Ways To Use Embroidery Hoops. Mason Jar Craft Storage! Braided Rag Rug. Pin your three sewn strips anywhere you can be comfy (you are going to be there for a while! I did mine to my runner on my dining room table) this is the start of your braid. once you get close to the end of your braid you are going to fold over the end of your strip and snip with your a slit. grab the end of your new strip (the end without the slit) and pull through both slits (from behind) this will adjoin your strips and you will be able to continue your braid this is what it should look like, now keep braiding. once you get close to the end of your braid you are going to do the same as you did before and make a slit at the ends of your braided strips and at the beginning of your next strips this time wanted to add color so i took one strip of the honey bun and two of the white strips i cut out. it should now look like this. this will be what you do through out the whole process of braiding your rug. one color in the middle and two whites on the outside. look what you made!
Wool and the gang™ — watch the videos. Our 20 Favorite Crochet Sites - Womans Day - StumbleUpon. What can you do with an old pallet? So many things! If you ever come across the opportunity to pick up a few pallets take a look at some of the ideas I have come across for recycling old pallets into furniture and other practical and decorative pieces. I would like to mention that the designs below were found at various sources on the Internet. Where possible I have mentioned the original source, but unfortunately too many do not. If you are the original designer for any of the furniture below, please let me know so that I can add your details. Make furniture for your home ABOVE: Mobius Living take pallets to a new level, offering clients the opportunity to buy ready-made coffee tables.

ABOVE and BELOW: Who would have thought that a humble pallet could be transformed into so many practical pieces. ABOVE: All it takes is a few reclaimed timber pallets to make up your own living room furniture In the kitchen ABOVE and BELOW: Don't stop there... In the bedroom In the garden Pallets for pets Find and prepare your pallet. How to Turn a Pallet into a Garden. Good news and bad news. I had planned to film a short video showing you how to make a pallet garden, but the weather didn’t cooperate. I was stapling the landscape fabric onto the pallet when it started drizzling and got really windy. That’s the bad news. But I know I promised a tutorial today, so I took photos and have kept my word to share how to make the pallet garden. I tried to be as detailed as possible. That’s the good news. So keep reading my pallet loving friends, instructions on how to make your own pallet garden are just a few lines away… Find a Pallet The first thing you need to do is–obviously–find a pallet.
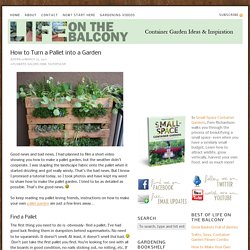
Don’t just take the first pallet you find. Collect Your Supplies Get Your Pallet into Shape Once you’ve dragged your pallet home, give it a once over. Let the Stapling Begin! Decide which side of the pallet will be the bottom when the pallet garden is completed and leaning against the wall. Lay the pallet face down. Now for the sides. Now for the Fun Part–Planting! Wednes-diy | Free People Clothing Boutique Blog - StumbleUpon. UPDATE: This post originally ran on March 23 2011, but with summer winding down we wanted to bring it back up for some late summer inspiration! A fellow fp girl sent this to me a couple weeks back and i’ve been thinking about it ever since!

I can think of a million reasons why these would be awesome… as apartment décor, as outdoor party décor, and – wouldn’t they be the best thing EVER for camping in general or at a festival? Just let them sit in the sun all day, and they’ll last all night! I am absolutely going to make some to bring with me to bonnaroo this year. you can buy a sun jar here, but you can make your own for much cheaper! What you need: a mason jar with a clear glass lid like this one from ikea, a solar garden light like the ones pictured above, which i found here, adhesive and glass frosting spray. start by spraying the inside of the jar with the frosting spray – this will help diffuse the light and give it a warm glow. don’t spray the lid though! Last image. How to Make Paper Pencils (tutorial) | scissors.paper.wok - StumbleUpon. I have always wanted to make my own pencils, but the thought of shaping two pieces of wood to allow a piece of lead to sit perfectly inside made me think it wasn’t worth the effort.
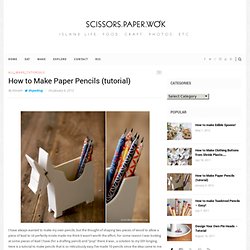
For some reason I was looking at some pieces of lead I have (for a drafting pencil) and “pop” there it was.. a solution to my DIY longing. Here is a tutorial to make pencils that is so ridiculously easy I’ve made 10 pencils since the idea came to me yesterday! Enjoy. Paper: I recommend using 6″ origami paper. Here’s a video I made so you can watch me make it from start to finish! I have to admit I really enjoyed doing this craft. Hope you’re just as excited about this as I am! Leads {here} paper {here} mod podge {here} {If you like pencils, you may also like my toadstool pencil craft!} Share 16K+ Kimanh Hi my name's Kimanh. Tutorial: Homemade Sidewalk Chalk | oh my! handmade goodness - StumbleUpon.

By Michelle Vackar, Modern Handmade Child One of our favorite outside activities at our home is drawing with chalk on the driveway. You can play hopscotch, four-square, and of course draw and create silly stories. My daughters and I were talking one day as we played hopscotch about how to make chalk and I thought to myself, let’s try it! It ended up being quite a lot of fun. What you will need: • Toilet paper or paper towel tubes • Scissors • Duct tape • Wax paper • Small bucket or disposable container to make the recipe • ¾ cup of warm water • 1 ½ cups Plaster of Paris • 2-3 tablespoons of tempera paint • Paper bag or a “mess mat” ** we made six tubes of chalk – we simply doubled the above recipe.

Step 1: If you are using paper towel tubes, cut each tube in half, so it is roughly the length of a toilet paper roll tube. Step 2: Cover one end of each tube with duct table to hold the contents within. Step 3: Cut as many pieces of wax paper as you have tubes. Holder for Charging Cell Phone (made from lotion bottle) | Make It and Love It - StumbleUpon. My husband and I both have cell phones. And both of us have phone chargers. And that means lots of obnoxious cords. You never know when one of us may be moving phone cords around, to give our phones an extra charge while we’re chatting away……… or trying to charge our phones up before running errands or something.

Needless to say, those phone cords seem to be everywhere…..and are generally in the way and hanging all over the floor. (Okay, and how about when you’re in a hotel or visiting family/friends. There’s never a perfect place to rest your phone while it’s charging.) I was looking around on the internet for a solution and found this. It made the perfect little holder for my cell phone while it’s being charged. Holder for Charging Cell Phone And no more phone hanging down from the outlet while in this room or that room……..the cord and phone are now up off the ground, and tucked away into the little holder, while the phone drinks up a full charge. And turns out, it’s pretty useful. Print Hula Hoop Rug Page | Crafts | FamilyFun - StumbleUpon. DIY Organization Solution - Grocery Bag Holder - StumbleUpon. Delightful country cookin: homemade air freshener - StumbleUpon.

"Don't you get fresh with me, ya hear! " Oh, I love it when adults (especially grandparents) say that to little kids. What does it mean exactly? Does it mean we'd rather children get dirty with us? Haha...who knows? Today, I'm going to ask you to actually get fresh with me. I digress. I was roaming around on Tasty Kitchen one day when I came across a recipe for homemade air freshener. To make these little beauties, you first need a heat-proof jars (I found mine for $0.99 each at Michael's), food coloring colors of your choice, and essential oil. Into each jar, drop a few drops (I repeat...a few...it doesn't take more than 2 or 3) of food coloring. Now for the fun part. Why salt? Get one cup of water boiling on the stove. Then, pour in the other cup of cold water and the salt, stirring until the salt is dissolved. Quickly pour the hot gelatin mixture in each of your jars, and then use a disposable stick or spoon to stir it into the oil and food coloring.