
ATtiny85 microcontroller tutorials, Part 2: Working with ATtiny85. Kosarad tartalma, meska.hu. Bring Science Home. Kinetic & Digital Clock (Arduino + 3D Print) : 8 Steps. Holo clock by ekaggrat. How To Make Wireless/ Non Connected Led Light - Simple Electronics Tricks. /wp-content/uploads/2015/08/dino.txt. % (Header) (Generated by gcodetools from Inkscape.)
(Using default header. To add your own header create file "header" in the output dir.) M3 (Header end.) CNC Dual Arm Plotter : 11 Steps. The blue "arms" L in the above diagram may be regarded as a 2DOF (degrees of freedom) robotic arm with motor M1 acting as the "shoulder" motor.
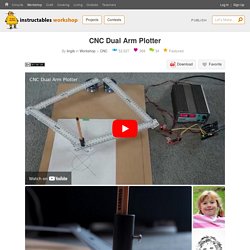
Instead of attaching a heavy "elbow" motor to this arm, a separate motor M2 is connected to the pen by means of a series of light-weight linkages. The final pen position is determined by the resulting parallelogram of forces. Motor choice is not critical other than each motor must be able to resist the "push" from the opposite motor. Maximum plotting area, for a given set of arms, is obtained when motor M2 is mounted directly above motor M1, Construction, however, is greatly simplified if the motors are placed close together as shown. Ks0426 keyestudio Micro:bit Mini Smart Robot Car Kit V2 - Keyestudio Wiki. Keyestudio Micro:bit Mini Smart Robot Car V2 Description Here comes a mini STEM education DIY robot platform based on Micro:bit programming.
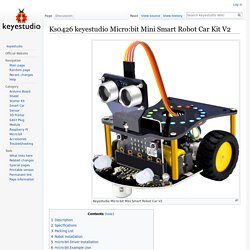
Micro: bit is an ARM structure microcontroller designed by BBC.
Robot. 3D. Two wheeled self balancing robot (redesign) I redesigned the robot.
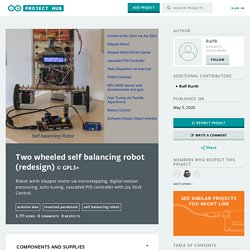
The hardware has not changed, but the software has been redesigned. In the old version there was a separate PID controller for each motor. To steer the robot to the right or left, the setpoint of the PID controller was assigned by the appropriate value. If the robot should drive straight ahead again afterwards, the resulting difference in steps had to be artificially neutralized and this was sometime the reason for some trouble. Now the robot has only one PID controller for both motors.
Mini CNC lézerfa gravírozó és lézeres papírvágó. - Áramkörök - 2021. DIY Self Balancing Robot using Arduino. After being inspired by RYNO motors and other self balancing scooters from Segway, I always wanted to build something my own Arduino Segway Robot.
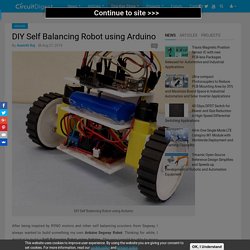
Thinking for while, I decided to build a Self Balancing Robot using Arduino. This way I would be able to grasp the underlying concept behind all these scooters and also learn how PID algorithm works. Once I started building, I realized that this bot is a bit of a challenge to build. Meet the next-generation Blynk platform! The big day is here - our brand new Blynk platform is open for sign-up!

We are so thrilled to put this powerful software machine into the hands of our community. Blynk’s journey, which started in 2014 with the first-of-its-kind mobile app builder and turned us into one of the most popular IoT platforms worldwide, is taking a new exciting turn. (1177) Pinterest. Extraordinary Patterns of a Pendulum Wave. Welcome to the RNT Insider Area. Lucky you — you’re in!
We’ve got some of our BEST free bonuses for you on this page. Random Nerd Tutorials is a free online resource with electronics projects, tutorials and reviews. STEAM Project: Tiny Dancers (A Homopolar Motor) Free DIY Science: Educational Innovations, Inc. Create. IoT Cloud. (572) Pinterest. Hobby Projects Site. This is a simple magnetic levitator which suspends objects a set distance below an electromagnet.
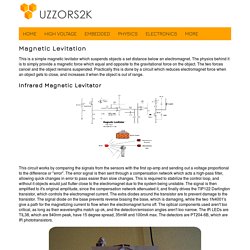
The physics behind it is to simply provide a magnetic force which equal and opposite to the gravitational force on the object. The two forces cancel and the object remains suspended. DIY magnetic levitator kit circuit schematic. Some time back I've bought this magnetic levitation kit from eBay in order to take a look on how it works and what we need to make it.
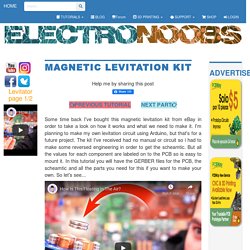
I'm planning to make my own levitation circuit using Arduino, but that's for a future project. The kit I've received had no manual or circuit so i had to make some reversed engineering in order to get the scheamtic. But all the values for each component are labeled on to the PCB so is easy to mount it. In this tutorial you will have the GERBER files for the PCB, the scheamtic and all the parts you need for this if you want to make your own. So let's see...
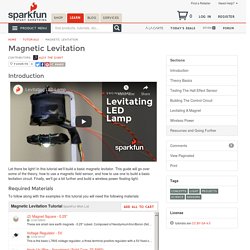
Magnetic Levitation. Favorited Favorite 8 Introduction Let there be light!
Now Supports ESP8266 Arduino Board with WIFI Websocket Camera Demo - Arducam. It is good news to hear that the Arduino IDE support was announced on the ESP8266 community forum, the source code can be found from . It is more than another Arduino board, but can be thought as an Arduino combined with a WIFI shield. With faster CPU speed and much smaller form of factor, most important the less than $10USD price is more attractive, you are worth to try although there are also some limitations. Setup is fairly simple with downloads for Linux, OS X, and Windows. A more detailed setup can be found from the adafruit guide. Physicsfun shop. Night Light Lithophane Maker. Instructions Change the values in the forms above to change your night light lithophane design! When you change values, the image under "your design" will change to show you how the new night light lithophane looks. Ekobots - Magnetic levitator shield for arduino nano. by jsirgado. How to make an Anti gravity suspension structure? - is Tensegrity structure.
Arduino NANO Propeller LED Analog Clock Video Tutorial.