
Street Photography Composition Lesson #3: Diagonals. For today’s street photography composition lesson, we will discuss a compositional rule that is simple enough: the diagonal.
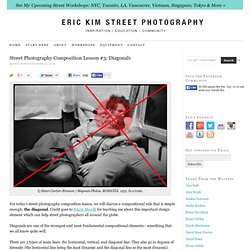
Credit goes to Adam Marelli for teaching me about this important design element which can help street photographers all around the globe. Diagonals are one of the strongest and most fundamental compositional elements– something that we all know quite well. There are 3 types of main lines: the horizontal, vertical, and diagonal line. They also go in degrees of intensity (the horizontal line being the least dynamic and the diagonal line as the most dynamic). 1. The horizontal line. The horizontal line is by nature, flat. 2. The vertical line. The vertical line is much more dynamic than the horizontal line. Imagine a man standing tall. 3. The diagonal line. Now let us go onto the diagonal line. Imagine a man standing up, and you shoved him quite hard. Dynamic Symmetry In one chapter he talks about the diagonal, and cutting the “reciprocal” line through it.
Street Photography Composition Lesson #4: Leading Lines. All photos in this article are copyrighted by their respective photographers.
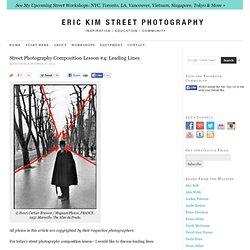
For today’s street photography composition lesson– I would like to discuss leading lines. Leading lines are one of the most basic photography compositional techniques– I am sure you have all heard of it before. But it is a technique that we often don’t listen to or follow. For example, it is easy to have a leading line in the background (for example, a background) that leads your eyes away from the main subject, rather to the main subject. Whenever I look at a photograph, the first question I ask myself is: who is the subject? If I cannot easily identify who the main subject is– it causes me to get stressed out and disoriented.
Therefore you can utilize leading lines to point out your main subject to the viewer. I will bring up some examples to further illustrate the importance of leading lines: Josef Koudelka : CZECHOSLOVAKIA. 1963. . © Josef Koudelka / Magnum Photos : CZECHOSLOVAKIA. 1963. Street Photography Composition Lesson #5: Depth. All of the photos in this article are copyrighted by their respective photographers.
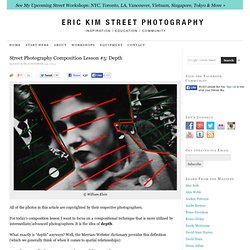
For today’s composition lesson I want to focus on a compositional technique that is more utilized by intermediate/advanced photographers. It is the idea of depth. What exactly is “depth” anyways? Well, the Merrian-Webster dictionary provides this definition (which we generally think of when it comes to spatial relationships): a: the perpendicular measurement downward from a surfaceb: the direct linear measurement from front to back For the purposes of photography and composition, we will use b (the direct linear measurement from front to back). But the problem is with photographs are that they are 2-dimensional. Street Photography Composition Lesson #6: Framing.
All photos included in this article are copyrighted by their respective photographers.
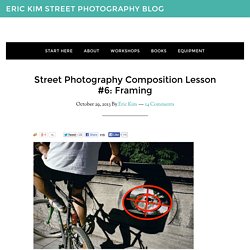
For today’s street photography lesson, I want to talk about framing. Framing itself is a pretty basic compositional technique, something I am sure we all learned when we first started. But let us delve deeper into framing. Let us see examples from the masters– and how they framed their images to retain focus, energy, and depth in their images. Street Photography Composition Lesson #7: Perspective. All photographs in this article are copyrighted by their respective photographers.
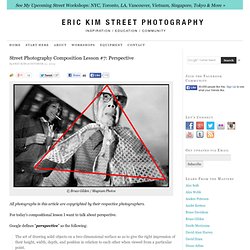
For today’s compositional lesson I want to talk about perspective. Google defines “perspective” as the following: The art of drawing solid objects on a two-dimensional surface so as to give the right impression of their height, width, depth, and position in relation to each other when viewed from a particular point. In street photography utilizing unique perspectives or vantage points make images have different impressions and feelings. I often find that street photographers don’t utilize interesting perspectives enough– most photos are just from eye-to-eye level. To make more edgy and interesting photos, try embracing more unique perspectives (shooting from a really low angle, or getting on top of a roof and shooting from a high vantage point). Street Photography Composition Lesson #8: Curves. All photos in this article are copyrighted by their respective photographers.
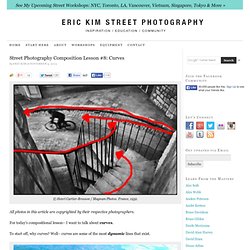
For today’s compositional lesson– I want to talk about curves. To start off, why curves? Well– curves are some of the most dynamic lines that exist. Have you ever seen a river that is completely straight? No– they are all curved. With composition, everything starts at nature. RiversA woman’s bodySolar systemsSand at the beachSeashellsHillsLeaves As my friend Adam Marelli (a much more knowledgeable teacher on composition) has taught me– very few lines exist in nature which are straight lines.
As we discussed, curves are natural — and when I think of curves, they are elegant, have energy, movement, and force. Curved roads give a sense of energy–movement, and motion. Let us think of some other curves that are man-made. Highways (and speedways)StairwellsGraphsArchesSnakesMuch much more… Street Photography Composition Lesson #9: Self-Portraits. “At first, my presence in my photos was fascinating and disturbing.

But as time passed and I was more a part of other ideas in my photos, I was able to add a giggle to those feelings.”- Lee Friedlander For today’s compositional lesson I want to introduce the idea of incorporating self-portraits into your street photography. While self-portraits don’t fit into the textbook definition of “composition” per se– I still feel that they are an interesting compositional technique we can add to our toolkit to make more interesting images.
Self-portraits and street photography Self-portrait of Stanley Kubrick Self-portraits have been done by artists throughout the ages– from painters, photographers, sculptors, etc. When it comes to street photography, many photographers have also created self-portraits in their work by either photographing themselves or themselves in the context of their urban environment. Street Photography Composition Lesson #10: Urban Landscapes. For today’s lesson I want to talk about “urban landscapes.”
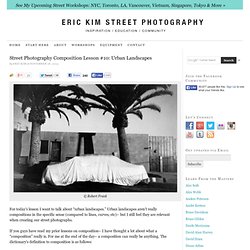
Urban landscapes aren’t really compositions in the specific sense (compared to lines, curves, etc)– but I still feel they are relevant when creating our street photographs. If you guys have read my prior lessons on composition– I have thought a lot about what a “composition” really is. For me at the end of the day– a composition can really be anything. Street Photography Composition Lesson #11: “Spot the Not” When it comes to composition– one of the first things you should ask yourself is: “Who is the subject?”
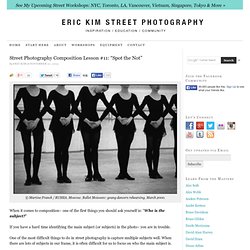
If you have a hard time identifying the main subject (or subjects) in the photo– you are in trouble. One of the most difficult things to do in street photography is capture multiple subjects well. When there are lots of subjects in our frame, it is often difficult for us to focus on who the main subject is. So how do we overcome this difficulty?
I propose the compositional concept of: “Spot the not.” “Spot the not?” Now what do I mean when I say “spot the not?” Spot the not: who doesn’t belong? Now let us bring another example– this one a lot cuter. Who doesn’t belong? Street Photography Composition Lesson #12: Color Theory. Eric Kim, Downtown LA 2012.
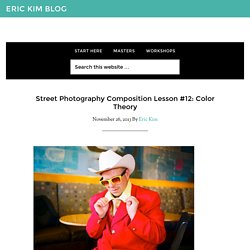
For today’s compositional lesson– I want to talk about color theory— and how you can better utilize colors when it comes to your street photography. Personally around 2 years ago, I made the switch from shooting fully black and white — to just shooting color film (Kodak Portra 400). Since then, I have learned to see the world in a totally different way. It has been fun, refreshing, and quite exciting. However at the same time– shooting in color presented a new bag of worms. So for this lesson we will talk about some color theory — in terms of how we can make colors better work for us.
Complementary colors Isaac Newton’s Color Wheel The first theory we will tackle is “Complementary colors.” Complementary colors are colors which cancel each other’s hue to produce an achromatic (white, gray or black) light mixture. Complementary colors tend to work really well together– and create a nice harmony that feel balanced. A modern RGB color-wheel (or star). Sports Teams Beer. Street Photography Composition Lesson #13: Multiple-Subjects. I think one of the most difficult compositional techniques in street photography is to incorporate multiple subjects in the frame — without it becoming too cluttered or overwhelming.
Generally the problem is that most photographers that try to incorporate multiple subjects have some of the following problems: Overlapping subjectsDistracting backgroundsNo central subjectNot enough points of interest.