
Holder for Charging Cell Phone (made from lotion bottle) My husband and I both have cell phones.

And both of us have phone chargers. And that means lots of obnoxious cords. You never know when one of us may be moving phone cords around, to give our phones an extra charge while we’re chatting away……… or trying to charge our phones up before running errands or something. Needless to say, those phone cords seem to be everywhere…..and are generally in the way and hanging all over the floor. (Okay, and how about when you’re in a hotel or visiting family/friends. I was looking around on the internet for a solution and found this. It made the perfect little holder for my cell phone while it’s being charged. Holder for Charging Cell Phone And no more phone hanging down from the outlet while in this room or that room……..the cord and phone are now up off the ground, and tucked away into the little holder, while the phone drinks up a full charge.
Hanging String Balls. Whattya need?
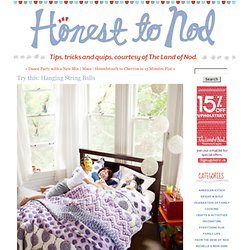
BalloonStringScissorsGlueJar How do I make glue string balls? Step 1: Hang inflated balloon from ceiling. Step 2: Put string and glue in the jar with a hole in the lid. Next, pull string from hole while wrapping around the balloon. Step 3: Wait until dry (try to contain yourself). 25 Handmade Gifts Under $5. The BEST Play-Dough Recipe. Have you ever made play dough and it just fell apart??

Well… not this time. This recipe will make play dough that is seriously the closest thing to store-bought you’ll ever make. No falling apart or drying out (as long as stored in a sealed container). It will last up to 6 months.The secret to this recipe?? Two things: First, Cream of Tarter… it’s what helps the dough stay together. and Second, not a lot of salt… all that salt dries out your dough! Build a Thumb Piano - Step-by-Step Guides for Offbeat DIY Projects. Make Your Own Photo Puzzle With Craft Sticks& I have to say, I have the cutest nieces and nephews!
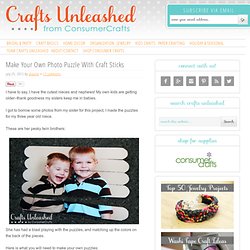
My own kids are getting older–thank goodness my sisters keep me in babies. I got to borrow some photos from my sister for this project, I made the puzzles for my three year old niece. These are her pesky twin brothers: She has had a blast playing with the puzzles, and matching up the colors on the back of the pieces. Here is what you will need to make your own puzzles: Select the photos you would like to use for the project. For each photo, you will need 5 craft sticks of the same color. You will want to dig through the box of craft sticks to find the ones that are the straightest. Apply adhesive to the back of your photos. Keep in mind, the entire 4″ side of your 4×6 photo will not be used. With this photo, I decided there was enough room for cropping above the heads of my nephews. Melted Crayon Art Projects ~ Be Different...Act Normal. Melted crayon canvases are popping up all over the place.
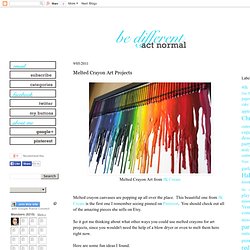
This beautiful one from JK Create is the first one I remember seeing pinned on Pinterest. You should check out all of the amazing pieces she sells on Etsy. So it got me thinking about what other ways you could use melted crayons for art projects, since you wouldn't need the help of a blow dryer or oven to melt them here right now. Here are some fun ideas I found. Sam's Scrap Candy created a melted crayon canvas of her own, but added a personal touch with hand prints: Recycled Wall Art. Maggie and her husband Jeff have a large, blank wall in their house that has been taunting them since they moved in. With both of them having strong creative opinions, it has been hard to agree on what to hang there.
That is until they saw this post from Tali at Growing Up Creative. They made it this weekend, put their own spin on it, and are thrilled with the results! Here is how you can do it too: Start with some cardboard tubes from rolls of paper towels, toilet paper, and wrapping paper. Next, flatten them out, measure, mark and cut them into equal sections. Once your pieces are cut out, play around with them! Next, send your husband outside in the ice and snow to spray paint your creation! Once your paint dries, you are ready to hang your masterpiece on the wall! VIDEO: How to Make Roses Out of Duct Tape. Most favorited all-time. Putting the blossoms on the branch. Glowing jar project – varázslat a lakásban (EN/HU) Alana Taylor.
Hey :), so i want to make the diy t-shirt scarves but i have a question about step 5, where it says to cut 1-1 1/2 ” horizontal strips all the way up to the armpit.
Like does this mean like you are cutting the shirt into separate strands then you just put them all together on your neck ? And when you stop at the armpit do you like get rid of the rest of the shirt ? Like the sleves and like the neck line ?? The Adventures of an Urban Socialite™ Julia Petit - Petiscos & Grampo e linha. Já faz um tempinho que detectamos uma onda de pulseiras de corrente decoradas com trabalhos em crochê e linhas nas lojas mais bacanas de acessórios.
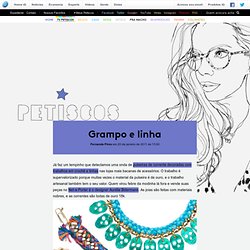
O trabalho é supervalorizado porque muitas vezes o material da pulseira é de ouro, e o trabalho artesanal também tem o seu valor. Quem virou febre da modinha lá fora e vende suas peças no Net-a-Porter é o designer Aurélie Bidermann. As joias são feitas com materiais nobres, e as correntes são todas de ouro 18k. Vale a pena o investimento, mas se você não pode arcar com o precinho, encontramos um site que ensina a fazer o passo a passo da pulseira sensação.
Separe a sua tesoura, linha de bordar trançada e grampos de cabelo. Handwriting tips. You’ve decided you want to improve your handwriting and you’re probably hoping a fountain pen will do the trick -- maybe a friend told you it would.

Maybe you’re just adventurous and you want to try your hand at calligraphy (or you might, once your handwriting improves). Good for you! A fountain pen may make your writing look a bit better, but if your writing looks as if frenzied chickens got loose on the page, chances are this won’t be enough. Most likely, you’ll need to retrain your arm and hand. After coaching handwriting and teaching calligraphy over the years, I’ve learned to see the characteristics of those who’ll be able to pick up the necessary motions quickly from those who’ll have to work a bit harder. Crampy, uneven letters are often the result of drawing the letters with the fingers rather than using the whole arm to write. People who inevitably have trouble with handwriting and calligraphy write with their fingers.
The Look - DIY! 7 new stylish ways to de-clutter your beauty closet.