
Operating Two Servos with the Arduino. The Arduino can control two servos with the same ease as one.
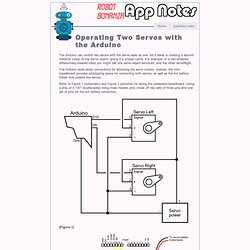
All it takes is creating a second instance (copy) of the Servo object, giving it a unique name. For example, in a two-wheeled differentially-steered robot you might call one servo object servoLeft, and the other servoRight. The Arduino lacks direct connections for attaching the servo motors. Instead, the mini breadboard provides prototyping space for connecting both servos, as well as the AA battery holder that powers the servos.
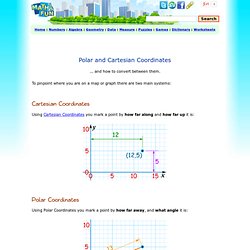
Refer to Figure 1 (schematic) and Figure 2 (pictorial) for wiring the solderless breadboard. Polar and Cartesian Coordinates. ... and how to convert between them.
Dominic Gentile. Torque Conversions: Convert Newton Meters to Newton Centimeters nm to n-cm, Convert to Dyne-centimeter, Convert to Kilogram meter, Kg-m, Convert to Kilogram Centimeters, Kg-cm, Convert to Gram centimeter, g-cm, Convert to ounce-inch, oz-in, Convert to foo. The World Famous Index of Arduino & Freeduino Knowledge. Arduino serial servo control. Video example: A quick test with a servo motor.
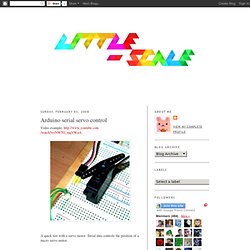
Serial data controls the position of a micro servo motor. Code: /* Quick Serial Servo Control. How-To: Shrinkify Your Arduino Projects. Ever since I started making projects with the Arduino, I’ve had a desire to shrink them down to a single, small circuit board.
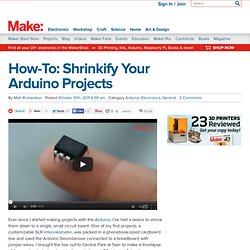
One of my first projects, a customizable SLR intervalometer, was packed in a phonebook-sized cardboard box and used the Arduino Deumilanove connected to a breadboard with jumper wires. I brought the box out to Central Park at 5am to make a timelapse of the sunrise, but when I got to the park, I spent 20 minutes fixing the connections between the Arduino, the breadboard, and the components. Since then, I’ve explored a few different ways of shrinking projects down and making them more robust. For the intervalometer, I designed a circuit board that had female header pins to seat an Arduino Nano. It was a huge improvement on the design, but I knew I could do a lot better.
I tried to teach myself AVR programming, but ran into a lot of snags along the way. When I came across this tutorial by MIT Media Lab’s High-Low Tech Group, I was elated. Gocupi - Go + Raspberry Pi polargraph. A Polargraph / drawbot inspired project, using a Raspberry Pi + Go + Arduino.
Made with the help and laser cutter of the Dallas Makerspace A very helpful Gocupi Software Guide is available that details the bill of materials and steps to install the software on a new Raspberry Pi and use the software. Processing -> LCD works once, then needs reset. #include <LiquidCrystal.h>#include <WString.h> #define CHARACTERSPERLINE 16#define LCDLINES 2#define MAXLINES 10 String heldText = String(CHARACTERSPERLINE*MAXLINES); int received = 0;LiquidCrystal lcd(7,8,9,10,11,12);int buzzerPin = 3; void setup(){ // start serial port at 9600 bps: Serial.begin(9600); //pinMode(2, INPUT); // digital sensor is on digital pin 2 lcd.begin(16,2); //lcd.autoscroll(); establishContact(); // send a byte to establish contact until receiver responds delay(1000); //heldText = "returns a new string that is a part of the original string.
Void loop(){ // if we get a valid byte, read analog ins: if (Serial.available() > 0) { // get incoming byte: handleIncomingChars(); // delay 10ms to let the ADC recover: delay(10); }} void establishContact() { while (Serial.available() <= 0) { Serial.println("0,0,0"); // send an initial string delay(300); }} void handleIncomingChars() { // read the incoming data as a char: char inChar = Serial.read(); InMojo - Make. Share. Live. Open Source Hardware. Arduino Sound – Part 1. This is the first in a series of articles about generating sound with an Arduino. The goals are to generate good quality sound which can be used to play simple tones, stored music, sampled sound, and even act as a MIDI synthesizer. I will cover the basic design, including code and hardware that anyone can use to add sound to Arduino microcontroller projects.
The first step is to look what has already been done. We want to explore many possible options for sound generation and resolve which is best for given situations. Example. New easier xBee for Mac Lion (OS X 10.7) with Arduino. Well, I have finally got around to posting the new tutorial for xBee’s on a ALMIGHTY mac.
This was tested on my mac running OS X 10.7 (Lion), with Arduino 1.0, Processing 1.5.1, and CoolTerm 1.4.1, and an Arduino duemilanove with a ATMEGA328P So I have found an easier way to program up your xBee’s without having to use Windows (X-CTU) to set up the settings on the xBee modules, or use screen which is a terminal program for mac that has no GUI and has weird key combinations.
It is a free program called CoolTerm. “WiiChuck” Wii Nunchuck Adapter Available. Want to hook up a Wii Nunchuck to an Arduino but don’t want to cut up the cord on your Nunchuck?
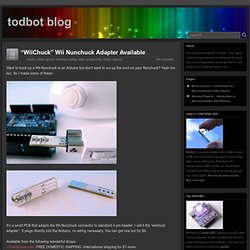
Yeah me too. So I made some of these: It’s a small PCB that adapts the Wii Nunchuck connector to standard 4-pin header. I call it the “wiichuck adapter”. It plugs directly into the Arduino, no wiring necessary. Available from the following wonderful shops: - FunGizmos.com. One of the coolest things about the Wii (to me) is that the expansion port on the bottom of the Wii remote is an I2C serial connection. Algorithmic symphonies from one line of code.
Lately, there has been a lot of experimentation with very short programs that synthesize something that sounds like music.
I now want to share some information and thoughts about these experiments. First, some background. On 2011-09-26, I released the following video on Youtube, presenting seven programs and their musical output: This video gathered a lot of interest, inspiring many programmers to experiment on their own and share their findings. Synth. This page is a meeting place for people making synthesizers and music generators with Freeduinos and Arduinos .
Code Resources for making synths and implementing analog output From a post over on the monome forums, some single chip / open source synth projects: AVR chip based designs: avrSynth - Dual oscilator, DCF, DCA, plus some LFOs. Has pins for all kinds of front panel controls, plus midi in. 1bit groovebox - full on crazy ass chip instrument, interface, sound output, the whole 9, also quite reductive in terms of sound pallette and control logic.
Wiring a 12 V Switch and LED to a 5 V Circuit. The previous page discussed the inability to rewire the insides of a 12 V illuminated toggle switch to make it compatible with 5 volts. The toggle switch either provides 12 V when switched on, or nothing (not ground) when switched off. We want to connect this to a 5 V microcontroller input to detect the position of the switch. If the 12 V switch were wired directly to the microcontroller input, the 12 V power source would damage the 5 V microcontroller. LPC2148 ADC Example: Nintendo DS Touch Screen > Using ADC to measure the current X/Y position on a Nintendo DS touch screen Resistive touch screens can be a great way to enable complex user input in your projects inexpensively and with a minimum number of pins.
With just four wires you can capture gestures, buttons clicks, constantly track the position of a finger or stylus, and other interesting things. Best of all ... thanks to the success of current touch-enabled devices like the Nintendo DS, there is also a steady supply of inexpensive touch screens available (which is precisely why we've chosen to use the Nintendo DS touch screen as an example). Resistive touch screens operate on the same principle as a simple potentiometer ... you apply 3.3v and GND on opposite ends, and measure the resulting current in between the two on a third pin (using an analog to digital converter).
The only difference is that rather than adjusting the resistance by turning a dial, you adjust it by touching a certain part of the screen. Rotobooth: A Rotary Phone and Arduino-Powered Photobooth. Photobooths are cool, but what’s really cool is powering that photobooth with a rotary phone and an arduino, with a Twilio hack. And it looks pretty hip too. Rotobooth took third place out of over 50 hacks at PhotoHack Day 2 in New York and truly captured the classic photo-inspired theme of the event. Rotobooth is controlled by a rotary phone (super hacked!) Connected to an arduino and a Mac mini that collects images on a Flickr account. 2148quickstart_adc_NDSTouchScreen_X.jpg 600×500 pixels. TVout Light Pen Demo. Arduino TVout Light Pen Demo focalist: So, here to prove that we can take decades-old technology and re-use it, poorly...
The Arduino Light Pen! Another fun little TVout project, I'm now coming up with a few improvements and seeing what kind of interesting and fun uses this little HID blast from the past can give us... I'll be documenting it up shortly, but you really don't get much simpler! Adafruit Industries, Unique & fun DIY electronics and kits. SparkFun Electronics.
Modern Device.