Made By Marzipan. You can make these eye catching wind chimes out of soda cans and washers.
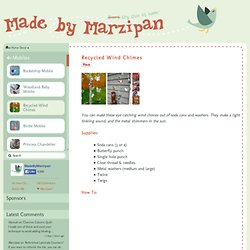
They make a light tinkling sound, and the metal shimmers in the sun. Supplies: Soda cans (3 or 4)Butterfly punchSingle hole punchClear thread & needlesMetal washers (medium and large)TwineTwigs How To: You’ll need a few basic supplies. DIY Vases. Everyone loves vases, but it’s difficult to find one that is unique and not the same old run of the mill vase you’ve seen 1000 times before.
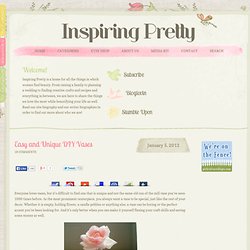
As the most prominent centerpiece, you always want a vase to be special, just like the rest of your decor. Whether it is empty, holding flower, a candle pebbles or anything else, a vase can be boring or the perfect accent you’ve been looking for. And it’s only better when you can make it yourself flexing your craft skills and saving some money as well. This lovely vase is simple and its beauty is its simplicity.
All it takes is a cute vase, some sequins and some glue. For this cozy yet stylish vase, pick up some clear craft glue and yearn and collect a few pop bottles, beer or wine bottles. For some true vintage charm, these are the way to go. Courtesy of sjarmerende-gjenbruk.blogspot.com. DIY Yarn Bowl. Two weeks ago, while discussing DIY ideas about our No New Gifts Christmas I mentioned a lovely yarn bowl that I wanted to make.
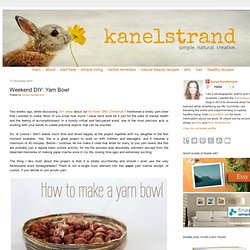
Most of you know how much I value hand work be it just for the sake of mental health and the feeling of accomplishment. In a mostly virtual and fast-paced world, one of the most precious acts is working with your hands to create practical objects that can be touched. So, of course I didn't waste much time and dived happily at the project together with my daughter in the first moment available. Yes, this is a great project to work on with children and teenagers, and it requires a maximum of 40 minutes. Before I continue, let me make it clear that while for many of you yarn bowls like this are probably just a regular basic school activity, for me the process was absolutely unknown (except from the bleached memories of making paper mache once in my life, looong time ago) and extremely exciting.
Mix well 1/2 cup of flour with 2 cups of lukewarm water. Seashell Fairy Lights. Candles in Seashells. Menu Planner. We all know that planning what to make for dinner can be a daunting task.
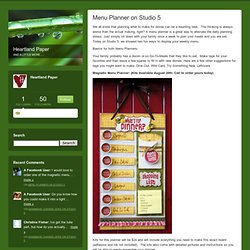
The thinking is always worse than the actual making, right? A menu planner is a great way to alleviate the daily planning stress. Just simply sit down with your family once a week to plan your meals and you are set. Today on Studio 5, we showed two fun ways to display your weekly menu. Basics for both Menu Planners- Your family probably has a dozen or so Go-To-Meals that they like to eat. Magnetic Menu Planner: (Kits Available August 20th- Call to order yours today) DIY Herb Garden. At some point near the middle of March, I always decide that I’m “done” with winter.

The sweaters and jackets get pushed to the back of the closet, the flip flops come out, and I inevitably freeze my butt off for several weeks until the weather catches up with my warm-weather state of mind. Likewise, my cravings for fresh herbs and veggies are always a little ahead of the season. Growing your own herbs is a great way to save money and avoid buying too much at a time and letting most of it go to waste.
If it’s still too cold to plant outside where you are (or if you’re short on space!) This hanging herb garden is the perfect project to get you in gear for spring. What you’ll need: Tin containers with snap-on plastic lids (tea, cocoa, and coffee cans are a good bet), coat hangers, pliers, scissors, herbs (I bought basil, rosemary, dill, and cilantro for about $2.50 each), masking tape, coffee filters, a nail, a hammer, X-acto knife, scrap fabric or paper, and glue or spray adhesive. DIY 3-D Wall Hanging. Ready to craft?

This project is so easy, anyone can do it. Before you start making excuses, let me tell you, I’d never painted before. Never used acrylics or done art on canvas. I can hardly even draw a straight line. Now that your excuses are gone, pick your colors and your theme and let’s get started! Need some ideas? Use different kinds of sticks. Maybe leave off the bird and use butterflies. This project should take two days. Day 1, Step 1 in creating your own three-dimensional wall art: Paint your canvases with some acrylic paint. Step 2: Leave the canvases to dry and start preparing your foliage. Step 3: If you plan to use an additional color on your canvases (I mixed some white and light grey to make the moon) you can go ahead and add that.
See the final assembly tips on day two after the paint dries on Page Two! About Erica Mueller Erica Mueller has written 22 posts in this blog. Erica Mueller is a stay-at-home mom to two lively little boys. Pages: 1 2. DIY Beanbag Cushion. Looking for hours of entertainment?