
Video Tutorial: Waterfall Twist. A few weeks ago I posted this picture of a half updo I did on my friend Ciara: You can see her pictures here.

I received a lot of emails asking how to do this hairstyle, so I decided to create a video tutorial for it. I created this tutorial for Latest-Hairstyles.com. If you want to read a step by step instead of watching the video you can find one on their website. How-To: Instant Hairstyles- Do Yourself.
GUEST POST. Photos by: Kathleen Bly post designed by kristin ess Mad love for our first guest post winner, Taylor Nick!!!
I am fully obsessed with this bohemian-inspired-braided-goodness! Even though Taylor had some SERIOUS competition, there’s no doubt that this little lady took the cake in our hair tutorial contest. She created a beautiful, textured, easy hairstyle that will work with almost any hair type. The Simple Gibson Tuck @ @ Sara Lynn Paige PhotographySara Lynn Paige Photography. I’ve received a lot of compliments on this easy rendition of the once popular Edwardian hairstyle, and I keep thinking to myself that Victorian is in right now and I should share this simple style. Hairy Situation / High bun updo. Sweet twist and pin variation.
This is another of my favourite twist and pin updos.
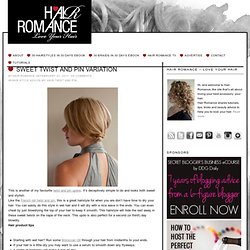
It’s deceptively simple to do and looks both sweet and stylish. IN A RUSH? FORGET THE BRUSH! Photos: Angela Kohler + thebeautydepartment.com post designed by kristin ess In a world where we can’t stop running late, the fun bun is probably the quickest way from A to Chic.
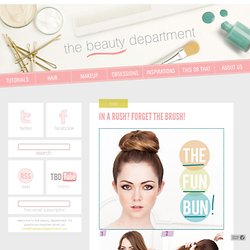
This look comes in über-handy when you wake up late and you’re rushing out the door (or even if you have plenty of time). A NEW TWIST. Hairy Situation / Prim and proper updo. Hairy Situation / pouf. Hairy Situation / Classic and easy looking updo. BALLERINA BUN (REMIX) Photos by Post design by Kristin Ess Hello lovelies!

Today we’re showing you how to create a hybrid of our two favorite things– a bun and a braid. Certainly you’ve racked up some mileage on Ballerina Bun Airlines. Perhaps you’re bored and want to put a new twist on things…? This is the perfect way to keep it simple + fresh. How-to do a Twist Braid tutorial. How To Style Pin Curls. Have you ever wondered how to style vintage inspired pin curls?
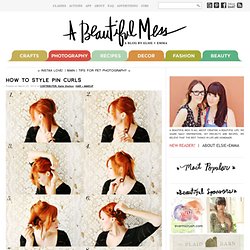
Just follow these simple steps! 1. Pin up all of your hair except for a section at the bottom. 2-4. Spray with water and begin taking small sections (about 1 inch) and rolling the hair up to the root. Pin in place. 5-6. Tips: If you have shorter bangs you may need mousse or gel to hold them in place. (also known as pin curl clips). Ten Ways to Dress Up a Ponytail. Sometimes I'm just not in the mood to spend a lot of time on my hair.

But at the same time, I don't want to look like a homeless hairdresser when I go to work, so I try to make my ponytails as fancy as possible. Here are ten easy ways I like to dress up my ponytail: 1. Wrap it with a strand of hair. Hairy Situation / Video Tutorial - Waterfall Braid Updo. Fifteen Ways to Pin Back your Bangs. ...love Maegan : Fashion, DIY, Home, Lifestyle: Pretty Ponytail Twist Hair Tutorial ~ Los Angeles. ...love Maegan : Fashion, DIY, Home, Lifestyle: Pretty Low Side Bun Hair Tutorial ~ Los Angeles. ...love Maegan : Fashion, DIY, Home, Lifestyle: Partial French Braid with Cascading Hair ~ Tutorialalso known as the "Waterfall Braid" ~ Los Angeles. I’m not the originator of this hair style but I’ve gotten so many requests for it, I thought I’d give it a go for you.
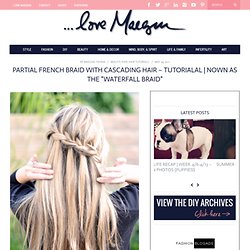
I don’t know what it’s called either so I haven’t researched it and/or found any other tutorials for it …thus, this is my version of it, and I’ve dubbed it the Partial French Braid w/ Cascading Hair. The photos I’ve seen online show the braid a little more straight across the back of the head and mine sort of braids at an angle, similar to my side/low french braid up-do. Hair - Go heap sugar album.
Styling / Hair and Makeup Tips & Tricks. How-To: Braided Headband [HAIR] If you have shoulder-length hair or longer it is easy to grow bored of wearing the same wavy and straight styles day after day.
![How-To: Braided Headband [HAIR]](http://cdn.pearltrees.com/s/pic/th/braided-headband-hair-tutorial-74561617)
This is a quick and easy hair tutorial to add some fun to your everyday look with a simple braided headband. You can sport this look with wavy or straight hair. My hair was straight the day I decided to try the braided headband, but I’m looking forward to trying it with wavy hair to create a soft romantic look. 唯美韩式编发2 来自怪怪兔在堆糖网的分享. 堆糖网 分类 首页 热门 最新 良品购 特卖惠 家居生活 美食菜谱 手工DIY 时尚搭配 美妆造型 婚纱婚礼 设计 古风 插画绘画 壁纸 头像 文字句子 旅行 摄影 人文艺术 影音书 人物明星 动画漫画 植物多肉 生活百科 搞笑萌宠 搜索含 的内容 搜索含 的商品 搜索含 的专辑 搜索含 的糖友 新浪微博腾讯 QQ 淘宝腾讯微博豆瓣 关联账号登录: 登录 注册.

讨厌自己单调又平凡的发型?快学学一下好看… 来自ZIO在堆糖网的分享. 堆糖网 分类 首页 热门 最新 良品购. Hair Tutorial: braided 'do. I know I said I would post this hair tutorial yesterday, but obviously I'm a no good liar because today is not yesterday, it's today. This hairstyle is basically the same thing as milkmaid braids, only modified to up the volume and lessen the big part in the back. Pigtails or regular milkmaid braids make me look like I'm balding, as I have a wicked scar in the back of my head.
I would recommend doing this in a mirror and checking the back to make sure it's all neat and tidy as you go, because I did not and it's a little (or a lot) messy in the back. I redid it before heading out and it looked much better, so make sure you use a mirror! For full instructions, keep reading after the jump. What you need: Beauty: Skin, Hair & Nails / braid head band. Turn your NAUGHTY HAIR day into a KNOTTY HAIR day! Someone sent me a picture of a "double knotted" hair do from the Michael Kors Runway show to try to "Kandee-fy" it..... NO TIME for hair-hair-do...you just need to "hairy up"? This look took me about a minute to do..it's awesome! Super cute, no fuss, and doesn't look like you have a "prom up-do"..ha ha ha (easy peesy)
TIPPED OUT. All photos: Kristin Ess + thebeautydepartment.com post designed by kristin ess Lots of emails this week asking for a tutorial on Lauren’s temporary bright colors. Here I’ve replicated the process for you in 7 steps on an extension. While I never recommend bleaching out the ends of your hair at home, if you want to do the fun colors yourself, maybe get the tips bleached out by a pro + then play with the temporary colors on your own. The best things about this color– you’re able to hide it in a bun for work if you need to, AND you’re only doing a couple of inches on the bottom so it won’t kill you to cut it off if you get over it quickly. TOOLS: highlighting comb, clips, foils, color brush, hair bleach with the appropriate volume (always seek a professional when using bleach), light pink color, dark pink color, light blue, dark blue, clear gloss.
Step 1 Highlight the tips of the hair using hair bleach with the correct volume. Step 3 Shampoo and lightly condition bleach out of the hair. To Add Colors in Life - StumbleUpon. We women adore fashion and style. Fashion comes in clothes, shoes, makeup, fancy accessories, styles the way we carry things and hairstyles. We enjoy dressing up, getting ready and styling our hair.
Hair is the part of fashion and beauty and Hair-styling is an art, to carry your hair according to your style statement and your physical appearance is a really tough job. Working girls got a small amount of time for their hairdos and hair-styling in their daily routine. Here are 100 different and amazing hairstyles. Here are 100 amazing hairstyles. Like this post and found these styles creative and amazing? Make-up / Hint of vintage. Girly / De pescao´ How To Use A Sock To Get Beautiful Curly Hair Without Heat. If you are a mom on the go with long hair you HAVE TO try this. It will knock your socks off and have you wrapping your hair up in them!
This is all about how to make your hair beautiful with no heat and no time. Curl your hair in your sleep with a sock. Yup, you heard me right. How To Make Hairspray. PRIM + PROPER.