
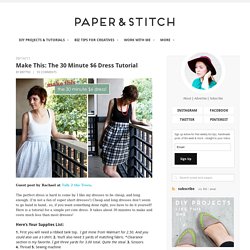
The 30 Minute $6 Dress Tutorial. Guest post by Rachael at Talk 2 the Trees.
The perfect dress is hard to come by. Most Popular Repurposing Tricks of 2011. Holder for Charging Cell Phone (made from lotion bottle) My husband and I both have cell phones.

And both of us have phone chargers. And that means lots of obnoxious cords. You never know when one of us may be moving phone cords around, to give our phones an extra charge while we’re chatting away……… or trying to charge our phones up before running errands or something. Needless to say, those phone cords seem to be everywhere…..and are generally in the way and hanging all over the floor. DIY Faux Curled Rosewood Wreath {Made From Rolled Recycled Book Pages} I have seen various versions of Faux Rosewood Wreaths in just about every store and catalog for the upcoming season; most with a price tag running upwards of $40 or more.

Some are crafted of paper and other of real wood shavings. 10 T-Shirt Scarf Tutorials. Look to inspire - page 37. How To Make A Stylish Photo Frame For Several Photos. Here is a simple yet stylish photo frame that can accomodate quite many photos at once. The idea is very simple. Fasten twines on the empty frame and hang photos using clothes pins on them. Guest post {Marie Darby…diy photo lampshades.
PINTEREST UPDATE: This is a post from 2010.

I do not take custom orders, only the tutorial is available. The lamps have held up wonderfully. As many of you requested, Marie is sharing a little tutorial here on how she made her lampshades. When she made them she was not planning on doing a tutorial for this blog, so be sure to thank her for taking the time to write all this out. Also, for those wondering…Kara will be sharing some tutorials for her book art on her blog soon. Tutorial: Homemade Sidewalk Chalk. By Michelle Vackar, Modern Handmade Child One of our favorite outside activities at our home is drawing with chalk on the driveway.

You can play hopscotch, four-square, and of course draw and create silly stories. My daughters and I were talking one day as we played hopscotch about how to make chalk and I thought to myself, let’s try it! It ended up being quite a lot of fun. What you will need: • Toilet paper or paper towel tubes • Scissors • Duct tape • Wax paper • Small bucket or disposable container to make the recipe • ¾ cup of warm water • 1 ½ cups Plaster of Paris • 2-3 tablespoons of tempera paint • Paper bag or a “mess mat” ** we made six tubes of chalk – we simply doubled the above recipe Step 1: If you are using paper towel tubes, cut each tube in half, so it is roughly the length of a toilet paper roll tube. Step 2: Cover one end of each tube with duct table to hold the contents within. Step 3: Cut as many pieces of wax paper as you have tubes. Giant Paper Rose Flower.
If you loved the beautiful DIY wedding this morning and Nata’s gorgeous paper flower bouquets, you are in luck as Nata is sharing how she crafted them with us!

She was inspired by a template created by Morgan Levine on Martha Stewart (as was I in the flowers I created for this styled shoot). I just love that this basic idea has inspired different brides to create their own version of giant paper flowers – you might remember these equally awesome giant paper flowers from this wedding I shared last year. :) Thanks so much Nata for sharing how you created your giant pink paper rose + special thanks to Studio Castillero for the photos of the DIY + her wedding! Materials (to make one giant rose) Step 1: Cut the petals Cut 5-6 teardrop petals and 15-6 heart-shaped petals from the petal colored crepe paper. IMPORTANT: Crepe paper is directional so it matters which way you’re cutting the paper. Repeat until all of your petals are cut Step 2: Cut the leaves + calyx. Recycled Wine Bottle Torch. 08.09.09 | by Erik Anderson Whether it’s product branding, package design or projects for ourselves, we’re pleased when we find a solution that’s very effective and creative, while keeping resources to a minimum.

This idea is very inexpensive idea and it’s a great way to recycle a wine bottle. See how this simple idea inspired this brand and wine bottle design. How To Make Tissue Paper Pom Poms. DIY Toner - Homemade Facial Toner Recipe. 8 hair care treatments you can make yourself. Eggs, yogurt and honey are, at first glance, all components of a tasty breakfast — but they also happen to be hair treatment ingredients, and affordable, all-natural ones at that.

And they're not the only ones. Did you know, for instance, that the oils in avocados more closely resemble our own skin's oils than any product in the beauty aisle does? Or that the mild acidity in lemon is an effective — and gentler — alternative to chemical-laden products? Next time your locks need a lift, save money by using one of these kitchen fixes. Guest blogger - Sasha from The Guilded Bee:
Here's another DIY project from our sweet friend, Sasha - from the The Gilded Bee.

Be sure to check out her awesome shop full of handmade packaging lovelies. Thanks for being here with us Sasha! I'm delighted to share my book tutorial with you today: Supplies you’ll need to make this project: • One—8.5 x 5.5 sheet of cardstock • One---1/2 x 3 inch piece of cardstock or paper • Two---2 5/8 x 3 1/8 inch pieces of cardboard, chipboard or matboard (not corrugated) • Hot glue gun and glue sticks. Homemade Lip Balm - How to Make Lip Balm with Beeswax, Honey and Cocoa Butter. How to Make Your Own Beauty Products from Scratch - Lifestyle.
Let's keep things simple this week.

When it comes to personal-care products, we are big believers in streamlining what you use—see "Eight Products You Think You Need But Don't" for a refresher—buying less in general, and getting creative. We have both always loved experimenting in our kitchens and our bathrooms, checking ingredients in products we love, isolating the main ones, and then trying them on their own. Sometimes it works: A favorite hair leave-in contained aloe, for example, so one day we tried aloe alone and found that, lo and behold, it worked just fine on its own. And sometimes it didn't. Over the years we have tried dozens of DIY beauty recipes to find ones we like—and that work. Simple body scrub Honey face wash We already told you about our new favorite homemade face wash last week but here's the recipe: In the palm of your hand, combine a tablespoon of raw, unfiltered honey with a half a tablespoon of baking soda, mix it together, and apply to damp skin.
Perfume Shave oil. CraftPOP.com Arts and Crafts Links Directory: Main. DIY Solar Lamp: Make Your Own Eco-Friendly Sun Jars. The principle is simple and seductively clever: solar lights that store energy during the day and release light at night. These can be purchased ready-made in a variety of colors (yellow, blue and red) but they can also be built at home. A simple, less-technical approach involves buying a conventional solar-powered yard lamp and then essentially harvesting it for key pieces to put in a jar. Simply Vintagegirl Blog » Blog Archive » Tutorial: How to Make Lovely Fabric Flowers.
29 May 2010 These elegant fabric flowers are very simple to make . . . and only take a few basic supplies. The finished product is delightfully lovely, and at times can look like a real flower! Every flower will turn out differently and that is part of the beauty! If you haven’t used those tea lights in a while, now’s the time! I hope you enjoy making these as much as we do . . . below are instructions with pictures on how to make your own. Soap Making Recipes and Tutorials.
Make a Lunch Box from a Milk Jug. DIY projects. Our Favorite Craft Supplies: Glue These are the types of glue that I use most often for Oh Happy Day projects. I’m a super fan of the Quick Dry Tacky Glue. Top Bloggers Favorite DIY Projects. How to Make Leaf Skeletons. I wanted to share with you a project from one of my readers who shares with us how to make leaf skeletons. I LOVE this! I have several leafs in various forms displayed in my home and knew I needed to make some of her leaf skeletons to add to my decor. I love how a pattern of leaves can enhance the beauty in your home. So I asked Heather if she would mind sharing her project with you.
You can find more great projects from Heather at her blog The Other White House. I have spent hours and tried various ways of making these. Print Hula Hoop Rug Page. Paper Flower Key Holder / Mark Montano. Glass Etching. V and Co how to: jersey knit bracelet. I don't know what it is about this time of year that makes me just want to have my bare feet in the sand, be watching the sun setting into the ocean, and breathing in the warm salty air of the beach...as i get older, more and more i find myself missing that place i used to go to almost every.single.day. as a teen.
Vintage Wanna Bee: HOW TO MAKE A FB TIMELINE COVER... How to Make a Bug Out Bag. Judah Method - Bleaching Experemnet on the Behance Network. How to make gift bags from newspaper. Fabric Upholstered Headboard. Building a house with your own hands. Building the house by yourself is not so difficult, judging by the photos. This structure is suitable for countries with warm climates. Most importantly, this is your home, your little corner.