
Drótékszer készítés alapjai - lépésről-lépésre. Biztos sokan találkoztatok már ezzel a technikával, de azoknak a kedvéért, akik még nem, ebben a fejezetben bemutatom a leggyakrabban használt alapelemeket.
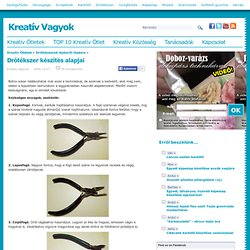
Mielőtt viszont belevágnánk, egy ki elmélet következik. Szükséges anyagok, eszközök: 1. Kúposfogó. Körívek, karikák hajlításához használjuk. 2. 3. 4. 5. 6. 7. Használható még tésztagép is, viszont ennél számítani kell rá, hogy kicsit elnyújtja a formát, amit utána kell igazítani. Alap elemek. FAP..........mode d'emploi. Tuto : Fleur wire en fil d'aluminium de 2 mm - gene.des. WirePendantWrap. Do you have a pendant or a bead that is drilled front to back, and wonder how to attach it?
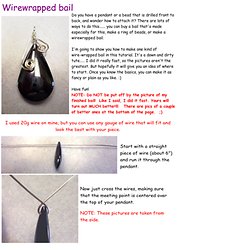
There are lots of ways to do this...... you can buy a bail that's made especially for this, make a ring of beads, or make a wirewrapped bail. I'm going to show you how to make one kind of wire-wrapped bail in this tutorial. It's a down and dirty tute..... I did it really fast, so the pictures aren't the greatest. But hopefully it will give you an idea of where to start. Have fun! Wirewrapped bail I used 20g wire on mine, but you can use any gauge of wire that will fit and look the best with your piece. Start with a straight piece of wire (about 6") and run it through the pendant. Now just cross the wires, making sure that the meeting point is centered over the top of your pendant.
NOTE: These pictures are taken from the side. Take your pliers and make a bend in one of the wires right where they cross, so that that piece is now standing straight up from the pendant. Sun Clasp - free project! You can discover our readers favorite wire tutorials by reading the comments from last week's post.
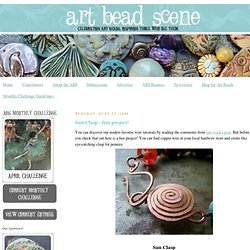
But before you check that out here is a free project! You can find copper wire at your local hardwire store and create this eye-catching clasp for pennies. Sun Clasp Materials & Tools: How to Make Cone Coil Beads / Bead Caps : Cozy Sister's Jewelry Making Blog. Posted on | December 19, 2009 | 4 Comments A coiled cone bead, or elongated bead cap.
Dangles made with cone coil beads in three gauges. From left to right: 24 gauge, 20 gauge, and 18 gauge. All were strung onto hammered head pins with "heads" of various length, made from 20 gauge wire. These dangles would work alone or in clusters as earrings or necklace accents. Making your own beads is a fun way to make your wire wrapped jewelry even more personal. To begin, grip the end of the wire at the very base of your round nose pliers’ nose. Grip the end of the wire at the base of the round nose pliers' nose. Rotate the pliers to wrap the wire around one prong of the pliers.
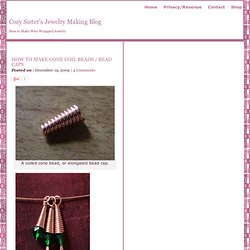
When you are about to complete the first rotation, rather than allowing the wire to form a complete loop adjust the wire so that it forms another layer, or coil, above the first one on the pliers (see picture). Rather than closing the loop, adjust the wire slightly to begin the second coil. Coiling Wire: A Technique for Making Wire Jewelry. Coiling wire is a basic wire working technique for making wire jewelry.
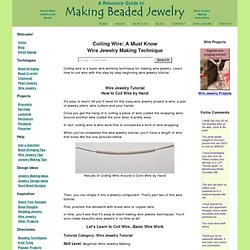
Learn how to coil wire with this step by step beginning wire jewelry tutorial. Wire Jewelry TutorialHow to Coil Wire by Hand It's easy to learn! Wire Jewelry Making - Basic Weaving Techniques. This tutorial teaches a few basic weaving techniques.
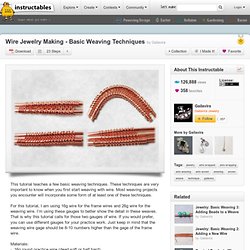
These techniques are very important to know when you first start weaving with wire. Most weaving projects you encounter will incorporate some form of at least one of these techniques. For this tutorial, I am using 16g wire for the frame wires and 26g wire for the weaving wire. I’m using these gauges to better show the detail in these weaves. That is why this tutorial calls for those two gauges of wire.
You can find more of my tutorials, both free and paid, on my website, Studiodax's Blog. Like many women, I loooove hoops!
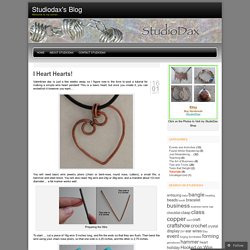
I make quite a few, in different shapes and weights, and although some designs can get a bit complex, the basic “one piece of wire” hoop style is quite easy to make. It’s been a while since I posted a new tutorial (sorry!) , so tonight it’s a “how-to” on making hoops! You’ll need the basic jewelry tools (chain nose pliers, cutters, and round nose pliers), as well as some metal smithing tools (steel block, chasing hammer, and a steel ring mandrel). But if you don’t have all of the metal smithing tools items, you can still practice all the basic steps without hammering… How to grasp the wire First, we cut 2 pieces of 20g dead soft round wire, each 3 1/4 inch long, and file/sand the ends flus. TECHNIQUE TIP: The closer the wire is to the tip of the pliers, the smaller the loop. Page6.