
101 Crafty Gifts. These are some useful tricks. Put your stuff up in the air! Hanging DIY ideas & tutorials. Posted by ScrapHacker.com on onsdag, juni 27, 2012 · 9 Comments To heck with both feet on the ground!
Now’s the time to put your ideas up in the air! Hanging String Balls. Whattya need?
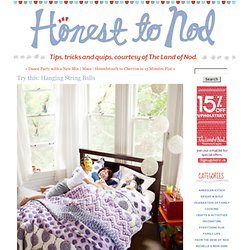
BalloonStringScissorsGlueJar How do I make glue string balls? Step 1: Hang inflated balloon from ceiling. Step 2: Put string and glue in the jar with a hole in the lid. Next, pull string from hole while wrapping around the balloon. Feather Wall. Whattya need?

Feathers (any color you like)HammerNailRulerPencil How do I make a Feather Wall? Step 1: Determine the size and shape of your feather wall. Use the pencil to mark the corners and edges of your shape. Step 2: Grownups only. Step 3: Within the shape, measure and mark additional points at 2" intervals. Make Your Own Canvas Portrait! 52 Weeks Project. 33 Ways To Stay Creative. 25 Cool Ideas To Display Family Photos On Your Walls. Family portrait by Lori Andrews (via designcrushblog) We all have family photos that we love.
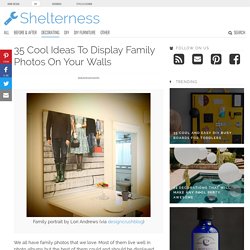
Most of them live well in photo albums but the best of them could and should be displayed throughout the house. It’s one of those things that add a personal touch of coziness to any interior decor. Besides, nowadays there are so many cool ways to display them that your family photos could even become a real design element. Some time ago we’ve already shown you a bunch of cool ideas how you can hang your photos and art in creative ways. Displaying pictures could be challenging but we can and will make the process more easy for you. Mixed and matched family photos. Glowing jar project – varázslat a lakásban (EN/HU) Faux stained glass containers. At one point in my life I got ahold of some cool glass jars with fitted lids: I liked them but not plain – I wanted to spice them up a bit.

So what is a Mod Podger to do? Well, of course, add tissue paper. I love tissue paper on glass because with the light, it gives a bit of a faux stained glass look. As you can see from my first pictures. Cool paper toy. [VIDEO] Hand Stitching, part 1 - LA. One of my favorite crafts is hand stitching-- it's fun, addictive, expressive and relaxing :) Over the next few weeks, I'm going to share easy ways to make your own patterns for hand stitching along with some tips and ideas :) These are some samples of my past projects-- I like to draw patterns freehand and use my handwriting.
Emphasis Added! Off the Shoulder Sweatshirt: DIY. Inspiration Tutorial Things you need Sweatshirt ~mine is a mens medium~ScissorsPaint PensPencilPaint brush I cut around the collar about an inch down from the seam. cut the collar out Sketch a pattern in pencil.

ReStyle a comfy sweatshirt! I am so in love with this restyled sweatshirt.
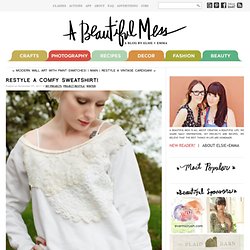
When Amanda sent it my way I think I gasped aload! It's so beautiful, simple and cozy. Who doesn't want to look pretty in something so comfy! Wp-content/uploads/2011/09/gathered-bag-tutorial2.pdf. Laura Thoughts: Make-up Magnet Board. We all know with craft blogs that original ideas are often hard to come by, we find ideas we love and make them our own but we didn't come up with the idea ourselves.
I feel like I've finally done something original here and I'm excited about it. I'll show you the finished product and then explain. Salvage Savvy: Monday [P]inspiration: Gallery Wall Ideas. Today I'm getting inspired by great Gallery Walls.
![Salvage Savvy: Monday [P]inspiration: Gallery Wall Ideas](http://cdn.pearltrees.com/s/pic/th/salvage-inspiration-gallery-28403579)
The Pastel Pirate wedding blog!: DIY DIVA: Attendants gifts. DIY Marbled Glassware. When graphic designer and artist Joanna Bean Martin shared with us her technique for marbling the bottoms of glassware with nail polish, we couldn’t wait to try it ourselves.
Who knew it would be such an easy way to add color and pattern to your next tablescape or party? Remember, the brighter and bolder colors you use, the more the glasses will radiate and glow. Have fun! You’ll need:flat bottomed glasswarevariety of colorful nail polishclear nail polisha disposable plastic containernail polish removerpainters tapetoothpicks Mask off the bottom of the glass with painters tape. Fill a disposable, plastic container with water.
Layer the colors one on top of the other. Submerge the bottom of the glass into the polish. Allow to dry completely before applying a layer of clear polish. Once everything has dried, remove the painters tape and touch up with nail polish remover and a cotton swab. The Look - DIY! 7 new stylish ways to de-clutter your beauty closet. UpCycled Window Shutters - DIY Inspiration. Posted by ScrapHacker.com on fredag, mars 16, 2012 · 6 Comments Open your eyes to the possibilities of upcycling old shutters into new awesome creations. I’ve gathered a pick of 10 inspiring and doable DIY projects (most with link to DIY tutorials) to show you there’s no need to shut the door to shutter futures anywhere. Lollies - a little ART CANT HURT. A perfect rainy day thing to do!
The colors make any day better! How to make LOLLIESyou will need: jolly ranchers, candy sticks, parchment paper, foil & a cookie sheet 1) lay a piece of foil on cookie sheet. cover foil with a piece of parchment paper.2) unwrap candies and place side by side on parchment paper in your choice of color & flavor combinations. use three candies together for extra large lollies, and only two candies together for regular lollies.3) heat candies in oven for about 5 minutes at 200 degrees. keep a close eye on the candies and take them out as soon as they've barely melted together. if you leave them in too long they will melt too much and you won't be able to put a stick into the lollie. alter the cook time accordingly.4) carefully take cookie sheet out of oven. immediately lay candy sticks into place on melted candies. slowly twirl in melted candy to coat the stick and so it will hold in the lollie. they're hot! Simple Ideas That Are Borderline Crafty (35 Pics)
25 Handmade Gifts Under $5. If your gift list is long and your budget is small here are some great Handmade Gifts that you can make. Keep in mind that handmade items are not just beautiful but special… I love to give them and I love to receive them. In my opinion they are the best! Art 1. Optical Design.