background preloader

Want to-do's

Facebook Twitter

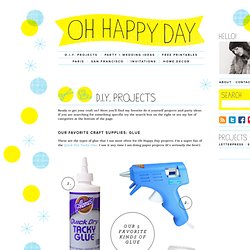
20 Ways To Make Your Walls Look Uniquely Amazing. The Only 20 Books You'll Ever Need To Read In Life. SKS Bottle & Packaging. DIY projects - StumbleUpon. Our Favorite Craft Supplies: Glue These are the types of glue that I use most often for Oh Happy Day projects. I’m a super fan of the Quick Dry Tacky Glue. I use it any time I am doing paper projects (It’s seriously the best!) Click through for details… (more…) Gold Medal Badges by Kathleen Ballos Do you have a favorite event in the winter olympics? Click through for instructions… (more…) Favorite Party Ideas This Week 1. (and I don’t give out that praise lightly!) Cassette Tapes Reborn as a Clever Box Lamp Cassette Lamp by Vanessa Moreno – Bright Ideas Lighting Design Competition - StumbleUpon. A bit of green :: Crafts :: Plastic Cup Lamp - StumbleUpon.
Now that my university is closed for winter holidays, I finally have more free time to do all the crafty things I’ve been wanting to. One of these is a lamp made from plastic cups I’ve seen at taf, the art foundation, in the Monastiraki region in the center of Athens. When I first saw it at taf, I was amazed; I looked closely and I couldn’t believe my eyes! The object itself is so peculiar, modern and alien-like it could be in any design exhibition.

With my best friend’s birthday coming up, I decided to make it myself and give it to her as a gift. It turns out it was the easiest craft I’ve even done, the epitome of DIY objects! Disclaimer: There have been some concerns about the safety of this construction (see the comment of user “when” below for example). I only needed a couple of things: 200-250 large plastic cups (recyclable, at least )600-700 staplesa staplera lamp socket, lamp cord and plug – mine came from a broken IKEA lamp! That’s all you will need. …to this! You might also like: & Crayon Heart Valentines with Lifestyle Crafts & Whipperberry - StumbleUpon. DIY Wrap Bracelet - Honestly WTF - StumbleUpon. You should all know by now that we are all about stacking bracelets on our wrists.
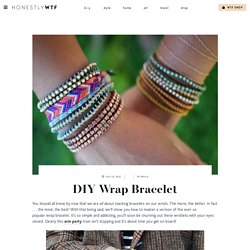
The more, the better. In fact . . . the most, the best! With that being said, we’ll show you how to master a version of the ever so popular wrap bracelet. It’s so simple and addicting, you’ll soon be churning out these wristlets with your eyes closed. You’ll need (for a double wrapped bracelet) :* Lengths will vary depending on the size of your wrist (see comments for suggestions). Fold the length of leather cording in half to form a loop. Place the ball chain along the leather cording with the end of the chain meeting the end of the wrap. Continue wrapping while checking it for fit around the wrist. When you have reached the end of the ball chain wrap the linen cording around the leather strands 2-3 more times.

Thread the hex nut through the strands and tie a second knot. Trim with scissors and your wrap bracelet is finished!! The materials are listed for a double wrap bracelet. It’s a party! Design Seeds&: For All Who Love Color | Search - StumbleUpon. #f0e0d1 #c98d58 #382d36 #9760a3 #d4aae0 #c1c8d4 Find The Palettes You Love color curl posted 01.05.14 comments 3 nature palette posted 01.04.14 comments 0 sponsored links nature tones posted 12.30.13 comments 0 thistle tones posted 12.29.13 comments 1 winter spectrum posted 12.22.13 comments 3 iced tones posted 12.20.13 comments 3 frozen berry posted 12.09.13 comments 5 nature hues posted 12.08.13 comments 1 winter sky posted 12.02.13 comments 1 thanksgiving hues posted 11.28.13 comments 2 color fall posted 11.26.13 comments 2 northern lights posted 11.22.13 comments 3 <<< previous next page >>> ShareThis Copy and Paste. Inspired Entertaining: DIY Chalkboard Wine Glasses - StumbleUpon.

Last month I got an email from one of those "deal of the day" websites featuring a very cute set of wine glasses with chalkboard stems from a company called Chalkboard China. I've seen chalkboard glasses before, and always thought them to be a fun and chic way for guests to keep track of their glass throughout the night so you don't end up with mixed-up glasses or dozens of half-full glasses left around the house.
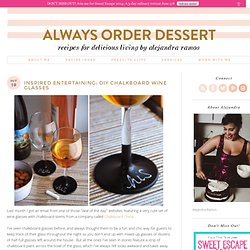
But all the ones I've seen in stores feature a strip of chalkboard paint across the bowl of the glass, which I've always felt looks awkward and takes away from the beauty of the wine or beverage in the glass. What I like about this version is that the writing part is at the bottom on the stem and foot of the glass, so it doesn't compete with the beverage. I also like that the simple black foot on the glass is in itself an elegant design element, and would work just as well with no writing on it. So I figured, "I can totally make that myself! " Materials 1. 2. 3. Method Step 1. Most Popular Repurposing Tricks of 2011 - StumbleUpon. MADE: TUTORIAL: Color My Summer and Cinco De Mayo--Ruffled Streamers - StumbleUpon.

Hello color-loving friends! Today I’m helping kick off the summer series over at Delia Creates and Kojo Designs.We’re going to COLOR my SUMMER (and yours!) Because summer feels a rainbow of never-ending fun. Swimming pools are open, flowers are in bloom, berries need picking, vacations are planned, the sun stays up late, and we celebrate our nation’s birthday with fireworks and friends. So to color my summer, I’m sharing a rainbow-inspired party decoration that’s easy to make and fun to stream around the house: Standard streamers feel like the oldest party decor in the book. I first spotted the idea two years ago on My Paper Crane and the colorful image was burned into my brain. I’ve even got a tricky shortcut to help you go from standard crepe paper streamers: to colorful ruffled ones! And then you’ll be ready for any party that comes your way.Cinco de Mayo plans this week??

And hopefully the Lime Chicken Fajitas to go along. Okay, let’s get started. Let’s cheat! And sewed them up! Make an Edible Candy Bowl | Dollar Store Mom - Frugal Fun - Crafts for Kids - StumbleUpon. Today’s post is a lesson in improvisation. Why? Well, this project was INTENDED to be a candy tray, a fancy version of something I saw done flawlessly at Tutto Bella. After reading through that tutorial, I thought it would be a breeze! Famous last words, right? Now, if I was a crafting perfectionist, or blogging perfectionist, or if I’d had two more cups of coffee today, maybe I’d've tried a second time to make my vision work…but I’m not, I’m not, and I didn’t. Supplies: candy canes- $1 for twelveold fashioned hard candies- $1starlight mints- $1 for a bag, I used just one for this particular project Unwrap the candy canes and starlight mint and arrange on a baking sheet lined with wax paper or parchment paper.

Bake at 350 for 8-10 minutes, but watch it closely the whole time!! Then I realized it was still quite hot and pretty pliable, so I quickly grabbed a bowl, turned it upside down and placed the whole thing on top. - StumbleUpon. Triple Max Tons: Easy Holiday Hair - StumbleUpon. Wednes-diy | Free People Clothing Boutique Blog - StumbleUpon. UPDATE: This post originally ran on March 23 2011, but with summer winding down we wanted to bring it back up for some late summer inspiration! A fellow fp girl sent this to me a couple weeks back and i’ve been thinking about it ever since!

I can think of a million reasons why these would be awesome… as apartment décor, as outdoor party décor, and – wouldn’t they be the best thing EVER for camping in general or at a festival? Just let them sit in the sun all day, and they’ll last all night! I am absolutely going to make some to bring with me to bonnaroo this year. you can buy a sun jar here, but you can make your own for much cheaper! I am not good with technical things, like putting together a solar power cell, so i found the easy way :) what you need: a mason jar with a clear glass lid like this one from ikea, a solar garden light like the ones pictured above, which i found here, adhesive and glass frosting spray. last image.

Trending on FP.com: Web Hosting Hub | Website Suspended - StumbleUpon. Translation: “Quick! Before Santa sees us!” Translation: “I hope there’s cheese in here…” Translation: “…yes, I don’t want another pair of socks!” This creative children’s gift wrapping idea will definitely set the scene on Christmas morning – just imagine the smiles on the kids’ faces when they spot their Christmas presents being carted off by mischievous mouse thieves (I know that my boys loved them). Of course, it’s perfect for any gift wrapping occasion, especially children’s birthdays.
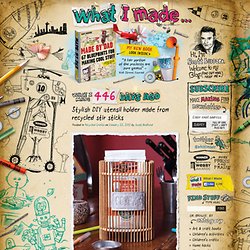
Learn how to make this cool children’s gift wrapping idea for yourself As far as gift wrapping crafts go, this has to be one of the easiest to make. An even quicker cheat courtesy of Julie: simply prop the present on a small block of wood, and stick the mice around the side of the present – perfect if you don’t want to reuse the mice and you can’t see under the present.

Download printables and instructions› [display_adsense ad_type="300x250"] Creative Recycling Of light Bulb into Valuable Things | Weird Pictures, Wonderful Things - StumbleUpon. When a light bulb burns out, we rarely give it a second thought. You can lend your imagination toward this fragile household item, intent on giving burnt out bulbs a second life as something very different, and aesthetically pleasing. It’s very easy to make, use of turning a light bulb into an oil burner, terrarium and many another interesting things. Used light bulbs, typically destined for the trash bin, could be the setting for an adorable miniature terrarium, practically any clear glass container can contain a tiny greenhouse, providing humidity and warmth to plants. Here are few amazing examples to use as inspiration. How to Make Leaf Skeletons - The Idea Room - StumbleUpon.

I wanted to share with you a project from one of my readers who shares with us how to make leaf skeletons. I LOVE this! I have several leafs in various forms displayed in my home and knew I needed to make some of her leaf skeletons to add to my decor. I love how a pattern of leaves can enhance the beauty in your home. So I asked Heather if she would mind sharing her project with you. I have spent hours and tried various ways of making these. You need washing soda, not baking soda! Gather your leaves. Washing soda is a strong base so you may want to wear gloves when handling the leaves. You will add 3/4 cup of washing soda and 4 cups of water to your pot of leaves. Keep going, you will need to add more water so your pan doesn’t dry out. When 1.75 hours are up fill a glass baking dish with cool water. I carefully removed them and rinsed with water and added clean water to the pan.

If you’re still with me, this is what I ended up with… I have a maple leaf which turned out not so well. EXPERT SECRETS | DIY Sugar&Wax - BEAUTY WOO ME - beauty tips, cosmetics... - StumbleUpon. {Image from this etsy shop where you can buy sugar wax if you don't want to make it. We are not affiliated. I just like the way they look. Let me know if you buy the wax!} Hello lovely reader. If you have questions after reading this post, see my follow up post on DIY Sugar Waxing with answers to the most common questions asked... leave a comment if you have more questions... we'll answer it! AND We'll be putting together a video for you as well so you can see it in action! Stay tuned. DO YOU ever make your own beauty products? My favorite, though, is homemade sugar wax or DIY sugaring (whatever you cal it). It's so quick and easy, dirt cheap (you have all the ingredients stocked in your pantry already, swear), non-toxic, hurts less than both strip and hard wax, and rinses clean off, so you don't have sticky spots on your skin when finished; it doesn't clog your pores (Hello?!

Sugar Wax Ingredients 2 cups sugar 1/4 cup water 1/4 cup lemon juice Seriously. My age is showing, isn't it? Gutter Gardens Grow Produce Without Taking Up Space. If you’d love to do a little at-home gardening but don’t have much space to do your planting, a simple gutter garden might be the perfect option. Alaskan news site Juneau Empire features a smart, simple idea for planting a small vegetable garden with very little space: A windowbox garden built from gutters. In Alaska, this idea solves a few problems for the author: We live near the glacier, so the soil is cold and has very little organic matter, there are lots of big trees shading it, and we have all the slugs and root maggots anyone could want, with porcupines, cats, bears and ravens meandering to boot.There is only one side of our house that gets much sunshine, and, of course, that side of the house has the smallest yard.
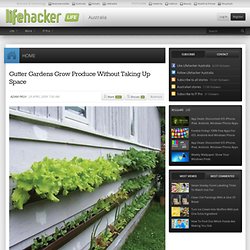
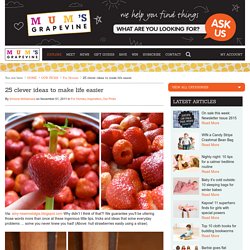
Even if your garden doesn’t face the same problems, the idea behind the gutter garden could be perfect if you’re low on space but would kill for some homegrown veggies. How does your garden grow? 25 clever ideas to make life easier - StumbleUpon. Via: amy-newnostalgia.blogspot.com Why didn’t I think of that?! We guarantee you’ll be uttering those words more than once at these ingenious little tips, tricks and ideas that solve everyday problems … some you never knew you had! (Above: hull strawberries easily using a straw). Via: apartmenttherapy.com Rubbing a walnut over scratches in your furniture will disguise dings and scrapes. Via: unplggd.com Remove crayon masterpieces from your TV or computer screen with WD40 (also works on walls).
Via: athomewithrealfood.blogspot.com Stop cut apples browning in your child’s lunch box by securing with a rubber band. Via: marthastewart.com Overhaul your linen cupboard – store bedlinen sets inside one of their own pillowcases and there will be no more hunting through piles for a match. Via: realsimple.com Pump up the volume by placing your iPhone / iPod in a bowl – the concave shape amplifies the music. Via: savvyhousekeeping.com Re-use a wet-wipes container to store plastic bags. Via: iheartnaptime.net. Print Hula Hoop Rug Page | Crafts | FamilyFun - StumbleUpon. Decorating with wall murals - KenyonArt.com. Creative Kismet & Blog Archive & little guiding stars - StumbleUpon. Since the new year has started I’ve been trying to think of ways to be more kind to my self.

Especially when that nasty gremlins try to creep in and stump me. I remembered this origami star video on You Tube and had to get them involved in my plan. I thought it would be fun to make a whole bunch with kind words and “you are….” phrases inside. I made 60 of them, enough to last me the whole year if I open one a week, plus a few extra just in case. I used 12 x 12 inch scrapbook paper and cut 1/2 x 12″ strips, then followed the video HERE*. I put them all in a little jar and prettied it up. They are so cute and sweet, like little treats. *UPDATE! Be Sociable, Share!