
Automatic Arduino Pet Feeder - 3D Printed (With Stepper Motor) : 5 Steps. CNC Machine : arduino. Optical Fibers and LEDs - Three Projects : 5 Steps. Using several rings of the basic module, covers and supports we can build a very similar installation to a lantern.
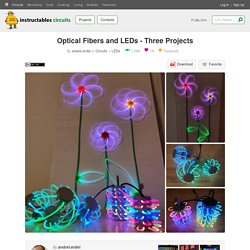
It is not a heavy construction at all, although it seems so at first sight. In addition to the parts mentioned, some connecting-rings must be printed, as you will see in the list below. Your Self-Care Weather Assistant on the Go : 12 Steps. Hi, in this instructable, you will learn to build a pocket weather station using an Arduino Nano board.
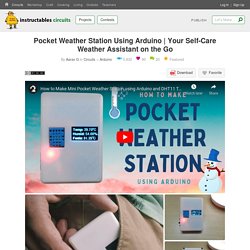
It will be a compact device that you can carry anywhere around, right in your pocket and will be capable of displaying the live temperature and humidity on the OLED display present on it. This is a great self-care device as you will always know when to take an umbrella out with you, both for the rain and the scorching heat! You can carry it around as it has an inbuilt rechargeable 160mAh lipo battery.
It is a really great project for learning and is also really fun to make. It might come out really handy sometimes. Kids Light Up Clock 2.0 : 6 Steps. Positioning each ModuleFollowing the order below (and in the video) position each of the 6 electronic modules in their proper position in either the top lid of the box, or the box bottom.
Each module is screwed in place to the box using screws. (It is easiest to position all the modules first before connecting any jumper wires to the expansion board.) Arduino Nano and Expansion Board - this secures to the box bottom with two 4mm screws on opposite corners. LED Module - first put the LED through the top lid of the box and then secure the PCB to the underside of the lid with two 4mm screws. Programming Arduino Using Loops and the Map Function in BlocklyDuino. To further explore the FOR loop, WHILE loop, and Map function we will also utilize a potentiometer, a pulse width modulation signal, and a servo motor.

We will do three exercises based on these topics. A Quick Recap of Part 1 The previous article, How to Program an Arduino Using BlocklyDuino, began with instruction on installation and initial setup of the program. If you haven’t used BlocklyDuino before, I highly recommend you begin with that tutorial. From there, we learned how to use digital input/outputs and IF-ELSE condition statements in BlocklyDuino. Fading and Brightening an LED using the FOR loop In this exercise, we are going to change the intensity of an LED’s brightness, first low to high, then high to low, and so on. How to Create an Arduino-Controlled Calculator. How to Create an Arduino-Controlled Calculator. Kids Light Up Clock 2.0 : 6 Steps. Aplicació Domòtica a la meva llar. Web Sacosta. 1.0 Arduinoblocks - EduCATbot - STEAM amb l'Estalvi energètic. Bloc Inicialitzar Al bloc d'Inicialitzar és on posarem totes les inicialitzacions que necessitem (l'estat inicial del programa).
Aquest bloc s'executa sempre, i només una vegada, al començament. Per sort per nosaltres, si fem servir els Sensors i Actuadors d'ArdunoBlocs, aquestes inicialitzacions ja es fan de forma automàtica. Onemywaybackhome (u/onemywaybackhome) - Reddit. Ohmmeter 2.0 : 3 Steps. A state machine has been implemented to differentiate the modes. 'A' mode - Value to color A value is entered by keyboard, it goes through an algorithm that returns its commercial value and displays it in the 3D resistor.
The program remains on active standby until a keyboard event arrives and if it is different from 'D' it shows the value on the screen and saves it in an array.When pressing 'D', the array with the resistor value is passed to the "valor_a_comercial" function that converts the value into a commercial value and then, this array is passed to the "mostrar_resistencia" function that turns on the RGB LEDs of the 3D resistor with the right colors. Battery Level Monitor Using an Arduino. What is a LED Bar Graph?
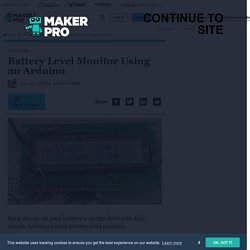
The LED bar graph is an LED array of 10 individual LEDs with 10 output pins. It has various applications including audio equipment and industrial control panel. In our project, we will use it as a battery level indicator. Like any other LED, when connecting the LED bar to your microcontroller, you have to connect the anode pins to the positive side and the cathode pin using a resistor at the end to ground. How Does This Project Measure the Battery Level? It is good to understand that batteries have what we call a level of charge.
The Arduino's analog pin acts as a simple voltmeter where the voltage value is retrieved. The values we convert will display on the LED bar graph where it can project the strength. DIY Arduino 1D Pong Game with WS2812 LED Strip. In this project it is presented 1-dimensional version of the classic game ‘Pong’ made with NeoPixel LED strip.
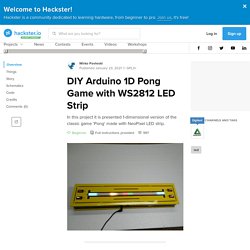
The game is for 2 players, in which the ‘ball’ the travels down the length of the LED strip, and will bounce back if the button is pressed when few end LEDs are illuminated. The speed of the ball is changed after every hit, making it more difficult to hit the ball in time. Device is very simple and easy to make and contains the following components: - Arduino Nano microcontroller. PRACTICAS ARDUINO – PROGRAMACION Y ROBOTICA. Arduino. Libro de proyectos. Arduino para 4º de ESO. Arduino. Arduino. 4º ESO TECNOLOGIA. En esta unidad didáctica, vamos a trabajos aspectos relacionados con la electrónica analógica y digital.
Automatic Rainbow Staircase Lighting : 9 Steps. (3) Anuncio Curso Objetos Conectados - Segunda edición. Web Sacosta. Una lámpara muy especial - electronperdido.com. Este proyecto nace de la idea de hacer una lámpara para niños, en la que ellos puedan elegir, mediante una simple cartulina, el color que quieren que tenga su lámpara por la noche.
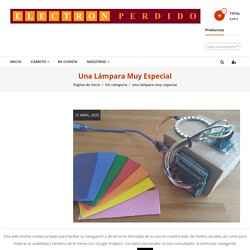
El sistema, basado en Arduino, leerá el color de la cartulina y lo reproducirá en los LED que iluminan la habitación. Como luz LED se ha usado un anillo que da un resultado espectacular y divertido cuando cambia de color, pues lo hace en secuencia. Este proyecto es para niños y, por lo tanto, hemos intentado hacer todo lo posible para que participaran en la realización del mismo.
Por eso usamos cartón, goma EVA y la pistola de pegamento caliente, para que ellos puedan ayudar en lo máximo posible. (2) Moppy + Star Wars Theme = Floppy Vader's Theme. Resultados de búsqueda. Arduino archivos - 330ohms. ¡Construye tu osciloscopio DIY con Raspberry Pi! - 330ohms. A veces se requiere de una forma de visualizar las señales que tiene nuestro circuito, como las de audio o TTL, de modo que podamos asegurarnos que nuestro proyecto funciona adecuadamente. Para visualizar estas señales se utiliza un osciloscopio, pero esta herramienta es por lo general costosa o de difícil acceso. (1) Make Your Own Musical Floppy Drives (Moppy Tutorial 2.0) How to Make Musical Floppy Drives : 7 Steps (with Pictures) - Instructables. My brother posted a video about this on facebook almost a year ago. Some old floppy drives playing Bach's masterpiece Toccata & Fugue and it got me really interested. So I read about it when the author posted a how-to on his blog and did a couple of tweaking using SammyIAm's Musical Floppy program when the project gained a lot of attention.
Awesome Floppy Drive Music : 7 Steps - Instructables. One floppy drive isn't as much fun as a whole symphony, so let's add some more! For this, you'll need an old computer power supply that has one or more floppy drive power connectors (see above for picture of connector), depending on how many floppy drives you want to add. If your power supply doesn't have enough of these connectors, you can buy adapters on the internet. The Arduino can only handle powering one floppy drive, so we'll use the computer power supply to power the Arduino. Pulsímetro y oxímetro con Arduino y MAX30102. Flexible 8x32 NeoPixel RGB LED Matrix ID: 2294 - $99.95. Adafruit NeoPixel Überguide. Getting Started With NeoPixel / WS2812 RGB LED : 8 Steps (with Pictures) - Instructables. It is very easy to control WS2812B LED strip without extra circuitry and discrete components. If you have an Arduino , 5V power supply and few jumper wires then you can play with it. Preparing The Power Supply : I used a 5V/2A regulated power supply for running the NeoPixel LEDs.
We need two GND connection : one to the LED strip and other to the Arduino.So I soldered two wires to the negative terminal and one wire to the positive terminal of the DC jack. Make Your Own Musical Floppy Drives (Moppy Tutorial 2.0) Cryptic Auto-Calendar : 9 Steps (with Pictures) - Instructables. The rings require machining on both sides of the material. A set of (3) dowel holes are created in the front face of the material and a mirror image set of the (3) dowel holes are created in the CNC Router spoilboard. Dowels are then inserted into the spoilboard and the sheet is flipped over and indexed onto the dowels. This insures perfect alignment of the sheet when flipping front to back. See this video from Vectric to better understand this method of alignment. Conectar Pantalla LCD a Arduino por conexión I2C - InputMakers.
Picaio/radar_ultrasonido_arduino. (1) Arduino Tutorial: Radar con sensor de ultrasonido - Arduino uno. Keyestudi Kit de casa inteligente con tablero PLUS, para Arduino DIY STEM. Semáforo óptico-acústico de CO2. Instagram. Escornabot: Control por gestos - Mecatrónica Lab. En este tutorial vamos controlar nuestro querido Ecornabot mediante gestos. Oplà IoT Kit. What is the Internet of Things (IoT)? The Internet of Things, or IoT, is a giant network of connected devices that collect and share data from all over the world.
Billions of devices that are connected to the internet share information with each other. We use these types of devices in our everyday lives, such as controlling lights at home from your phone. How is the Oplà IoT Kit content structured? The Oplà IoT Kit is divided into two ‘getting to know’ activities to provide you with the basics, plu eight step-by-step, projects ready to assemble. Who can use the kit? This kit comes with complete step by step assembly instructions, hence only basic DIY experience is necessary. El cajón de Arduino: Tutorial: robot coche - Introducción + Módulo de potencia L298N. I. E. S. Eduardo Valencia.
Damas interactivas 2: control mediante registros de desplazamiento 74HC595. BristleBot - IoT Data Visualization. Multimetro con Arduino V2.0. Juuke - a RFID Music Player for Elderly and Kids : 10 Steps (with Pictures) - Instructables. To get a better understanding of how the code works with the DFPlayer mini, I will try to explain it as easy as possible. The DFPlayer mini works by playing songs from a micro SD card. To know which song to play, the songs has to be stored as a number to the SD card. Un mini reproductor de MP3 con 6 proyectos. Sing for the moment! The DFPlayer Mini is a small and low cost MP3 module player with an simplified output directly to the speaker. The module can be used as a stand alone module with attached battery, speaker and push buttons or used in combination with an Arduino UNO or any other with RX/TX capabilities. It perfectly integrates hard decoding module, which supports common audio formats such as MP3, WAV and WMA.
MINI Night Lamp : 11 Steps (with Pictures) - Instructables. This project is inspired by Mohit Boite. Mural con vasitos de café. Citizen Science Box. Cómo controlar un brazo de robot con ROS y Arduino »Wiki Ùtil Arduino. Proyectos Archives - Luis Llamas. Web Sacosta. Mural de luces de colores (bolas de ping-pong) DIY electronic Foosball table. Ver - bernat - Correo de ByLinEdu. HeyTeddy is a conversation-based prototyping tool for Arduino. Tutorial de aplicación de FireBeetle ESP32 Hacer una pistola de medición de temperatura - Arduino Robot IOT Community Forum. Mecatrónica Lab – Robótica, Electrónica, Arduino y mucha imaginación. Bdring/TWANG32: ESP32 Port of TWANG LED Game.
Dunnnk - Generate Product Mockups For Free. Custom Tutorials. - Herramientas Online. (40) Breakout of Your ThingLink VR/360° Webinar. Sketch App Sources - Free design resources and plugins - Icons, UI Kits, Wireframes, iOS, Android Templates for Sketch.
Como generar Codigo G con Inkscape para CNC con Arduino Uno en Español. Creación de circuitos impresos con medios caseros. Símbolo común. EDU - Robomapper. Quintcopter Plywood Design. Does It Fly?: 10 Steps. Chrome Music Lab. Oxímetro de pulso de código abierto para COVID-19. Gallery — Firefly Experiments. Makers (Cubecon) #2 Gyro Sensor & Bluetooth. 17 gyroscope Projects.
Laberintos. Wash-A-Lot-Bot! A DIY Hand Washing Timer □ CoderDojo Valencia VIRTUAL - Documentos de Google. Como Revivir Arduino Nano : 5 Steps - Instructables. EM-Tronic 2020 Mini Synth : 7 Steps (with Pictures) - Instructables. Bienvenidos a futureworkss.com. Laboratorio 13. Arduino UNO based Projects List -Use Arduino for ProjectsUse Arduino for Projects. Tobor, el brazo. Arduino Tutorials. Simple Arduino Project List -Use Arduino for Projects. 46 proyectos makers para hacer en verano con Arduino y Raspberry Pi. SIK Experiment Guide for the Arduino 101/Genuino 101 Board (Spanish) Simple Arduino Project List -Use Arduino for Projects. ElCableAmarillo/Practicas: Repositorio de prácticas de programación y robótica realizadas por docentes. Semáforo con micrófono. Semáforo de ruido en el aula monitorizado por imágenes.