
Uncovering Toy Cameras and Polaroid Vintage Effects (With Photoshop Tutorials) Advertisement Since its emergence, the digital photography market has gradually supplanted the traditional one.

Digital compact and SLR cameras entered our lives, and some people announced the death of silver-based images. This is not all lie, and yet old-fashioned images have been particularly popular in the past few years. All we do seem to do now is try to recreate the atmosphere of those bygone times anyway. Blurry, distorted and over-saturated images are not just a fad anymore. And this is where toy cameras play a role. Photo credit: Pirouetting, by helenannsia How does this apply to modern design? What you can do, though, is use the magic of Photoshop to make your ultra-sharp, high-definition images look like they were taken with one of these cameras. Famous Toy Cameras Toy cameras are cheap, low quality and yet functional. Photoshop Tutorial: Getting that great X-PRO LOMO look.
Photoshop Tutorials Photos 41 Nicest Photoshop Photo Effects [Photoshop Tutorials] Looking at how powerful Photoshop can be in terms of photo editing, it’s probably not important if you suck at taking photographs or being labeled an amateur photographer.
![Photoshop Tutorials Photos 41 Nicest Photoshop Photo Effects [Photoshop Tutorials]](http://cdn.pearltrees.com/s/pic/th/photoshop-effects-tutorials-537751)
As long as you picked up a couple of Photoshop photo editing skills, it will still impress those who sees it. So the next time you want to publish some photos online, consider editing them so they look more impressive. 30+ Nicest Photoshop Photo Tutorials, Part II. Photoshop vintage effect. Back in October I took this photo, in front of our house.

A cool scene, bright colors and a double rainbow. After seeing this picture on my Flickr page, I received an e-mail from Marco who asked me about the post process of this image. Now here is my answer… Choose your image carefully First of all I need to mention that some pictures are better suitable than others. Add contrast and saturation Place the image in a separate layer. Adjust curves Add another adjustement layer. Select Green from the Channel dropdown menu and adjust the curve as shown in the image above. Now select Blue from the Channel dropdown menu and adjust the curve as shown in the image above. Add Vignette effect Select the layer with your photo and go to the Filter menu and select "Convert for Smart Filters". Now go to the Filter menu and select Distort > Lens Correction.
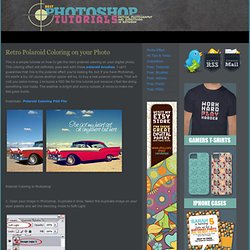
Add some Colorisation Your photo should look pretty dramatic right now with a lot of contrast. The final touch. Yellowish Retro Coloring Action. Most Popular Photo Effect Tutorials. Retro Polaroid Coloring on your Photo. This is a simple tutorial on how to get the retro polaroid coloring on your digital photo.

This coloring effect will definitely goes well with these polaroid brushes. I can't guarantee that this is the polaroid effect you're looking for, but if you have Photoshop, it's worth a try. Of course another option will be, to buy a real polaroid camera. That will cost you some money. 50 Excellent Digital Photography Photoshop Tutorials. Advertisement Adobe Photoshop is the industry standard for digital-image editing and graphics creation.

Photoshop’s versatility makes it a popular choice among Web designers, graphic designers, digital media artists, print designers, photographers and other professionals in design and image-editing. Whether you’re designing a business card or website or digitally enhancing an image, you can rest assured that Photoshop will give you the necessary tools to get the job done. In this article, we focus on tutorials on digital photography. You’ll find an assortment of top-notch tutorials that deal with applying post-production techniques and effects, color correction, enhancement and photo retouching. Without further ado, we present you with 50 Excellent Photoshop Tutorials for Digital Photography. Mixing Up Illustration: Combining Analog And Digital Techniques. Advertisement In the digital age, don’t forget to use your digits!

Your hands are the original digital devices— Lynda Barry People often ask how I arrived at a finished illustration. Honestly, it’s different every time, but it always starts with a hand-drawn sketch. Sometimes, I paint it completely by hand; sometimes I’ll scan in a pencil drawing. Sketching It Out Concepting for me always starts with pencil and paper. Researching This is the most underestimated part of the process, but one of the most important. Some artists who always inspire me are Mary Blair, Alice Provensen, Charley Harper, Maurice Noble and Eyvind Earle. Also, if I’m drawing an elephant’s skin, or wood on a camera, or a band on a helmet, I’ll want to take a close look at the real thing. Tricks + Treats: Spring to Autumn Photoshop Tutorial by Ryan Strong. Hi!

It's Ryan from I Am Photograph. As a fashion photographer it can be difficult shooting on location when you are shooting for the 'next season'. This past spring I shot on location for a fashion magazine that was to showcase clothes for the autumn/winter outerwear trend. Being that it was spring the woods were bright green with new leaves and didn't really communicate autumn. This is where retouching in Photoshop comes in handy! For this trick we will go in and change the wood's spring greens to autumn's reds, oranges and golds.
Go to your Layers palette and create a new Adjustment Layer > Hue/Saturation Most people know how to use Hue/Saturation to make a black and white photograph, but what some do not know or have not ventured to find is that you can use the drop down and only modify specific colors.